|
Project 10: Complete web-enabled embedded controller for LDR and LED control |
Scroll Prev Top Next More |
Project description
1.In Project 6 and Project 7, you learnt how to design and test a control algorithm to control a LED depending on the surrounding light level detected by a LDR sensor on both software and real hardware.
2.In Project 8, you learnt how to build a webpage and control LED(s) through that webpage.
3.In Project 9, you learnt how to display ADC readings and voltage drop of a LDR sensor on a graph and gauge.
4.In this project, you will combine all your knowledge from Projects 6,7,8, and 9 to make a final device that can:
a.Control a LED depending on the surrounding light level detected by a LDR sensor through a web application.
b.The web page must be able to:
i.Select the operating mode
ii.View analog input (LDR detection) as a gauge
iii.Set a threshold value.
iv.Set an analog output value
v.View analog output (LED brightness) as a graph
Learning objectives
In this tutorial you will learn:
1.Combine all the previous knowledge to create a complete web-based control system using Waijung 2 and Simulink
2.How to store data to non-volatile storage so that the system starts up with the same settings as before
Required hardware
No. |
Item |
Picture |
Quantity |
1 |
ESP32 with USB cable |
|
1 |
2 |
Protoboard (830 points) |
|
1 |
3 |
Jumper Wire Male-Male |
|
4 |
4 |
Red 5mm LED |
|
1 |
5 |
Resistor 220 Ohms |
|
1 |
6 |
Resistor 2k Ohms |
|
1 |
7 |
LDR sensor |
 |
1 |
8 |
USB Wi-Fi dongle (only necessary in WiFi AP mode) |
|
1 |


Stand-Alone (SA)
Hardware setup
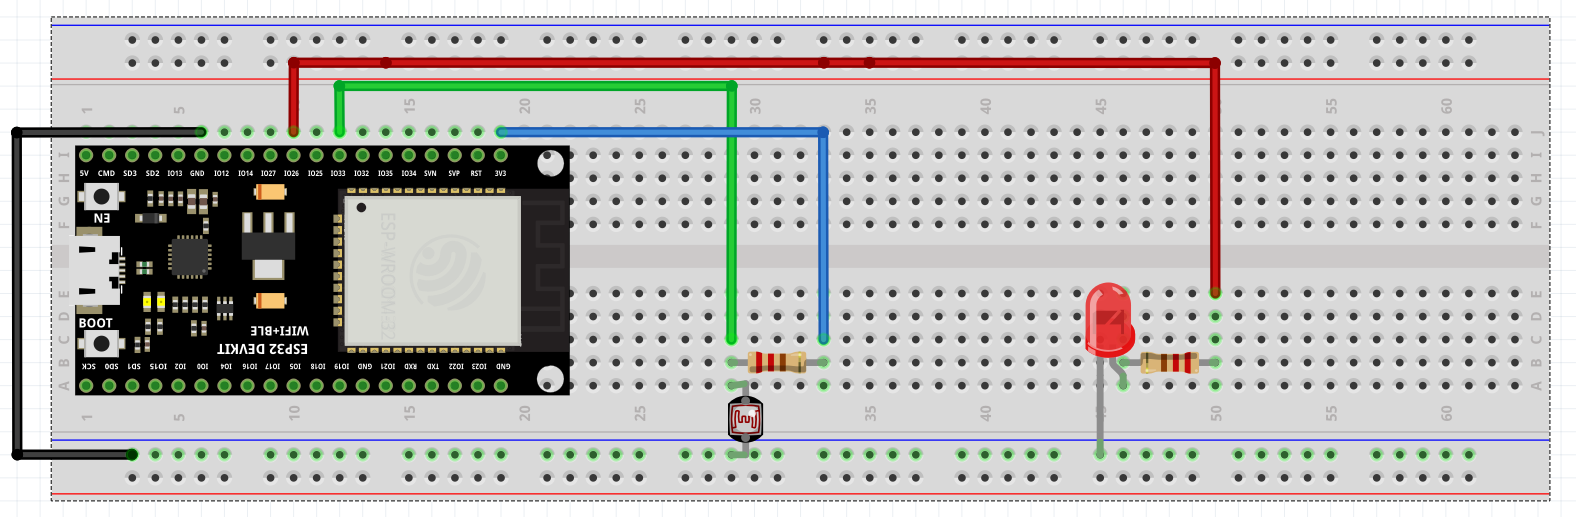
Tips and tricks to build SA model:
1.The Waijung 2 target setup block, SPIFFS block, and WiFi setup block will be configured and setup exactly the same way as was done in Projects 8 and 9.
2.The source files needed for this project can be found here and also at the end of the project - store them in the SPIFFS block just like you did in Projects 8 and 9.
3.The SA model of this project is largely a combination of the SA models in Project 8 and 9 (shown below for reference), along with using the control algorithm designed in Exercise 6.
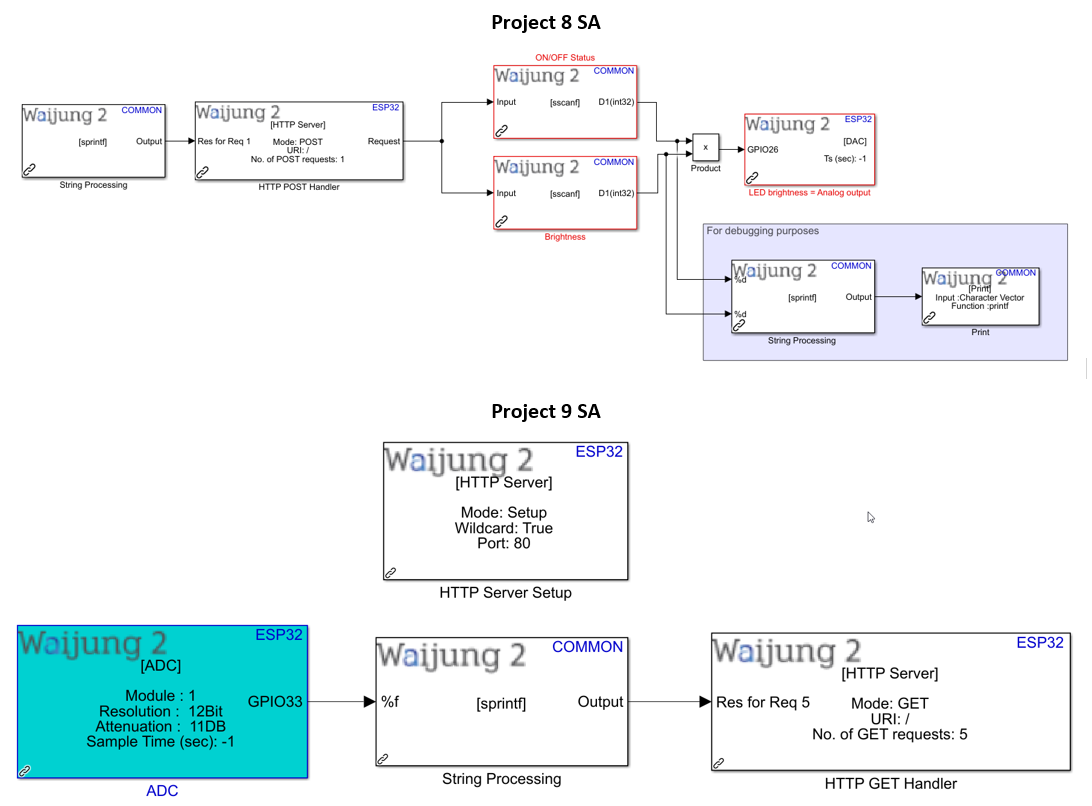
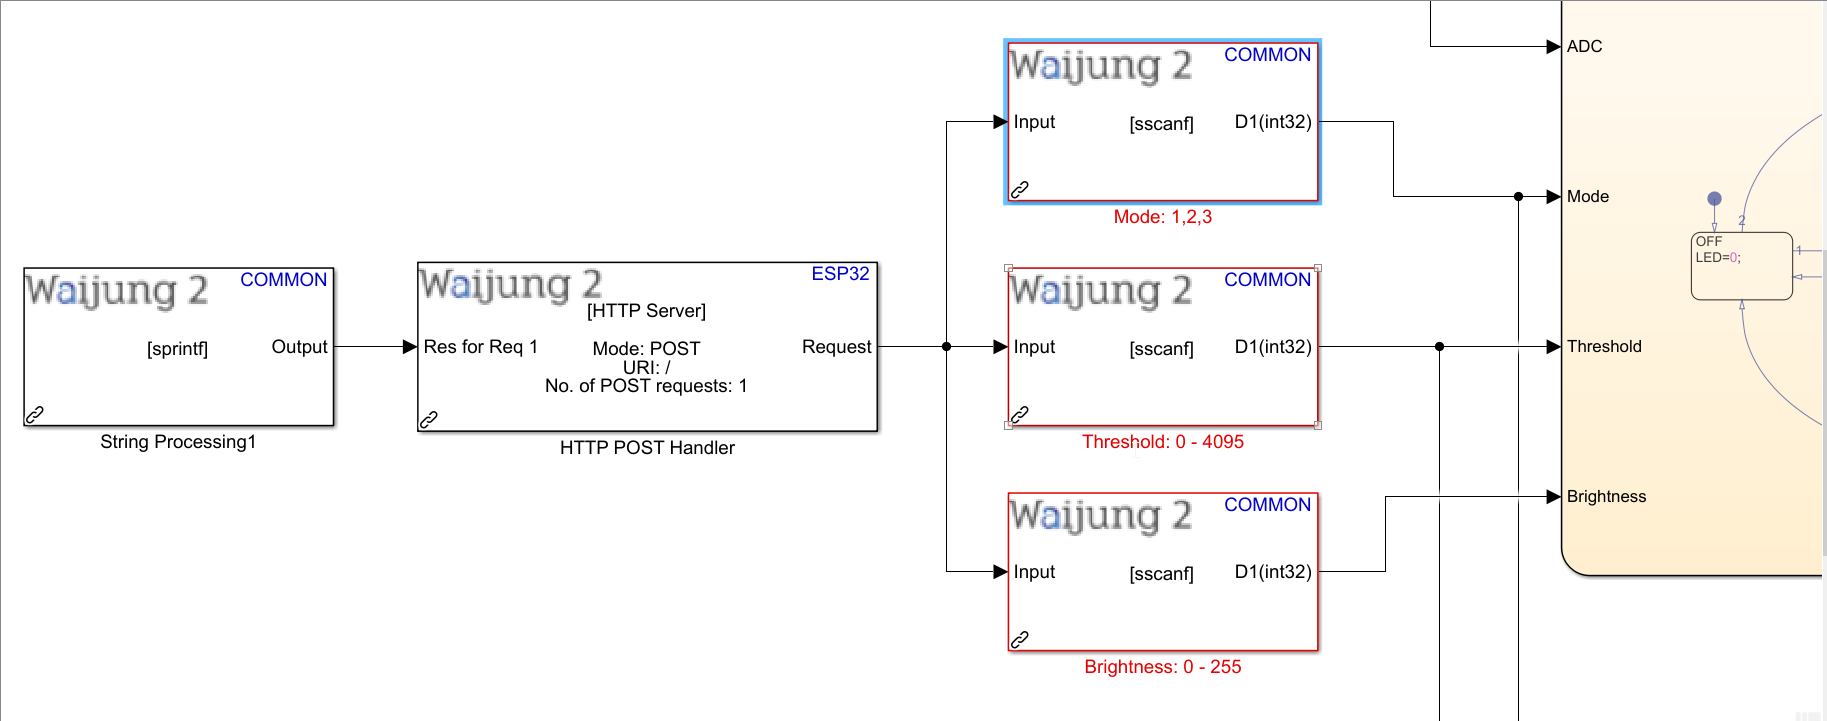
4.From Project 8 SA model, replace the 'Product' block with the control algorithm stateflow chart designed in Exercise 6.
5.Modify inputs to the stateflow chart to be string processing blocks representing Mode, Threshold, and Brightness instead of Status and Brightness. Your model should now look like:
6."ADC" input to the stateflow chart must be the Waijung 2 ADC block, which should also be connected to the String processing block, HTTP Get Handler block, and HTTP Server Setup block, exactly as shown in Project 9 SA model.
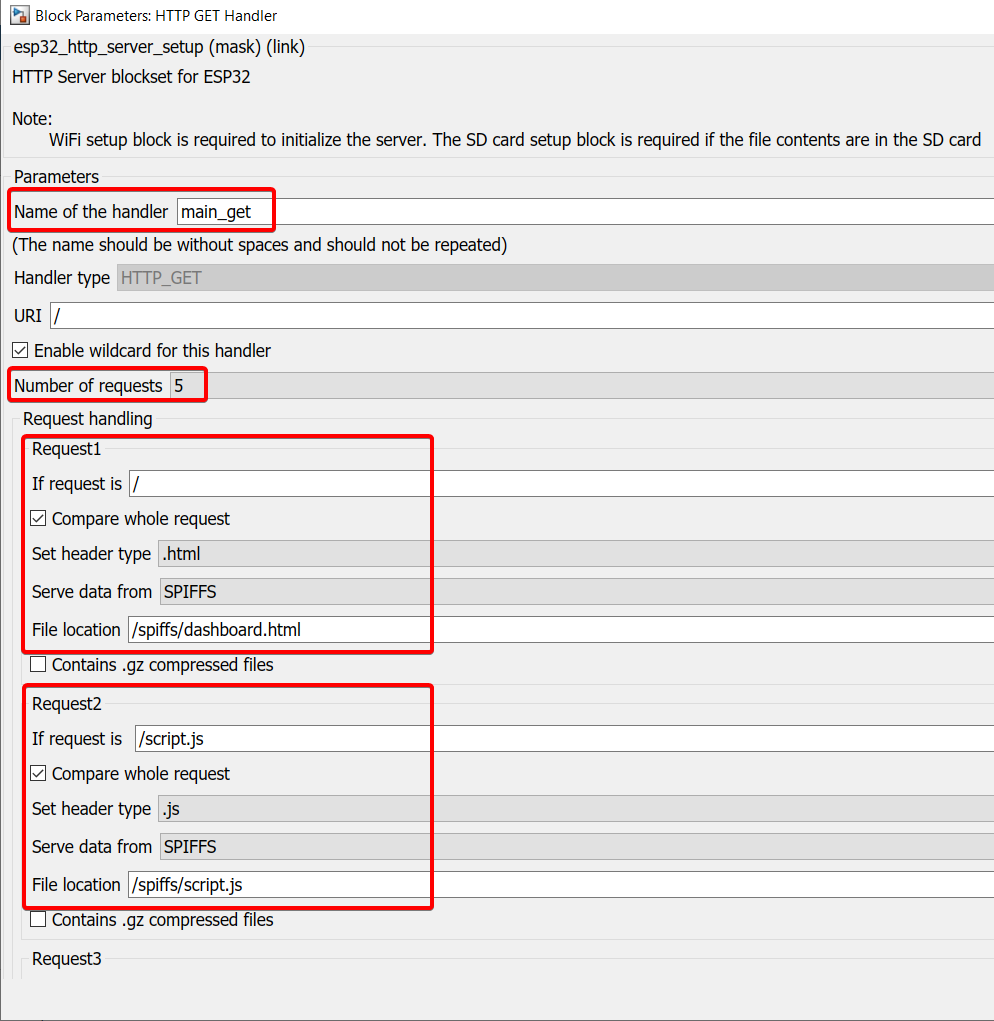
7.Make sure the source files for the webpage are stored in SPIFFS block, as shown in Projects 8 and 9. Then, configure the HTTP Get Handler block as shown:
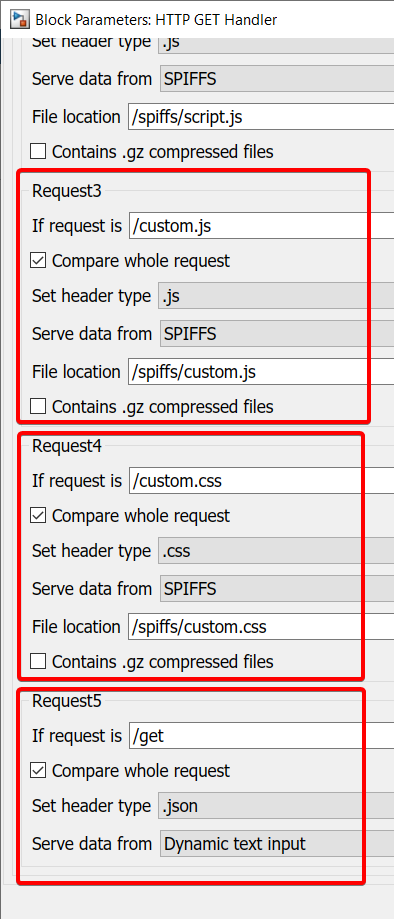
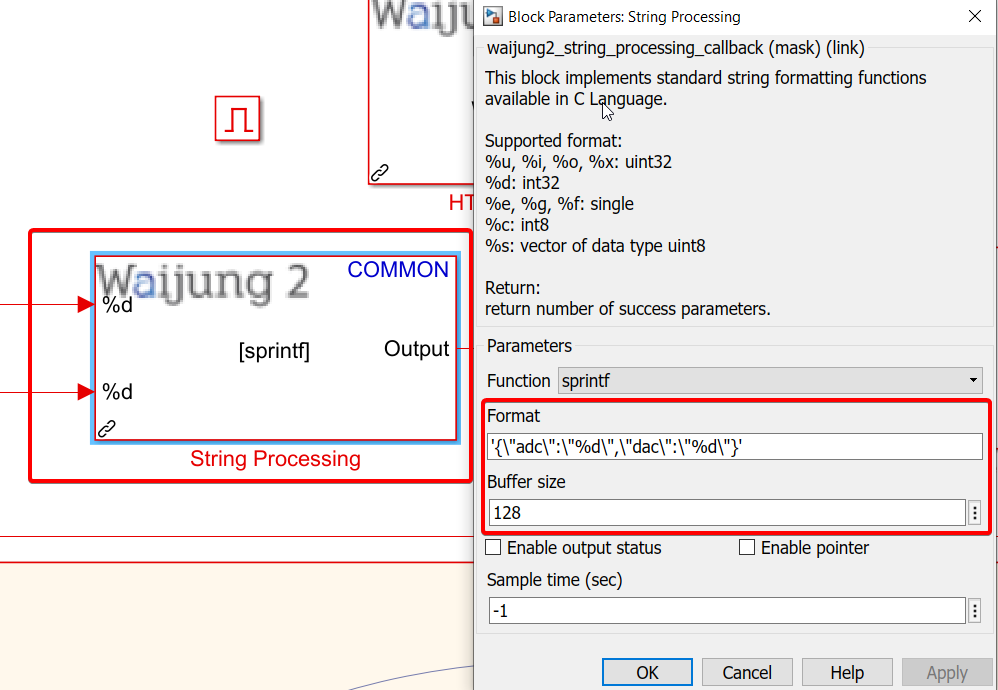
8.Recognize that you want to continuously extract both analog input (from LDR) and analog output (from LED) from the model and feed it into the HTTP server. Thus, the string processing block feeding into the HTTP Get Handler block must now have 2 inputs:
9.After you've built your model, saved it, and setup your hardware, go to APPS > Embedded Coder > Build
10a. If you have used WiFi AP mode:
Plug in your external WiFi USB dongle > connect to the ESP32 using the SSID and password you set in the WiFi Setup block > Go to the IP address you set in the WiFi Setup block
10b. If you have used WiFi STA mode:
Go to the IP address you set in the WiFi Setup block
Final result (click to view video):
1.ON/OFF are manual override modes where threshold or analog input value from the LDR does not matter.
2.However, when the system is in AUTO mode, analog input from the LDR must exceed the threshold value for the LED to turn on.
3.It is evident that when bright light is projected onto the LDR, its analog value reduces below the threshold value as a result of change in the LDR's resistance. This automatically turns the LED off.
4.As soon as bright light is taken away from the LDR, its analog value increases beyond the threshold value and the LED hence turns on.
5.When the page is refreshed, the settings from the Switch, Threshold slider, and LED brightness slider go back to their default values i.e. 0 as their data is not stored on the ESP32
Exercise
1.You can see in the result above that when the webpage is refreshed, your previous settings from Mode Selector, Threshold, and Brightness are not stored and it goes back to default values. Modify the system such that settings are stored in non-volatile storage and the system starts up with the same settings when the page is refreshed.
2.Library Browser > Waijung 2 blockset > Utilities > Import all 3 Volatile Data Storage blocks > Configure as shown below

3.You need to store the 3 variables to the 'Volatile Data Storage Write' block (use a 'Mux' block), and then read the same variables using 'Volatile Data Storage Read' block (use a 'Demux' block) and feed that to the HTTP Get Handler block through a String processing block.
4.The code for the webpage needs to be modified as well since the HTTP server now needs to be able to retrieve the most recent settings every time the page is refreshed or closed & opened again. The updated code can be found here and also at the end of the project. The explanation for the modified code is as follows:
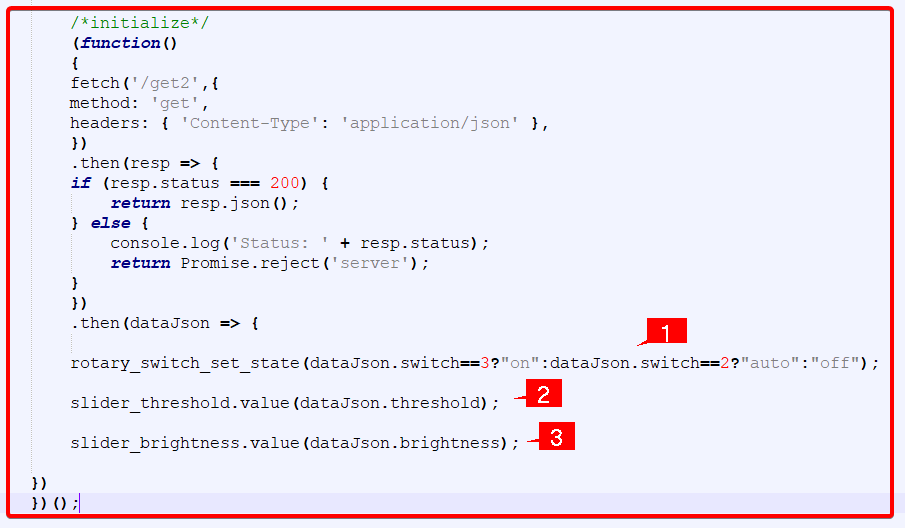
This section should be added to "dashboard.html" file that was used for this project.
1.Converts the 3 modes of the switch to "json" format so this information can be used for transmitting data to a webpage
2.Converts threshold value to "json" format
3.Converts brightness value to "json" format
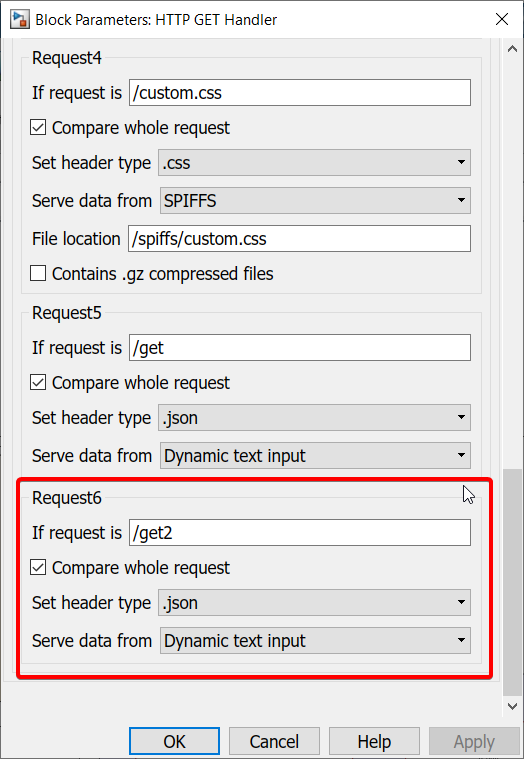
5.Change the number of requests in the HTTP Get Handler block to 6 and add Request 6 as shown:
Final result (click to view video):
As is evident, everything else functions exactly as before. The only difference from the previous model is that now when the webpage is refreshed, it starts up with the same settings as before. This is because the settings are now stored in non-volatile storage, so the data is not lost.
Project files: SA file | Source files: HTML/JS/CSS
Solution to exercise: SA file | Source files: HTML/JS/CSS