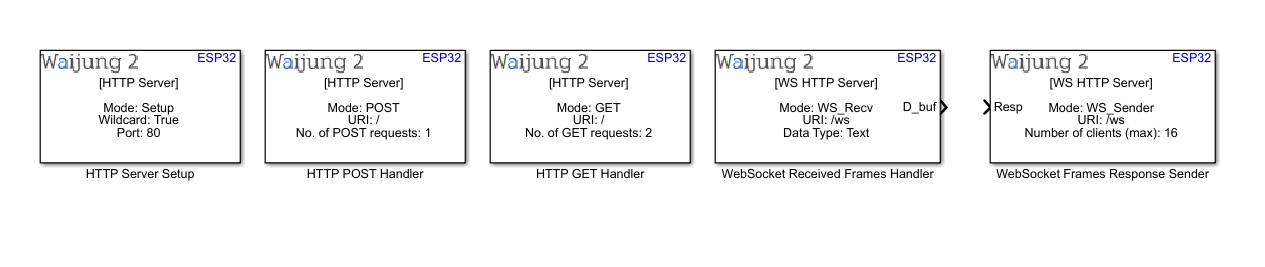
How this block appears in a Simulink model?
What can be configured?
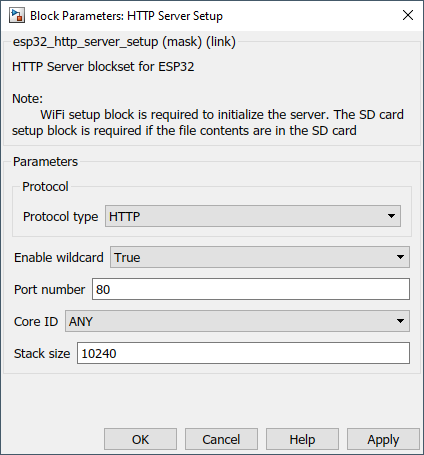
HTTP server setup block
Configuration Parameter |
Selectable Option/Value |
Description |
Protocol type |
HTTP--HTTPS |
Select protocol that runs on the server |
Certificate source |
From PC--From SD card |
Select from where the server certificate and the private key are loaded from for HTTPS |
Server cerificate path (.pem) |
|
The full path to the server certificate. This will be appeared when the protocol is HTTPS |
Private key path (.pem) |
|
The full path to the server private key. This will be appeared when the protocol is HTTPS |
Enable wildcard |
True--False |
Enable or disable wildcard. By enabling this, server accepts multiple uri s in a single handler |
Port number |
|
Specify the port number which the server operates |
Core ID |
0--1--ANY |
Select which core the server should operate |
Stack size |
|
Specify the stack size for the server task |
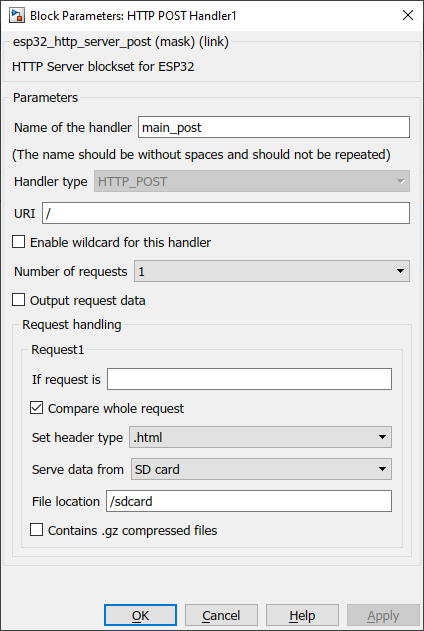
HTTP post handler block
Configuration Parameter |
Selectable Option/Value |
Description |
Name of the handler |
|
Specify the name for the current handler. When multiple blocks are used, It should not be repeated. |
URI |
|
Specify the uri for the handler. In case the enable waildcard for this handler is enabled specify the base uri here. |
Enable wildcard for this handler |
Check--Uncheck |
Enable or disable the wildcard for this current handler. |
Number of requests |
1 to 12 |
Number of requests handle using the current handler. This will be always 1 when the wildcard is false in HTTP Server Setup block. |
Output request data |
Check--Uncheck |
Enable this option to get the POST request body from the output port. |
If request is |
|
Specify the request to be handle (POST request body) |
Compare the whole request |
Check--Uncheck |
Compare the POST request body with the specified partially or fully |
Set header type |
.html--.css--.png--.ico--.txt--.js--.ttf--.woff2--.json |
Select the correct data type of the response data |
Serve data from |
SD card--Static text input--Dynamic text input |
The data source. Whether the response data from the sd card or static text from the mask text box or dynamic text from input port |
File location |
|
Full file path. This option is enabled when the data is served from the SD card |
Contains .gz compressed files |
Check--Uncheck |
Check, when the files are gz compressed files |
Text input |
|
This enables when the data is served from a static text input. Insert the data on the text area |
INPUT/ OUTPUT Port
Port Name |
Port Type |
Date Type |
Description |
Res for Req |
Scalar/Vector |
uint8 |
Data transmitted to the server |
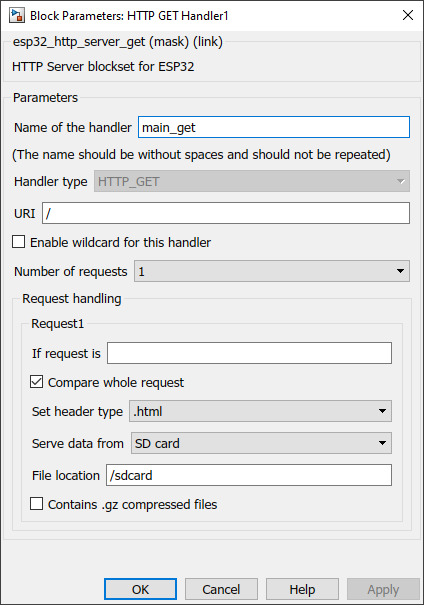
HTTP get handler block
Configuration Parameter |
Selectable Option/Value |
Description |
Name of the handler |
|
Specify the name for the current handler. When multiple blocks are used it should not be repeated. |
URI |
|
Specify the uri for the handler. In case the enable waildcard for this handler is enabled specify the base uri here. |
Enable wildcard for this handler |
Check--Uncheck |
Enable or disable the wildcard for this current handler. |
Number of requests |
1 to 12 |
Number of requests handle using the current handler. This will be always 1 when the wildcard is false in HTTP Server Setup block. |
Request buffer size |
32-64-128-256-512 |
The size of the data buffer for the receive data can be set from here |
If request is |
|
Specify the request to be handle (uri) |
Compare the whole request |
Check--Uncheck |
Compare the request uri with the specified partially or fully |
Set header type |
.html--.css--.png--.ico--.txt--.js--.ttf--.woff2--.json |
Select the correct data type of the response data |
Serve data from |
SD card--Static text input--Dynamic text input |
The data source. Whether the response data from the sd card or static text from the mask text box or dynamic text from input port |
File location |
|
Full file path. This option is enabled when the data is served from the SD card |
Contains .gz compressed files |
Check--Uncheck |
Check, when the files are gz compressed files |
Text input |
|
This enables when the data is served from a static text input. Insert the data on the text area |
INPUT/ OUTPUT Port
Port Name |
Port Type |
Date Type |
Description |
Res for Req |
Scalar/Vector |
uint8 |
Data transmitted to the server |
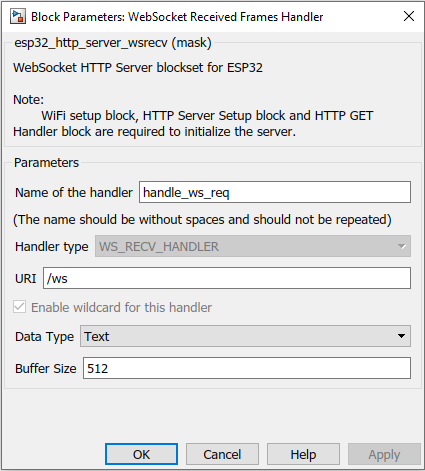
WebSocket Received Frames Handler block
Configuration Parameter |
Selectable Option/Value |
Description |
Name of the handler |
|
Specify the name for the current handler. When multiple blocks are used, it should not be repeated. |
URI |
|
Specify the uri for the handler. In case the enable wildcard for this handler is enabled specify the base uri here. E.g., /ws |
Data type |
|
Select the correct data type for the receiving messages. |
Buffer Size |
1 to 12 |
Select buffer size for the receiving messages |
INPUT/ OUTPUT Port
Port Name |
Port Type |
Date Type |
Description |
D_buf |
Scalar/Vector |
uint8 |
Message received to the server |
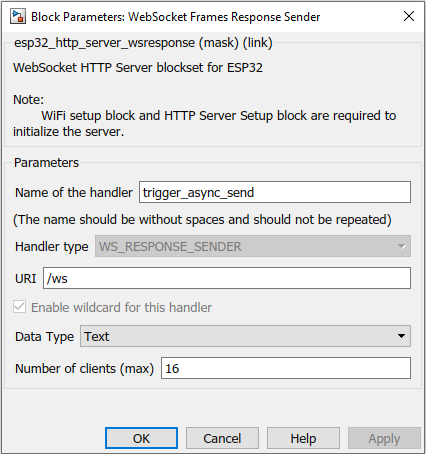
WebSocket Frames Response Sender block
Configuration Parameter |
Selectable Option/Value |
Description |
Name of the handler |
|
Specify the name for the current handler. When multiple blocks are used it should not be repeated. |
URI |
|
Specify the uri for the handler. In case the enable wildcard for this handler is enabled specify the base uri here. E.g., /ws |
Data type |
Text--Binary--Ping--Pong |
Select the correct data type for the receiving messages. |
Number of clients (max) |
1 to 12 |
Specify the maximum number of simultaneously listening TCP connections |
INPUT/ OUTPUT Port
Port Name |
Port Type |
Date Type |
Description |
Resp |
Scalar/Vector |
uint8 |
Message transmitted to the server |
When to use this block?
HTTP server setup block
Use this block for the application which need to implement a custom http server using ESP32.
HTTP post handler block
This block is used when there are POST requests from the client.
HTTP get handler block
This block is used when there are GET requests from the client.
WebSocket Received Frames Handler block
This block is used when there are WebSocket messages from the client.
WebSocket Frames Response Sender block
This block is used when there are WebSocket messages to be sent to clients from the server.
How does this block work?
HTTP server setup block
This block will initialize the http server with the given configuration.
HTTP post handler block
This block handles the POST requests from the client. Before using this block, first initialize the server using HTTP server setup block. The data to the input ports should be in string format.
HTTP get handler block
This block handles the GET requests from the client. Before using this block, first initialize the server using HTTP server setup block. The data to the input ports should be in string format.
Demo 1
Demo file : esp32_http_server_demo.slx
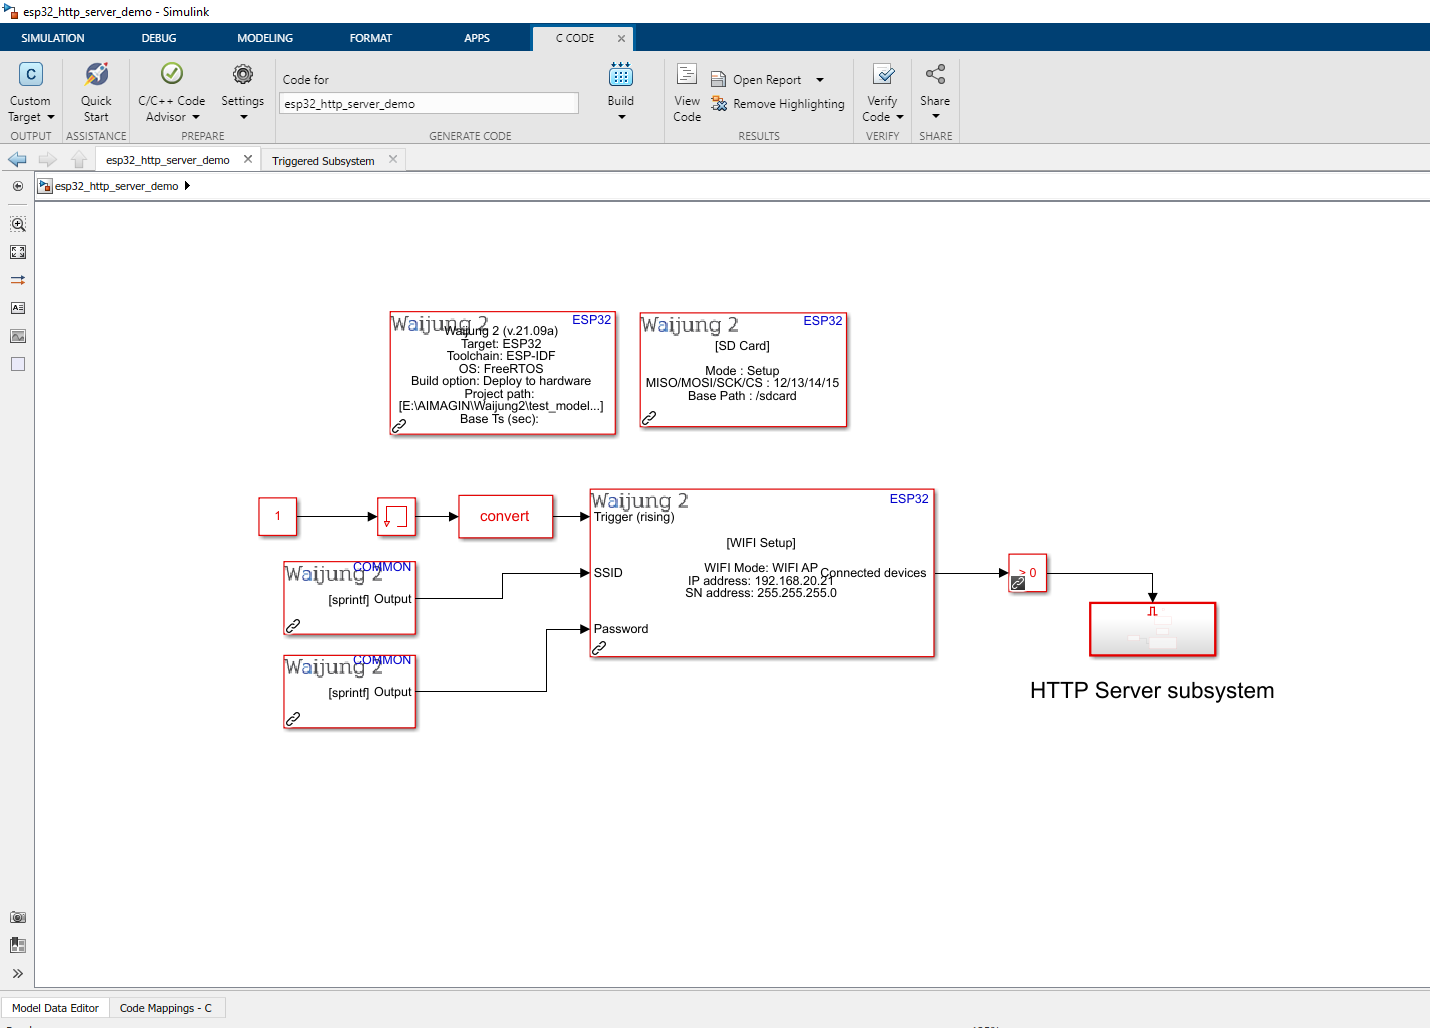
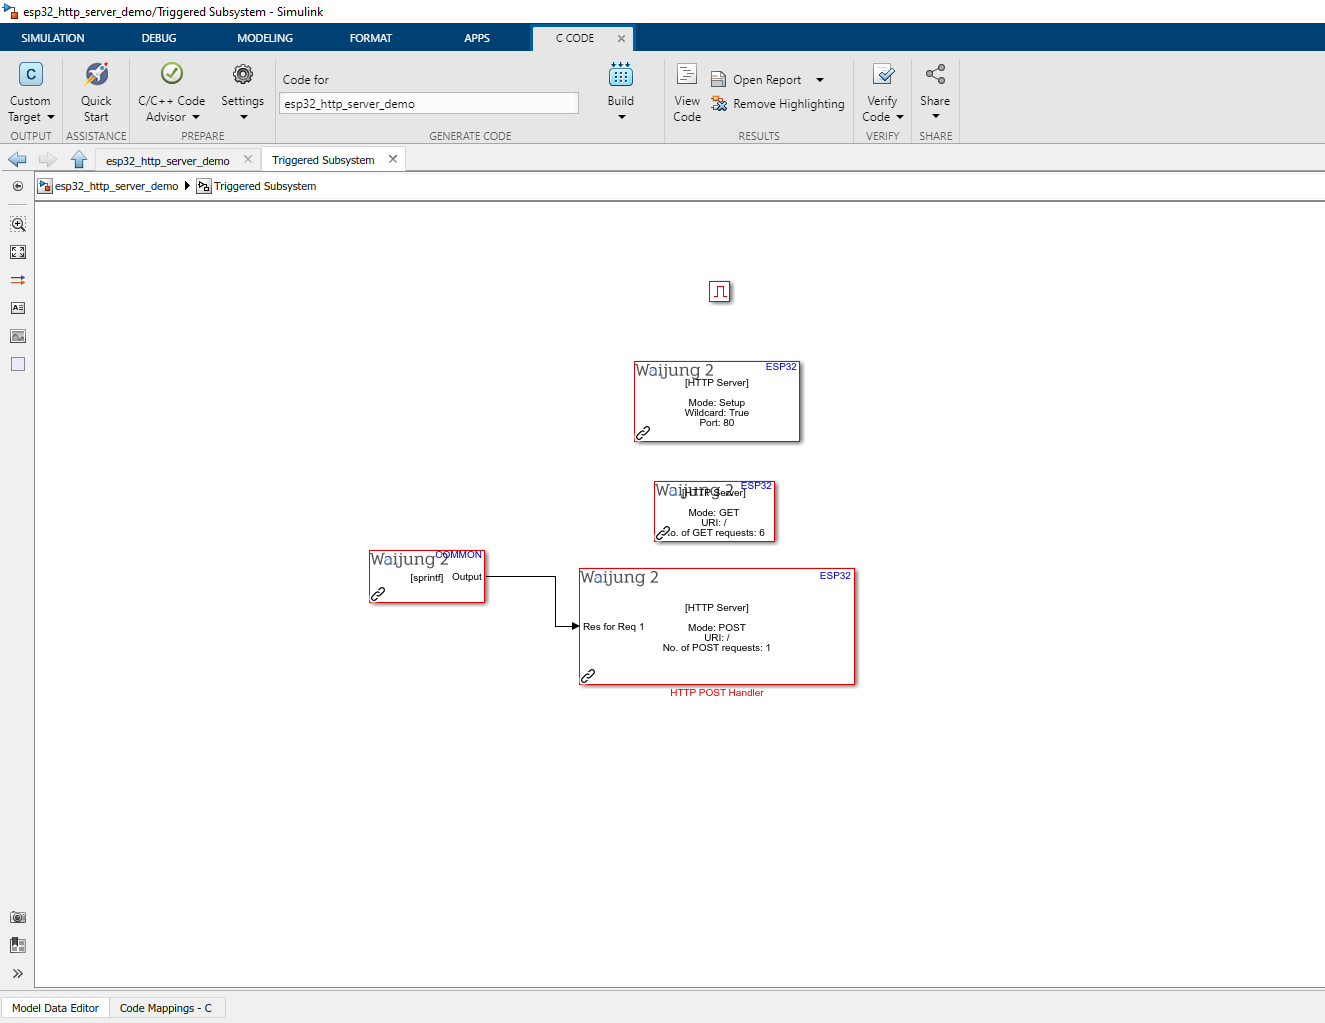
Description
This demo shows how to use HTTP server setup block, HTTP get handler block and HTTP post handler block by using the custom html web pages. Addition to this blocks, the WiFi block is used to initialize the WIFI in AP mode to access the http server and SD card block is used to initialize the SD card to serve the files (.html, ,css and .png).
Note : First copy the Simple_GET_POST.7z and extract the files to the SD card and insert in to the ESP32 module.
This example is compatible for hardware that allow SD card mount.
What should be happening?
Once the WIFI is initialize WIFI in AP mode use the following information to connect to the ESP32.
•IP : 192.168.20.21
•SSID : Test_http_server
•Password : 00000000
Once the IP address is accessed using the web browser, the web page is as below
•Action: On page load
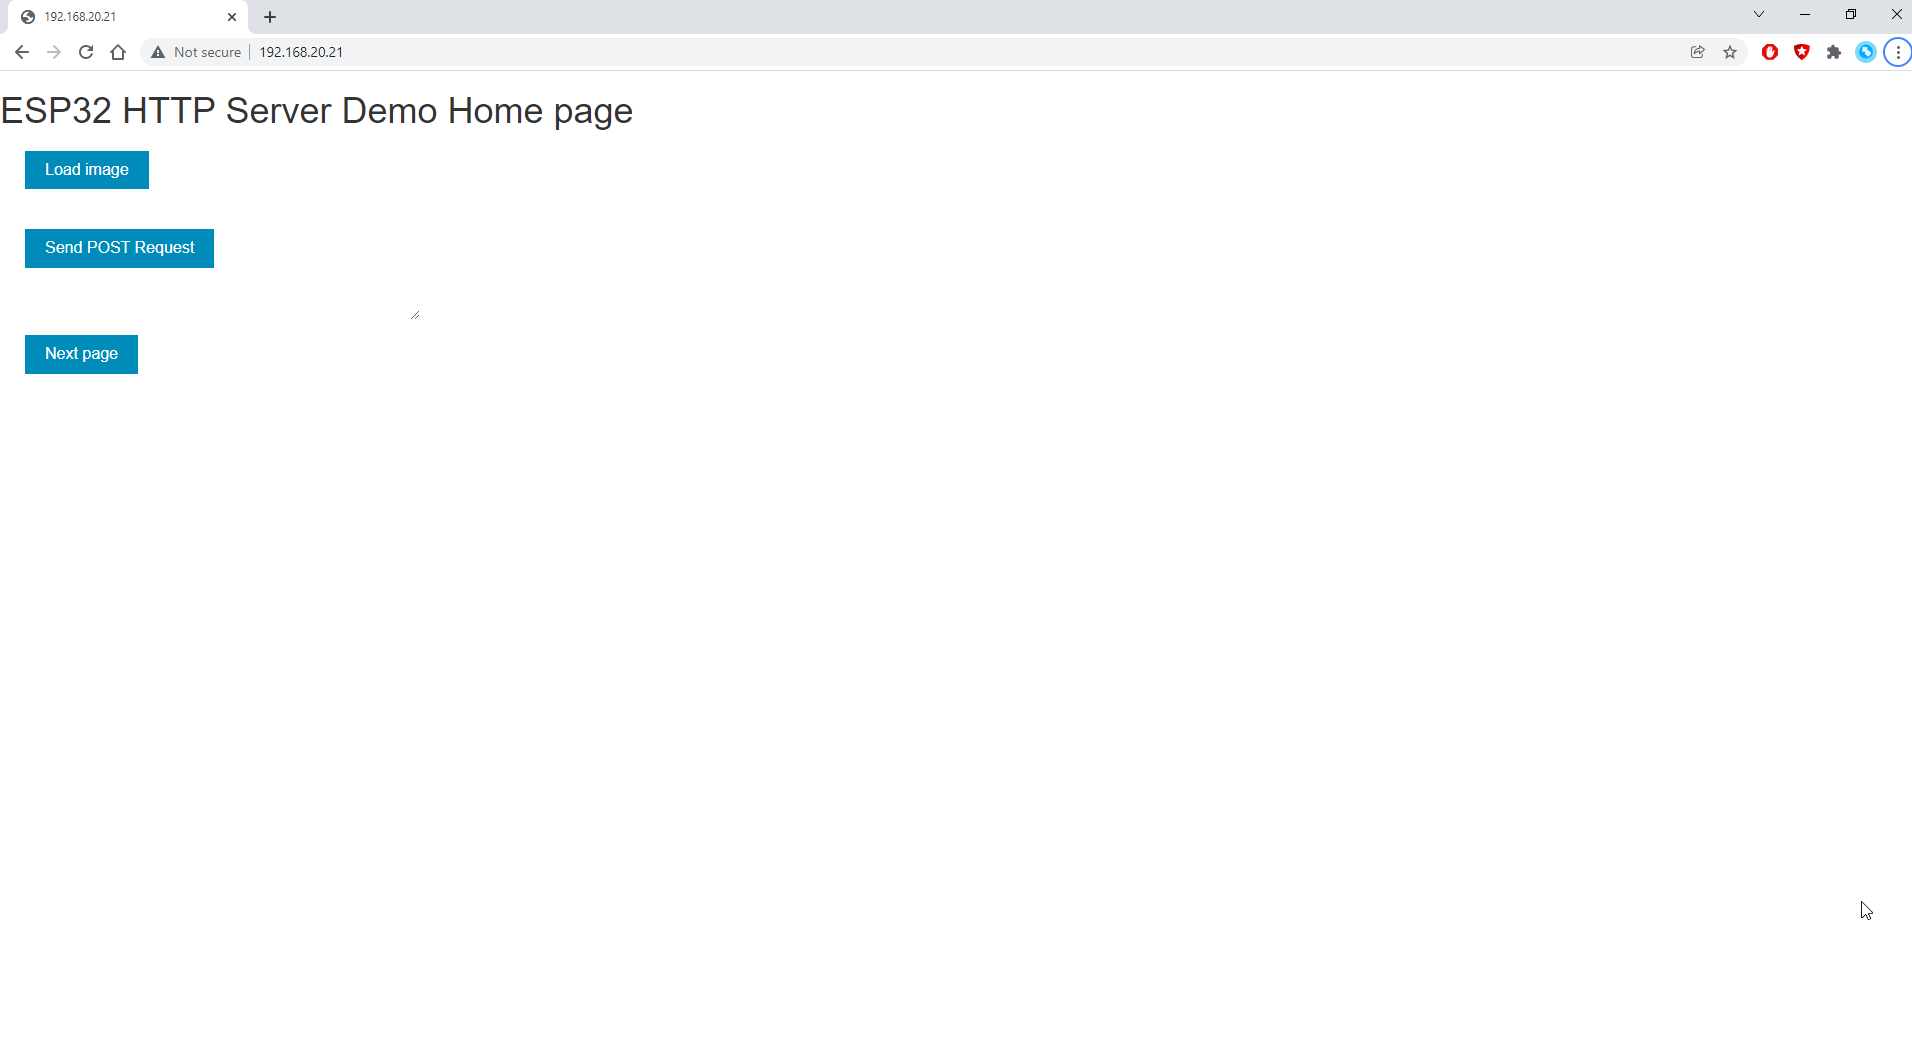
The client will sends GET/POST requests according to the button
•Load image button : Show an image from the SD card using GET method
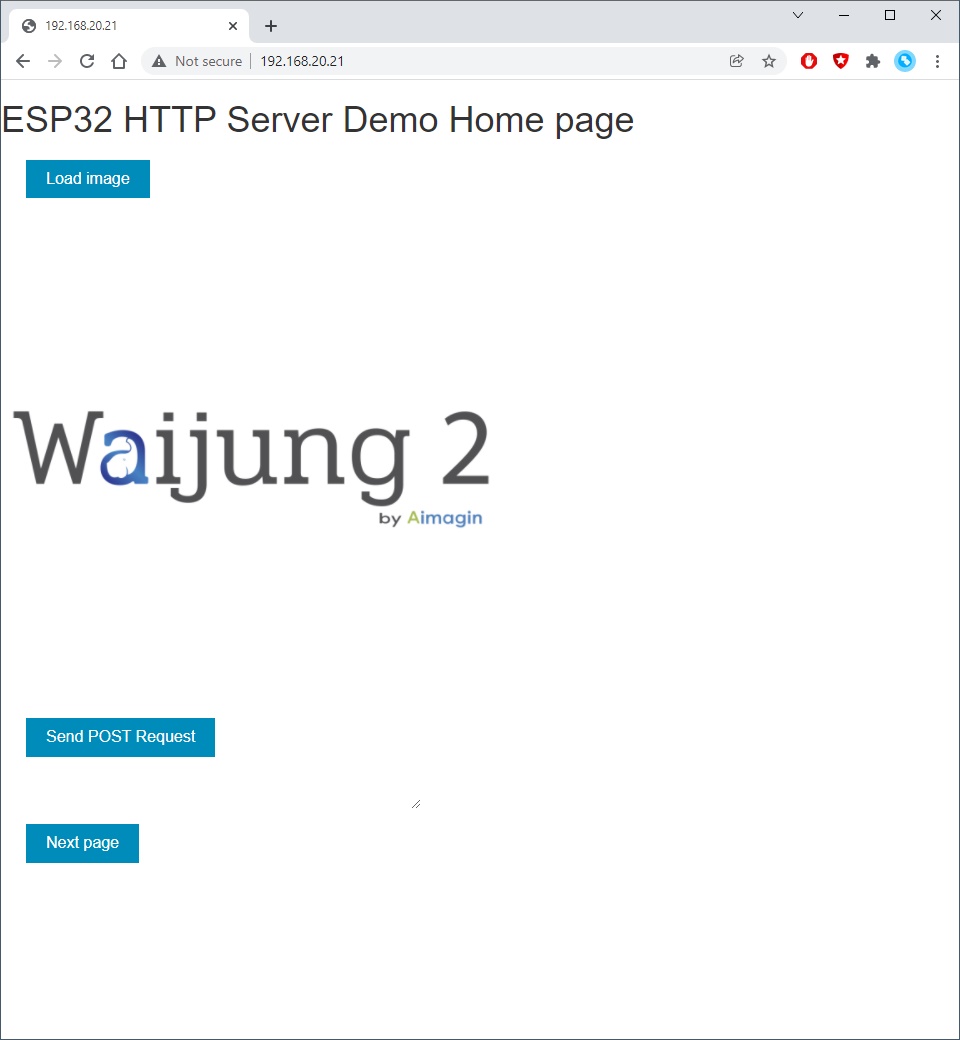
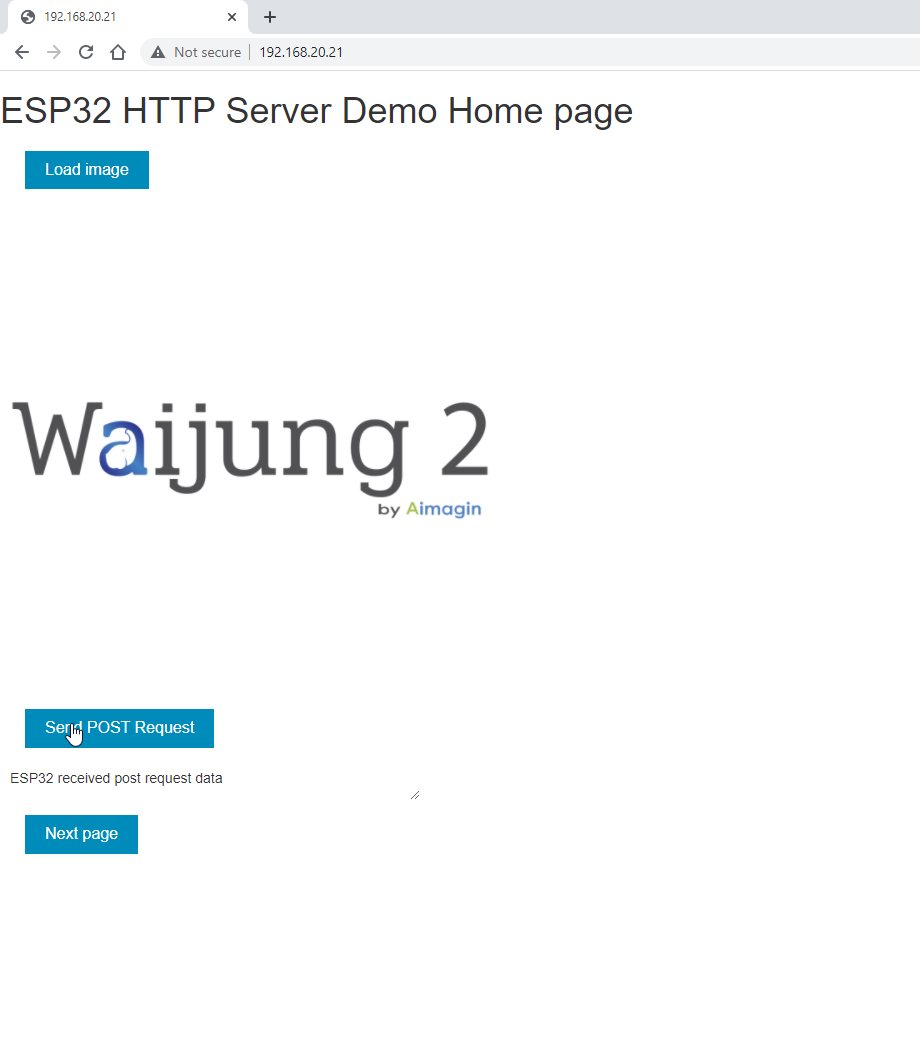
•Send POST Request button : Send POST request to to server and shows the response data in the text area
•Next page button : Redirect to another html page using GET method
Source files : Simple_GET_POST.7z
Demo 2
Demo file : esp32_http_server_demo_2.slx
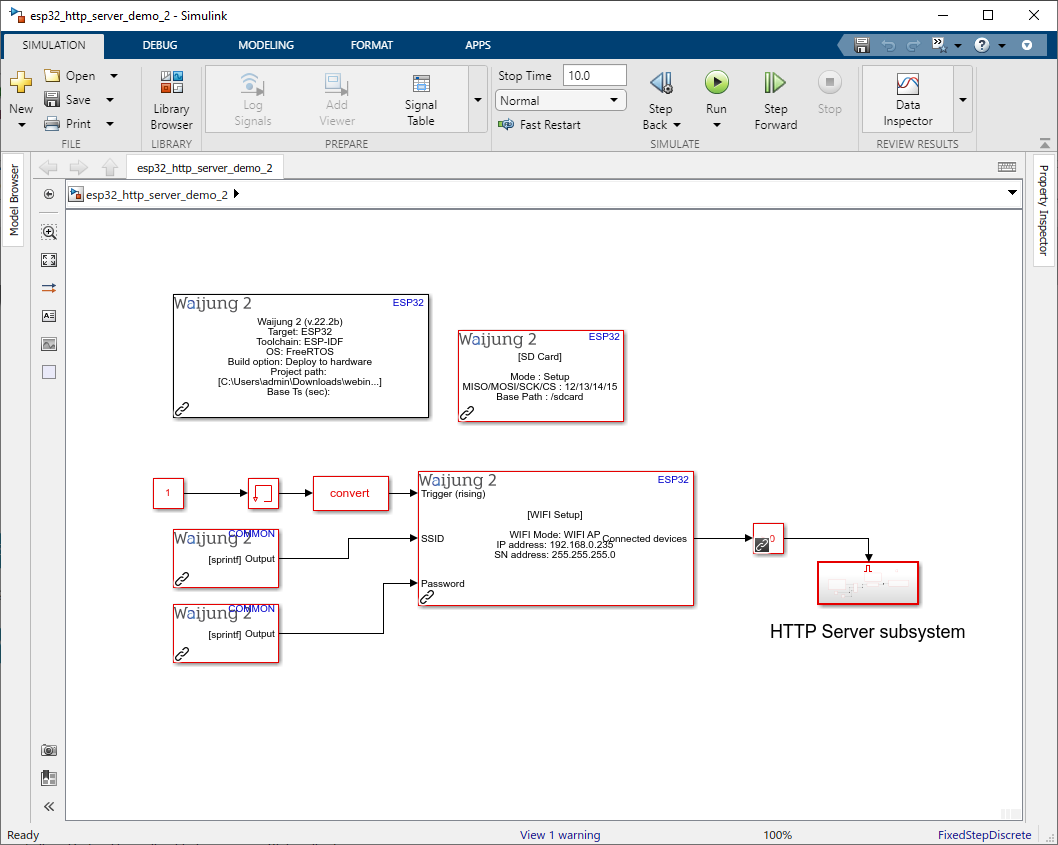
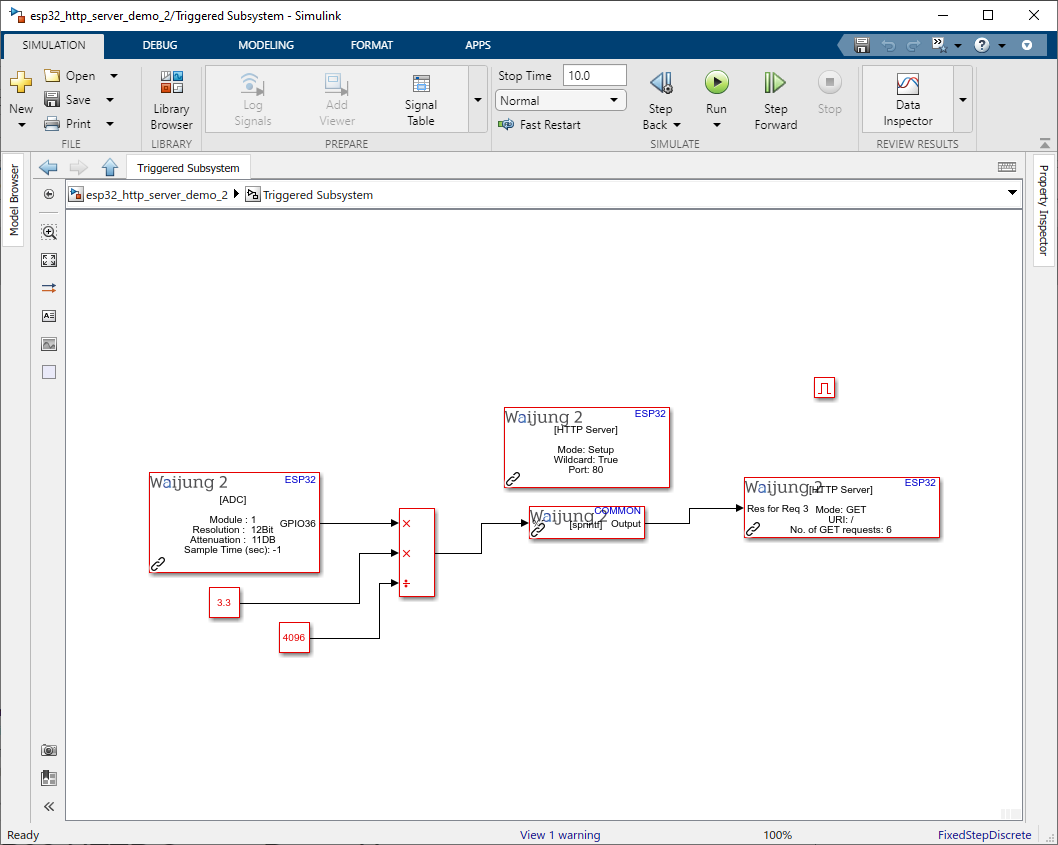
Description
This demo shows how to use HTTP server setup block, HTTP get handler block and HTTP post handler block by using the custom html web pages. Addition to this blocks, the WiFi block is used to initialize the WIFI in AP mode to access the http server and SD card block is used to initialize the SD card to serve the files (.html, ,css and .png). ADC block is used to read analog voltage measurement from GPIO36. Connect a potentiometer to GPIO36
Note : First download the line_graph.rar and extract the files to the SD card and insert in to the ESP32 module.
This example is compatible for hardware that allow SD card mount.
What should be happening?
Once the WIFI is initialize WIFI in AP mode use the following information to connect to the ESP32.
•IP : 192.168.0.235
•SSID : Test_http_server
•Password : 123456789
Once the web page is loaded, the ADC Reading graph will be plotted the data according to the reading from the GPIO36 as in the following figure.

Source files : line_graph.rar
Demo 3
Demo file : esp32_http_server_demo_3.slx
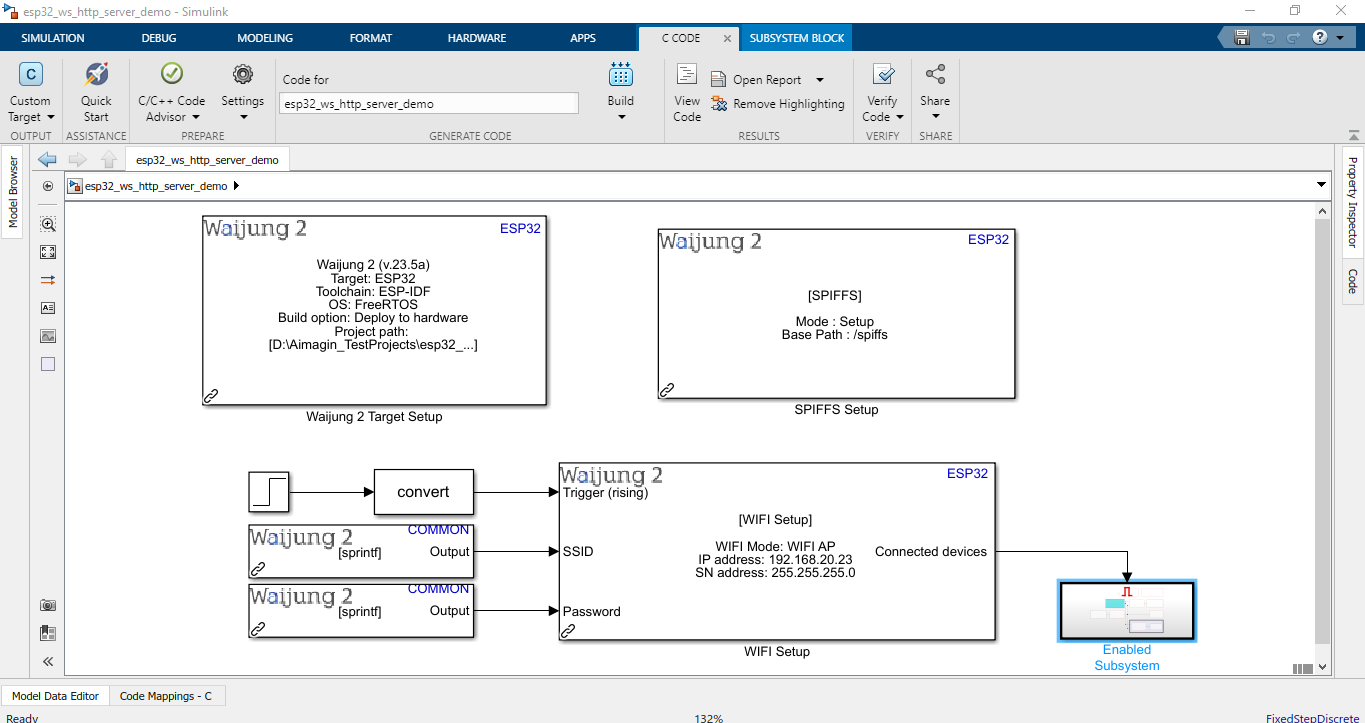
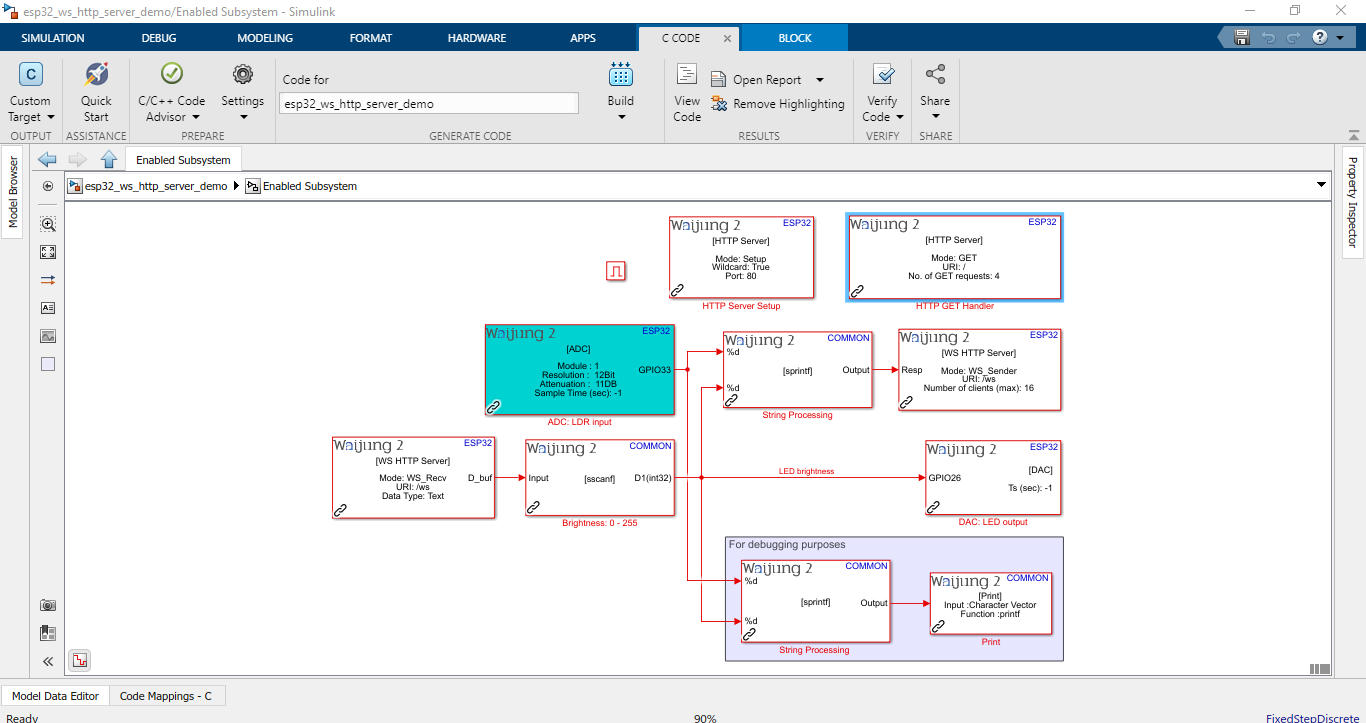
Description
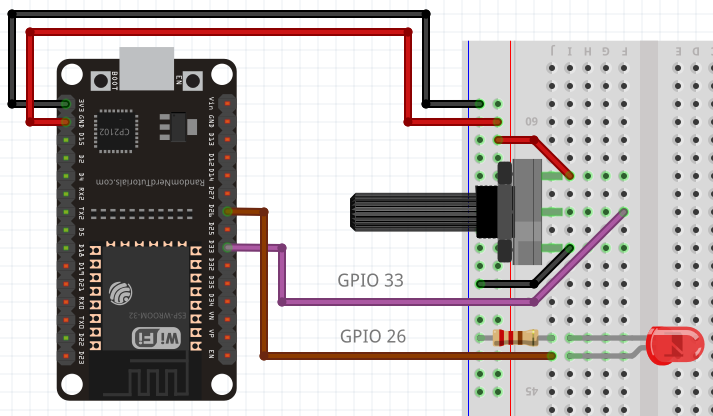
This demo shows how to use HTTP server setup block, HTTP get handler block, WebSocket Received Frames Handler block and WebSocket Frames Response Sender block by using the custom html web page. Addition to this blocks, the WiFi block is used to initialize the WIFI in AP mode to access the http server and SPIFFS block is used to initialize the SPIFFS to serve the files (.html, .css and .js). ADC block is used to read analog voltage measurement from GPIO33 (Connect a potentiometer to GPIO33) and DAC block is used to change the brightness of the LED. (Connect a LED to GPIO26).
Note: First download the websocket_data.rar and extract the files to the computer and select the folder path in SPIFFS block.
What should be happening?
Once the WIFI is initialized, WIFI in AP mode uses the following information to connect to the ESP32.
•IP : 192.168.20.23
•SSID : ESP32
•Password : password
Once the IP address is accessed using the web browser, the web page is as below.
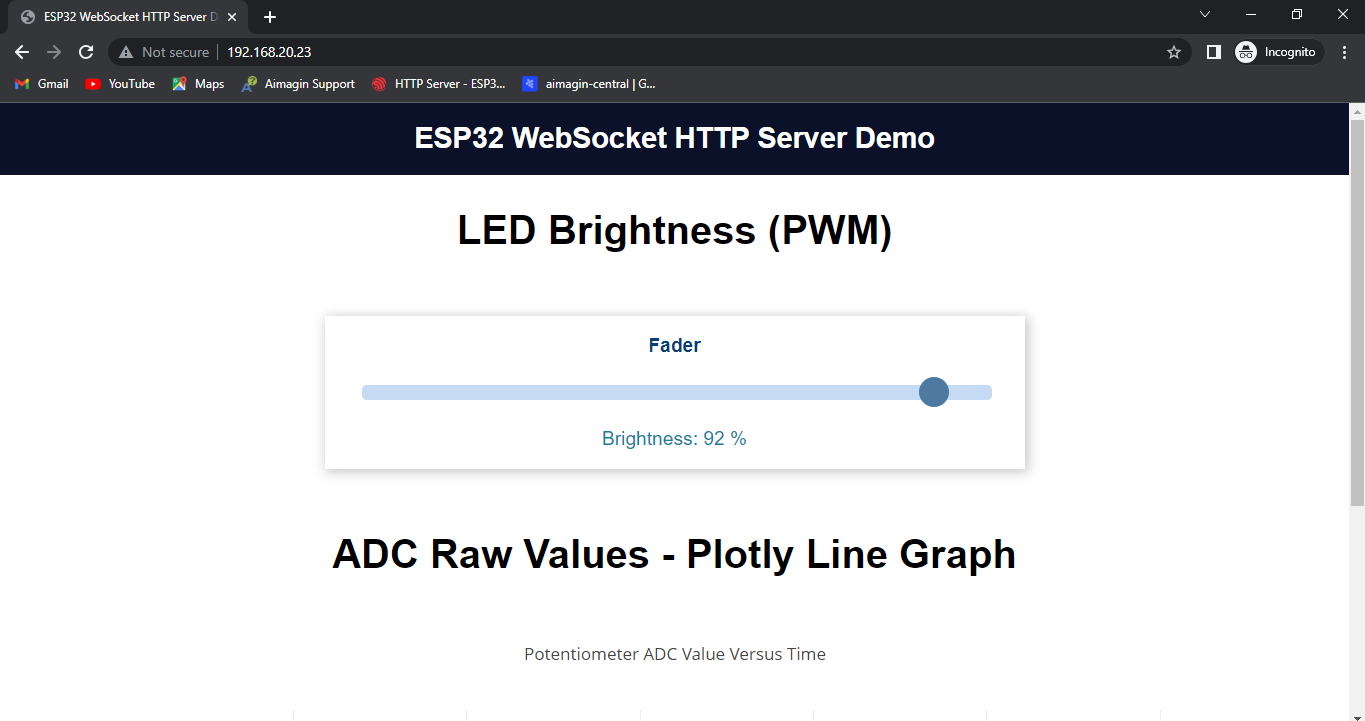
•There’s a range slider in a card that can be moved to set the brightness of the LED.
•In the card, there is a paragraph to display the current LED brightness (in percentage).
•The client sends the slider value to the server via WebSocket protocol.
•When a new position for the slider is set, it updates all clients (if multiple web browser tabs are opened (or multiple devices), they update almost simultaneously whenever there’s a change).
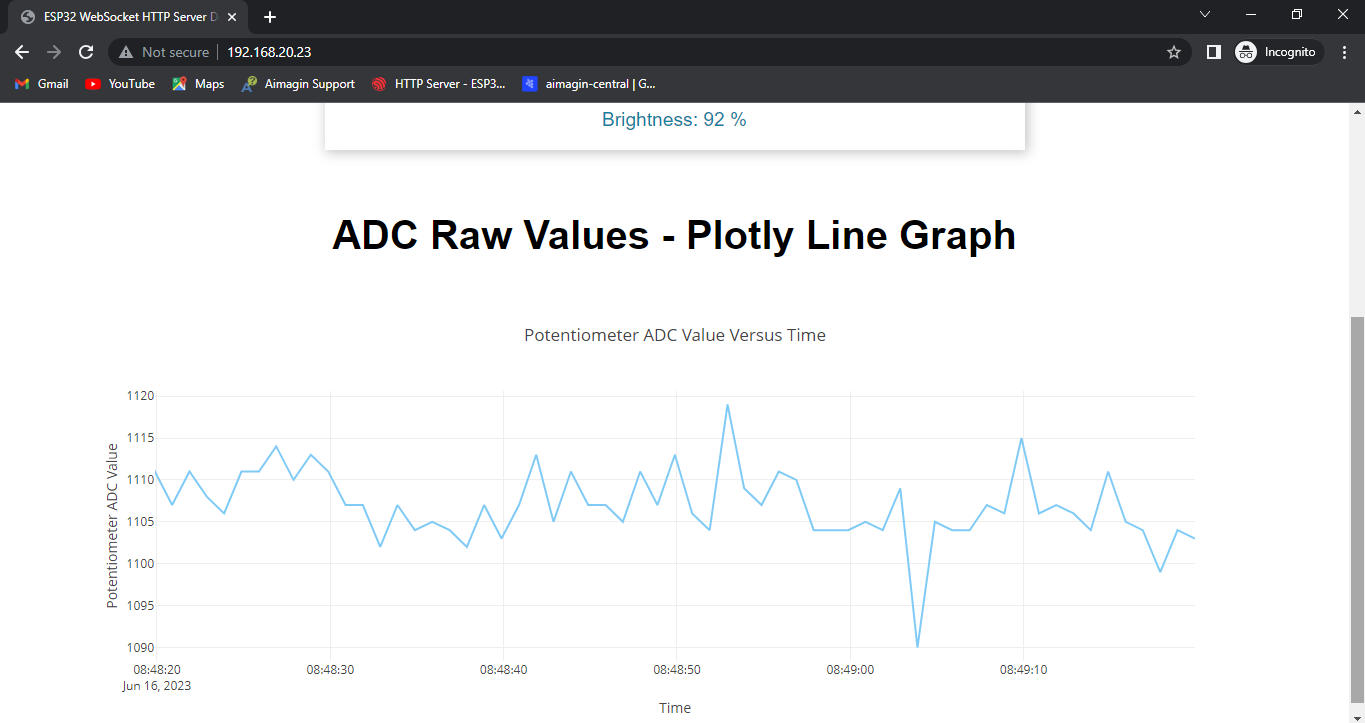
•And there is a chart to display data of ESP32 ADC pin (GPIO33) which is connected to a potentiometer over time.
•To build the chart, the plotly library has been used.
Source files : websocket_data.rar