Introduction:
In this section, we will explore how to create a standalone model of the RC circuit control system with a web interface. The web interface will allow us to adjust the PID gains and display real-time time-series responses of the RC circuit. We will utilize web development platform "Aimagin Connect" provided by Aimagin to design the web page and integrate it with the control system implemented on the ESP32 board.
Web Page Using Aimagin Connect
Aimagin Connect Reference: Aimagin Connect User Guide
Step 1: Create the Aimagin Connect model
Aimagin Connect Model: RC-Circuit Web Page.amgcnt
Use following Components:
•For arrangement : Use Flex, Raw and Col
•To create Graph : Use Multi-Axis Chart
•To change parameters : Use Knob
How to Create RC Circuit Web Page using Aimagin Connect
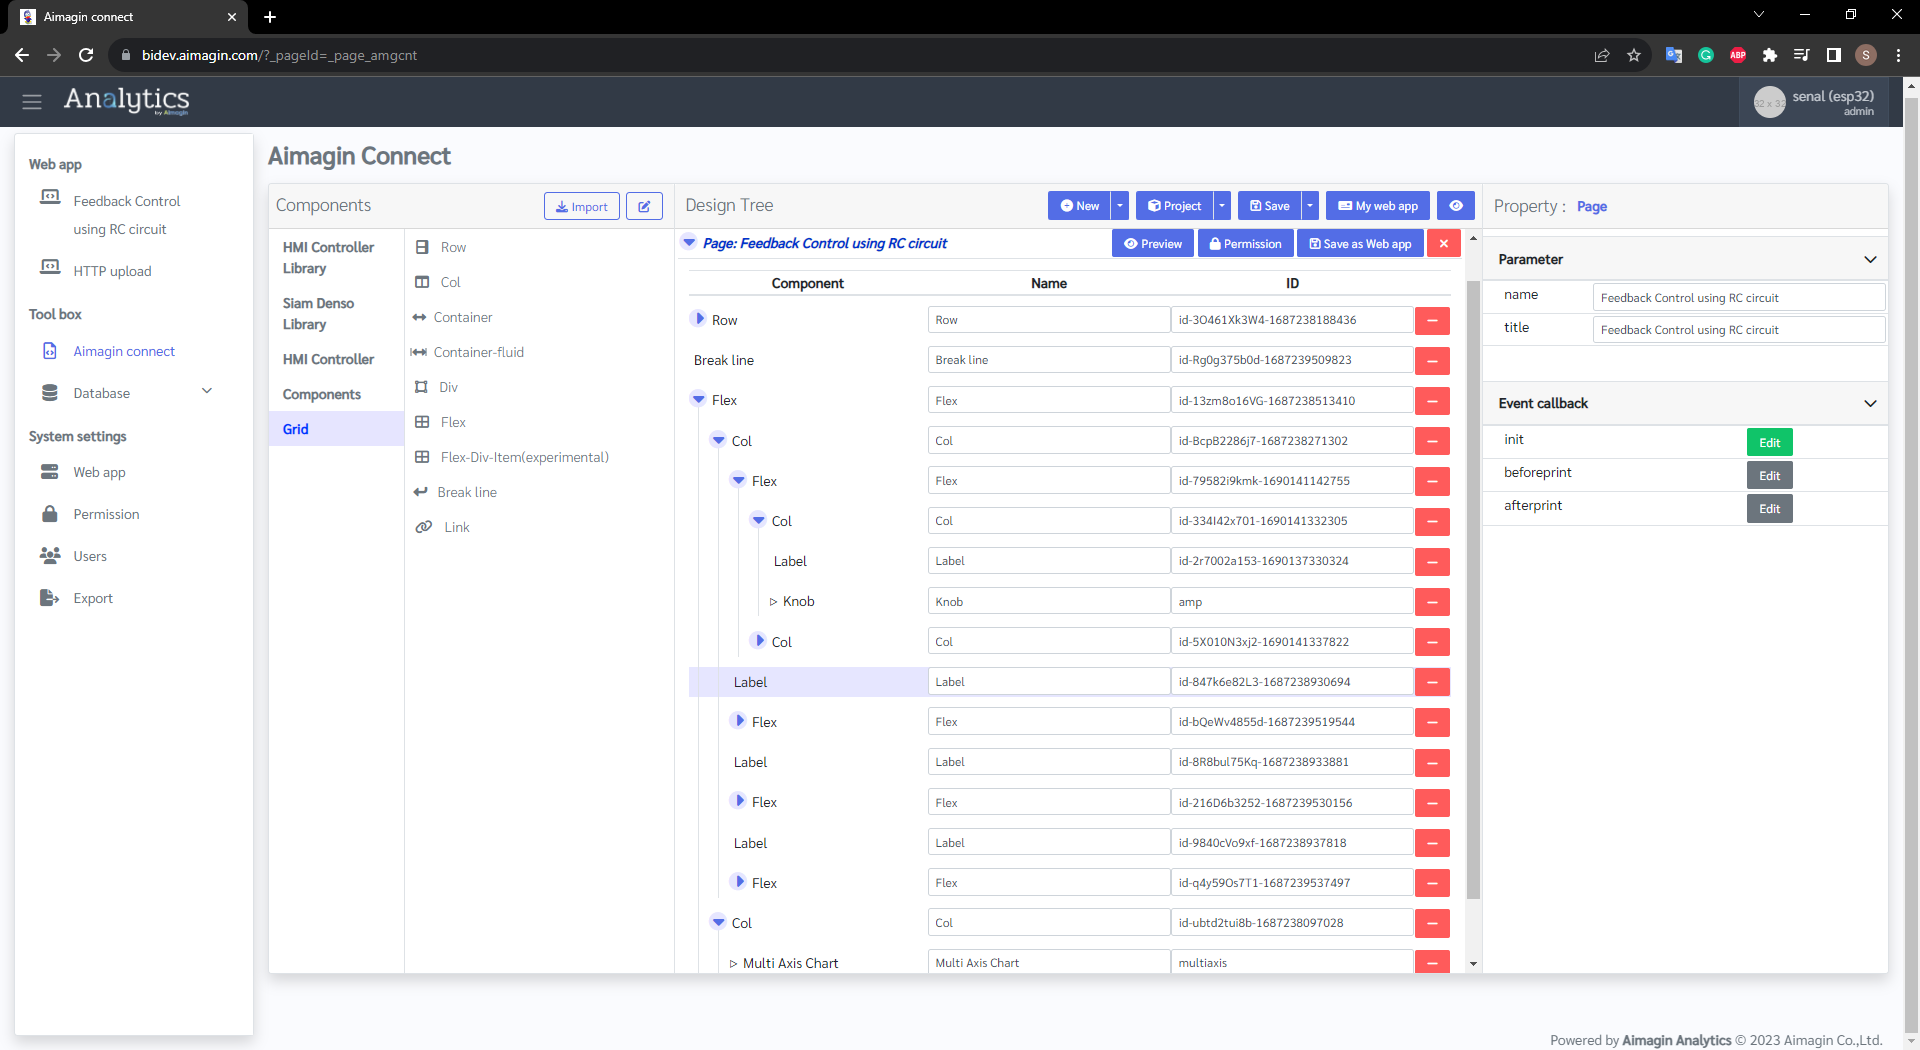
Figure 50: Design Web Interface Using Aimagin Connect
Step 2: Adjust 'Col' properties to make web page responsive across all devices
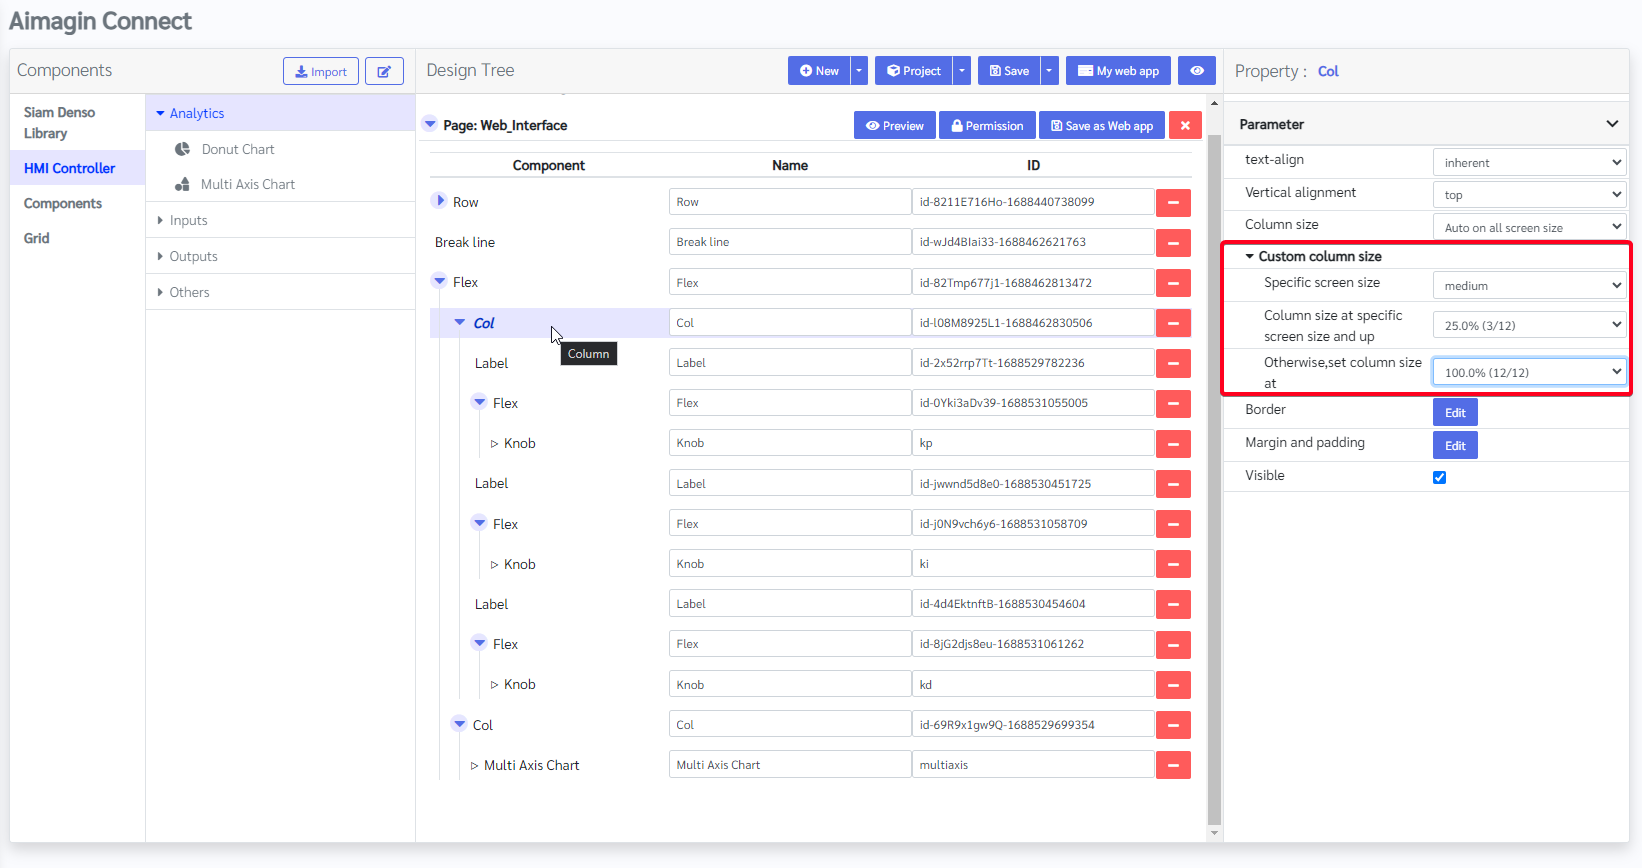
Figure 51: Adapting 'Col' Properties to Ensure Responsive Web Page Design Across All Devices
Step 3: Click on the 'Preview' button to get live preview of web page
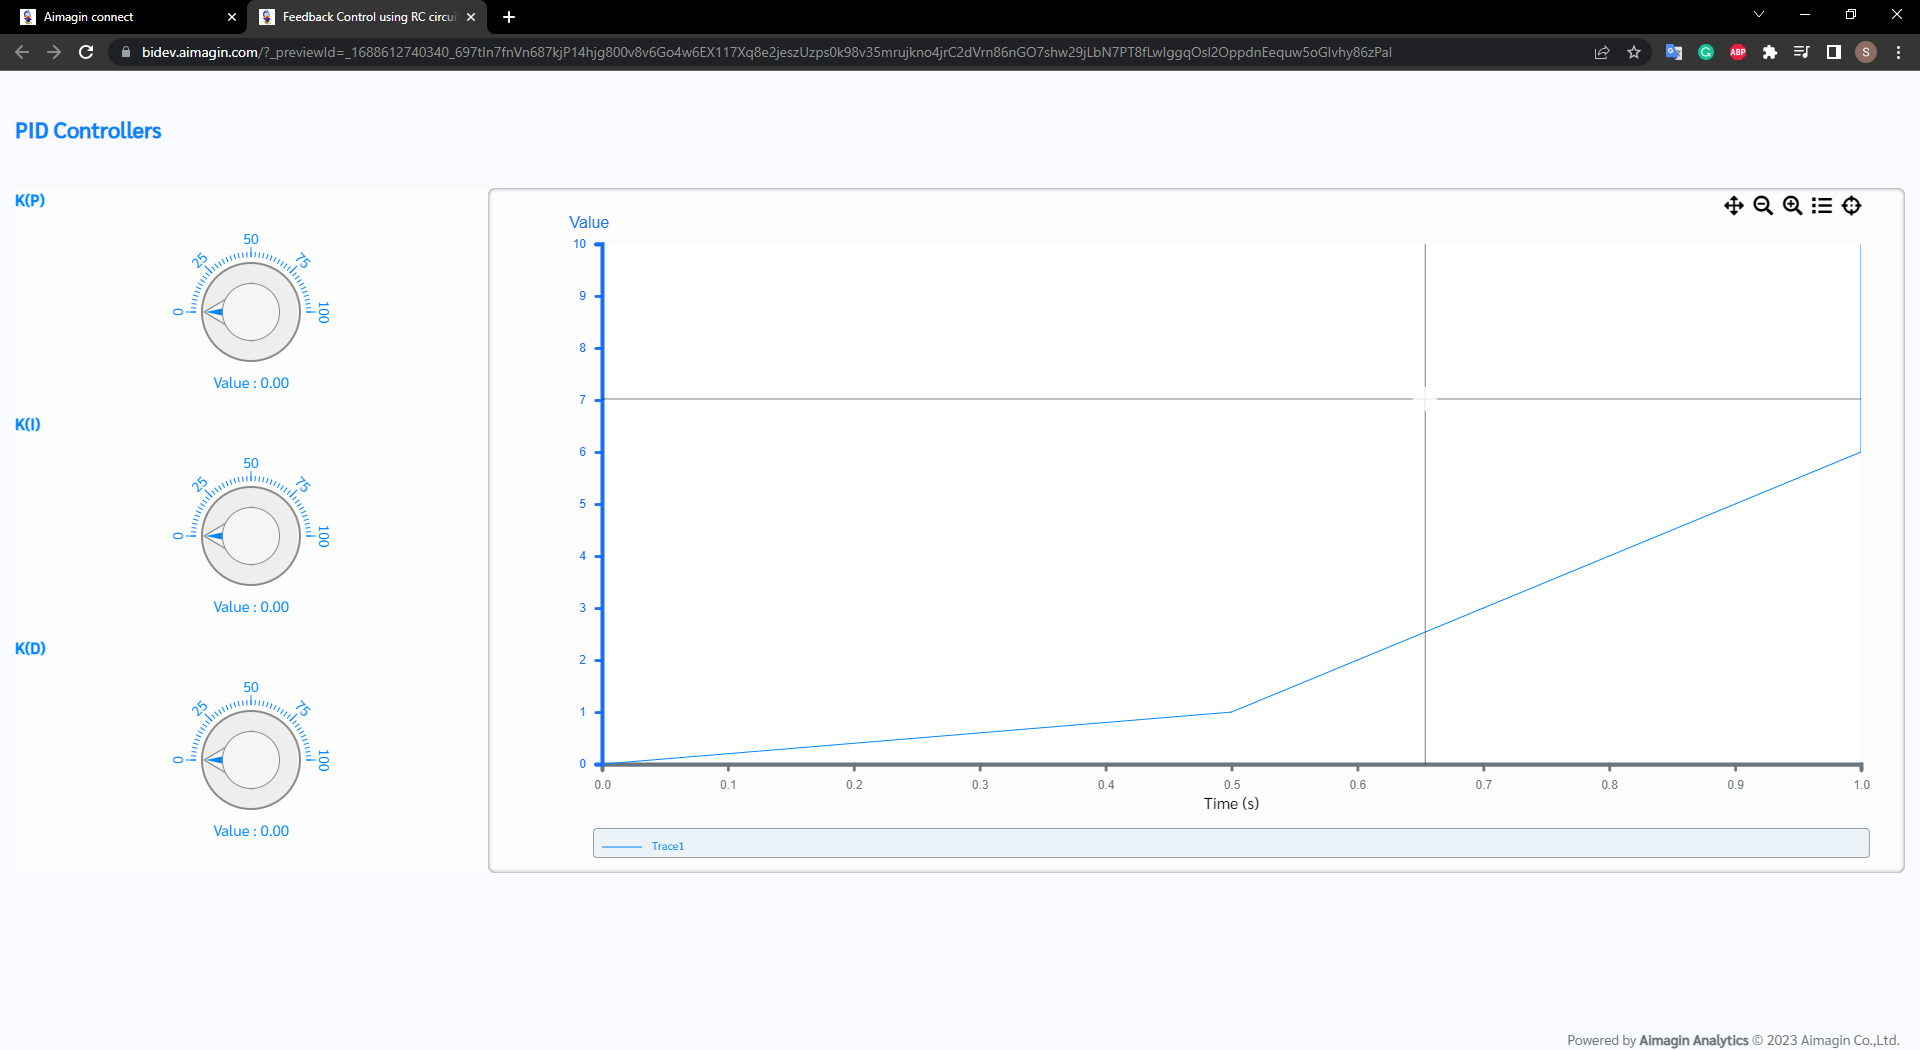
Figure 52: Obtained Live Preview of the Web Page
Step 4: Save as Web Page and Export
Please refer Aimagin Connect User Guide to save the web page as web app and export.
Step 5: Copy Aimagin Connect exported data to the SD Card
Open 'server' folder in export.rar and copy all to the SD Card
•core folder
•include folder
•system folder
•server.js
Aimagin Connect Web app: rc_export.zip

Figure 53: Aimagin Connect Web App Export Package: export.zip
Insert the SD Card to ESP32.
Stand alone model with WIFI AP Mode
Step 1: Create the Simulink model
Simulink Model: rc_sa_ap.slx
Use following blocks:
•For Input : Use Pulse Generator
•To get Input from Web page: Use Data Store Write
•To create controller : Product, Data Store Read, Add, Rate Transition, Discrete Derivative, Discrete-Time Integrator
•Waijung 2 blocks : Target Setup,DAC,ADC, Basic Custom Code, WIFI Setup, SD Setup, String Processing, Aimagin Connect, Aimagin Connect Custom mode, Aimagin Connect Read Request, Aimagin Connect Write Request
•For Output : Web page
Reference for Waijung2 ESP32 blockset: Getting started
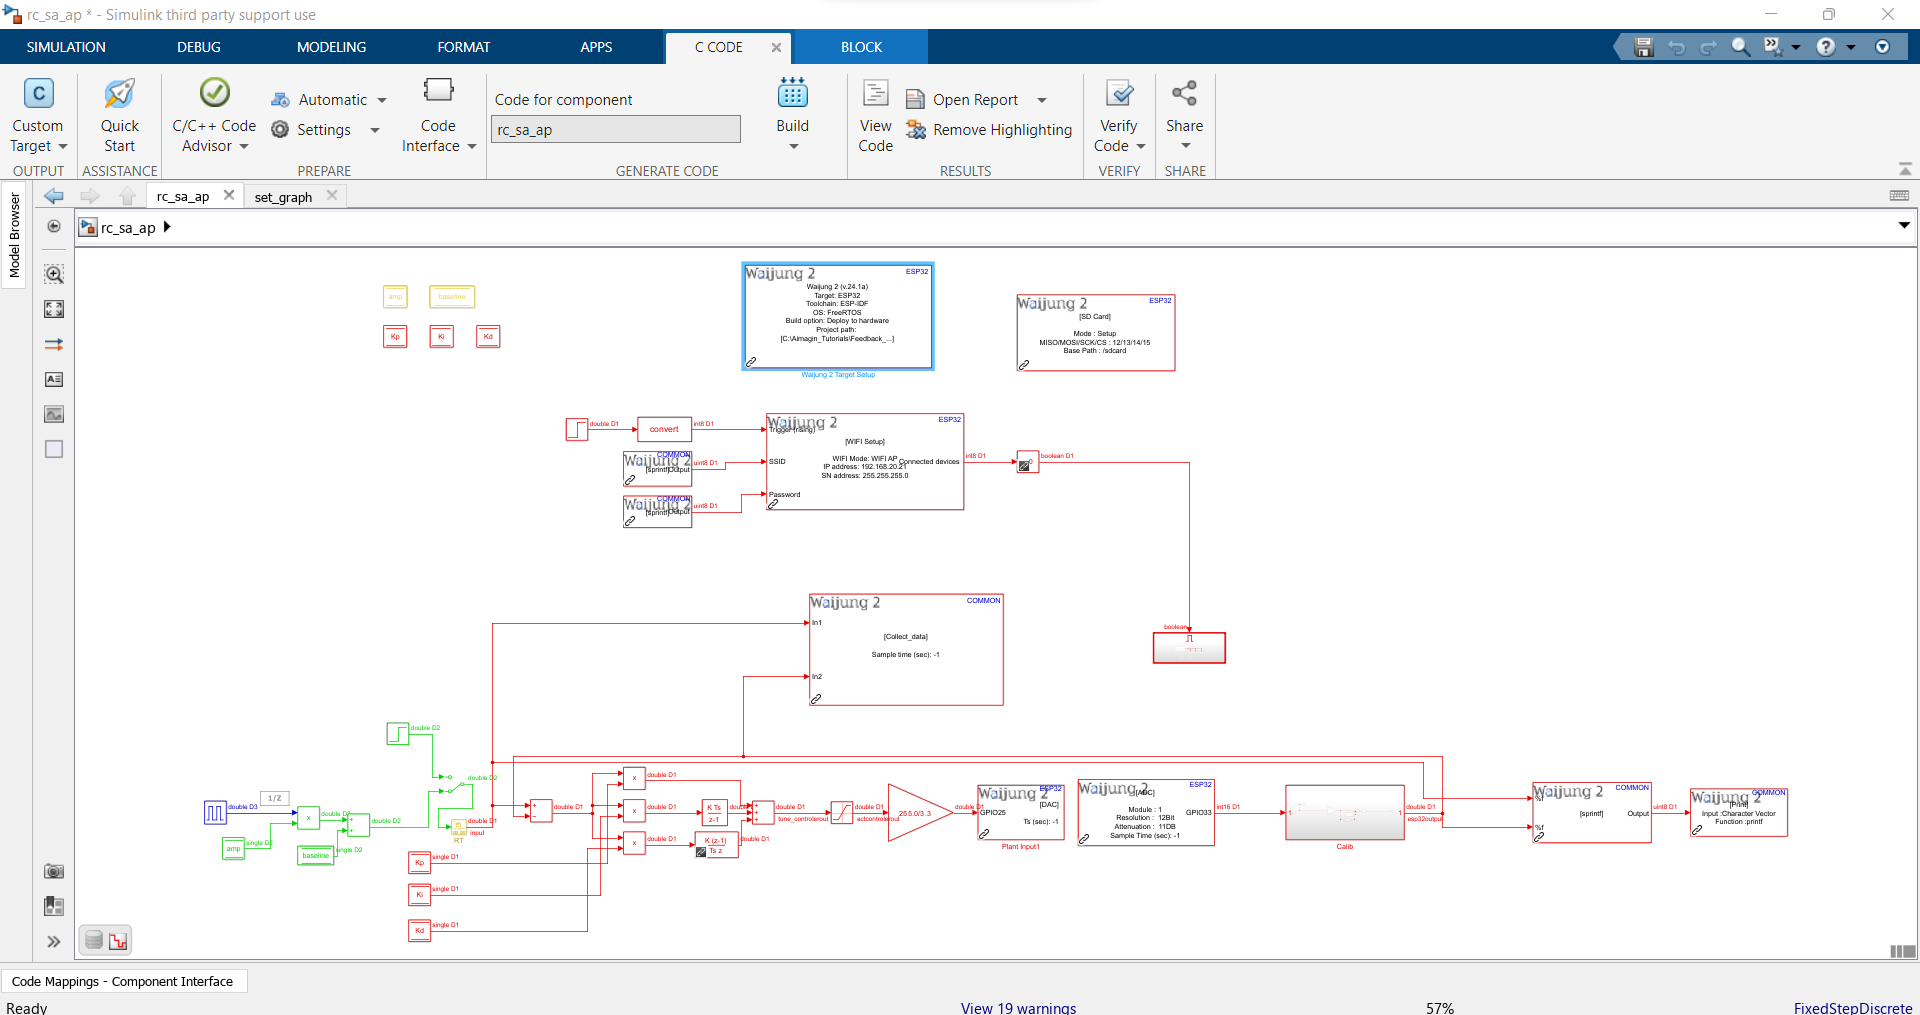
Figure 54: Stand-Alone Simulink Model in WIFI AP Mode
Step 2: Build to the ESP32 and type the ESP32 IP on web browser
1.Extract rc_cc_lib.rar to the working directory to include the custom code.
2.Connect the ESP32 with SD card to computer and set COM port in the Waijung2 Target Setup block.
3.Build the Simulink model to ESP32
4.Connect to the ESP32 WIFI SSID: RC Circuit Password: 123456789.
5.Open web browser and enter the IP address configured in Wifi block.
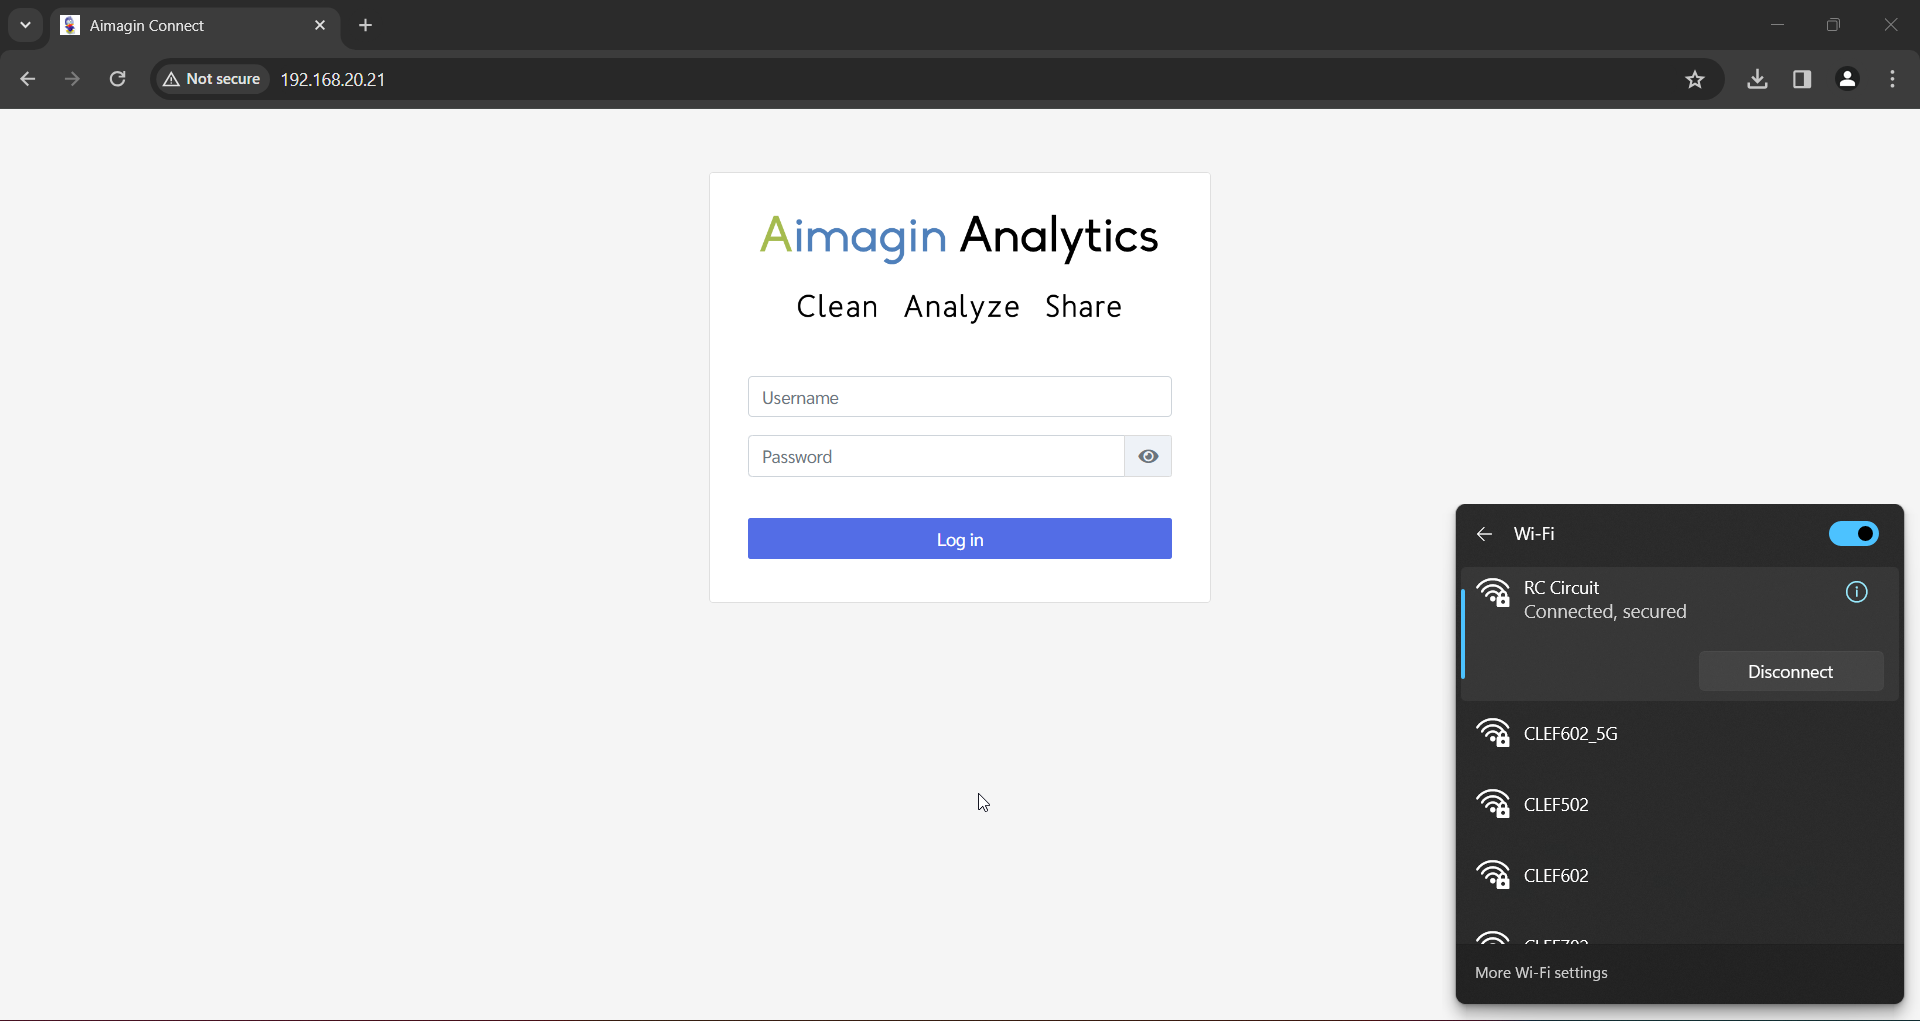
Figure 55: Aimagin Connect Login Screen
Step 3: Log in to your Aimagin Connect account and Select the 'Feedback Control using RC Circuit' app
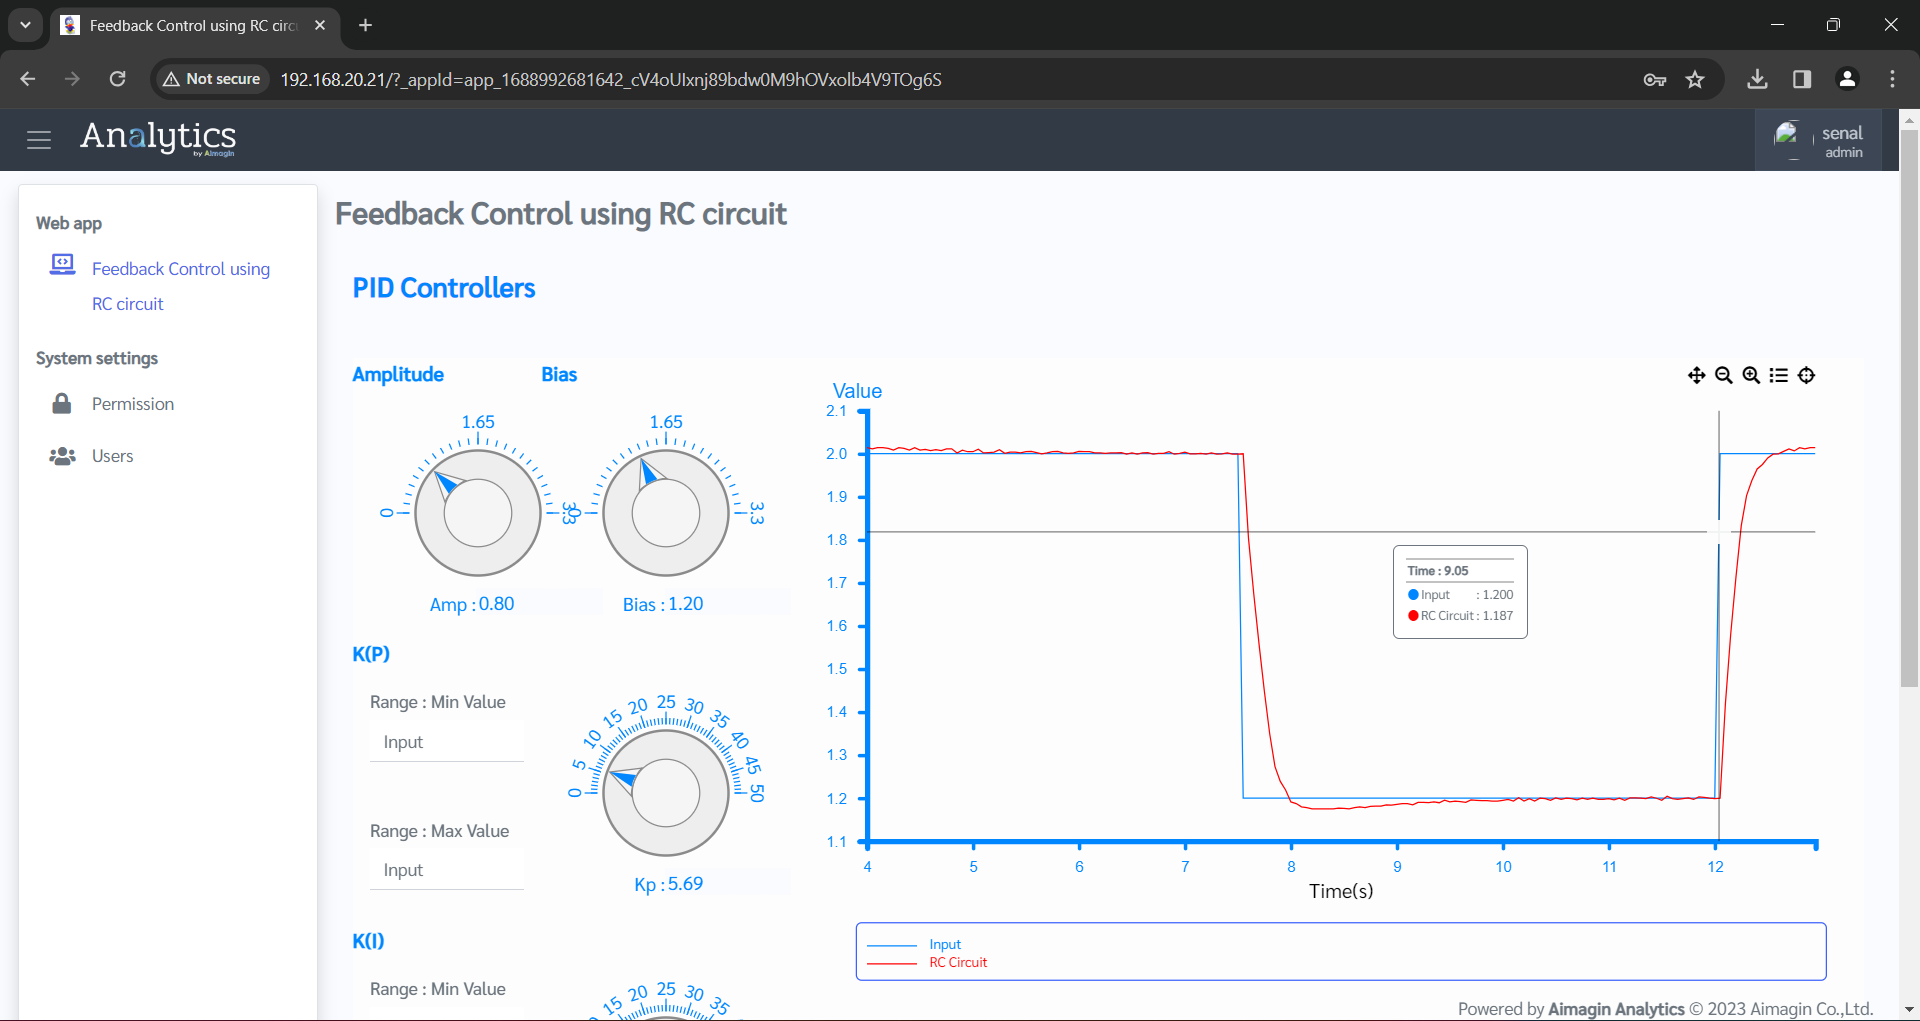
Figure 56: Feedbck Control using RC Circuit Web Page in WIFI AP Mode
Stand alone model with WIFI STA Mode
Step 1: Create the Simulink model
Simulink Model: rc_sa_sta.slx
Use following blocks:
•For Input : Use Pulse Generator
•To get Input from Web page: Use Data Store Write
•To create controller : Product, Data Store Read, Add, Rate Transition, Discrete Derivative, Discrete-Time Integrator
•Waijung 2 blocks : Target Setup,DAC,ADC, Basic Custom Code, WIFI Setup, SD Setup, String Processing, Aimagin Connect, Aimagin Connect Custom mode, Aimagin Connect Read Request, Aimagin Connect Write Request
•For Output : Web page
Reference for Waijung2 ESP32 blockset: Getting started
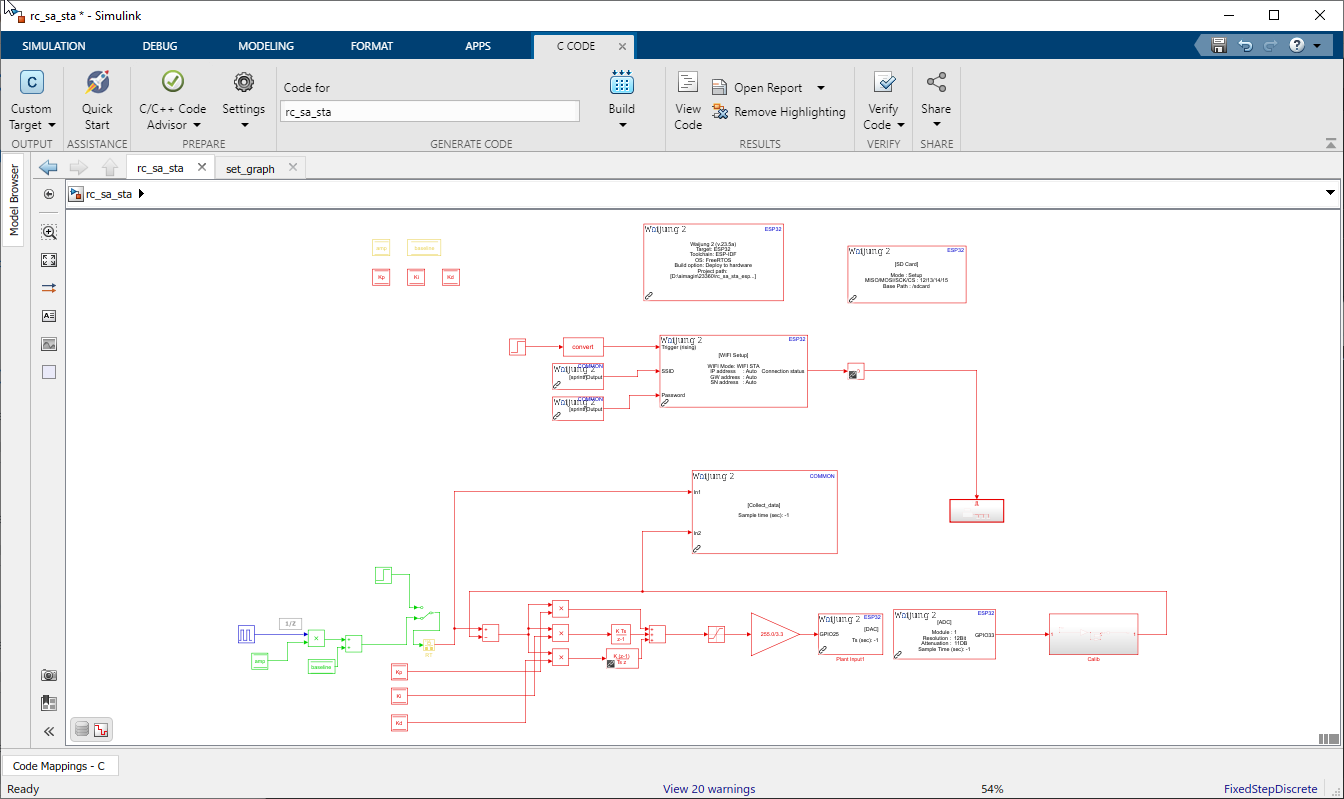
Figure 54: Stand-Alone Simulink Model in WIFI STA Mode
Step 2: Build to the ESP32 and type the ESP32 IP on web browser
1.Extract rc_cc_lib.rar to the working directory to include the custom code.
2.Connect the ESP32 with SD card to computer and set COM port in the Waijung2 Target Setup block.
3.Build the Simulink model to ESP32
4.Connect to the ESP32 COM port using serial monitor software
5.Extract the ESP32 IP address as shown in the following image
6.Open web browser and enter the acquired IP address
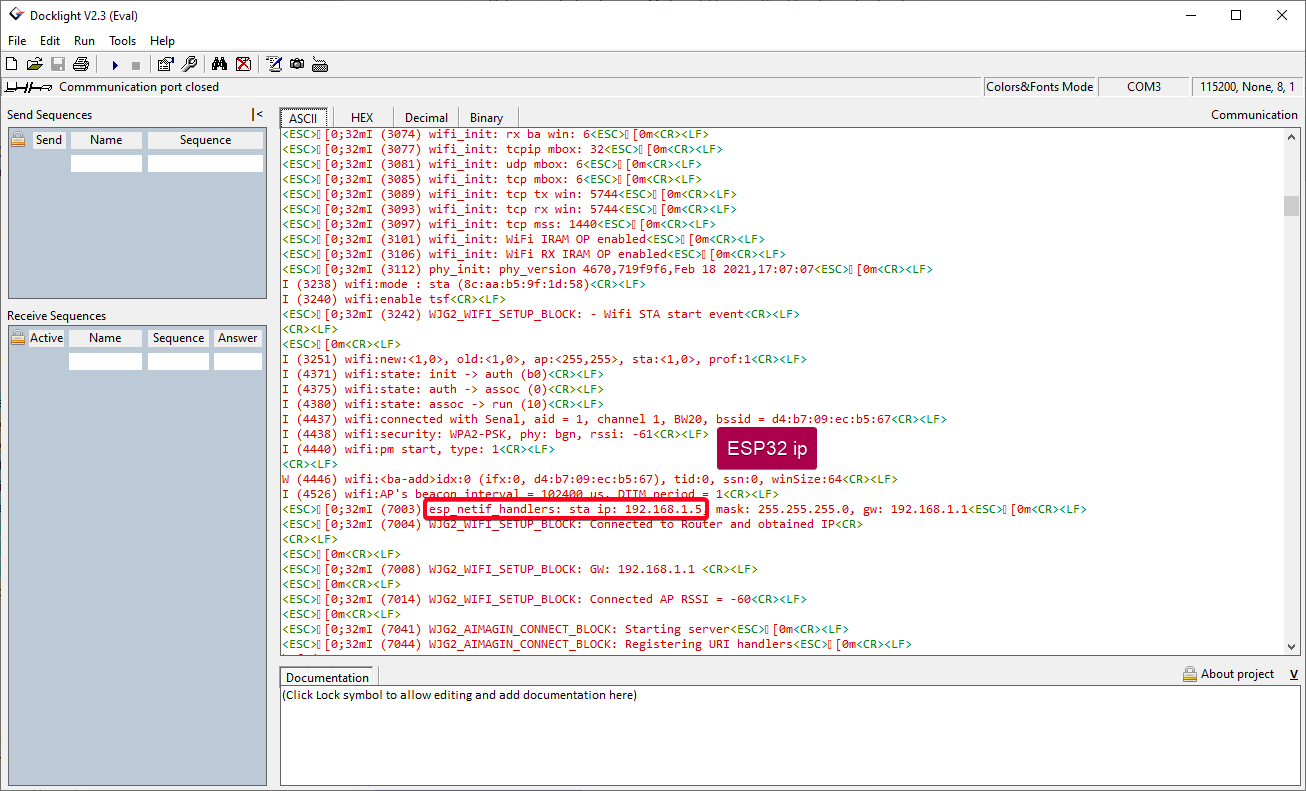
Figure 57: ESP32 IP Address
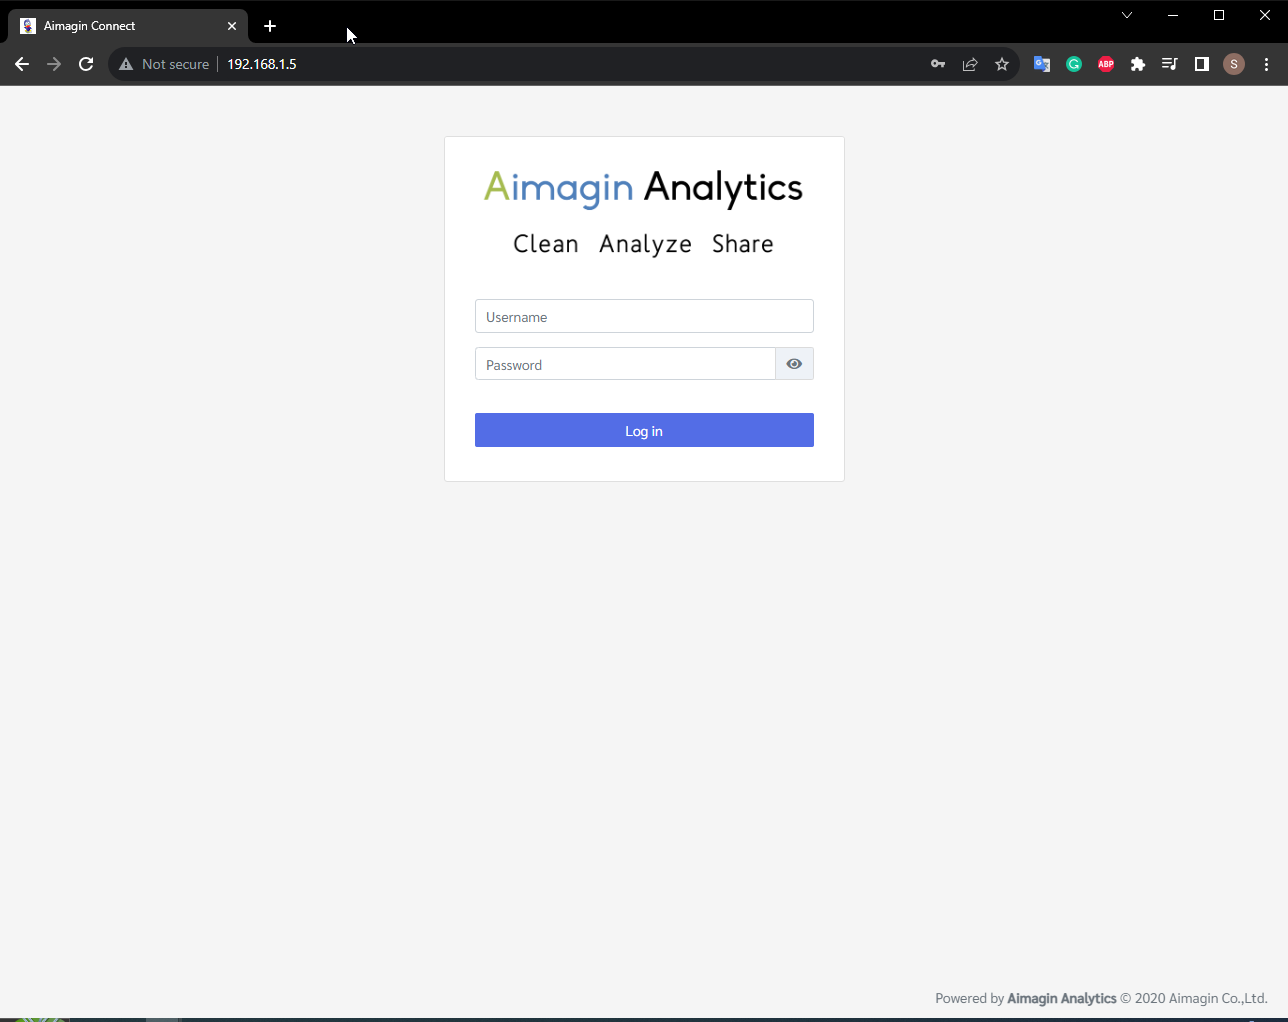
Figure 55: Aimagin Connect Login Screen
Step 3: Log in to your Aimagin Connect account and Select the 'Feedback Control using RC Circuit' app
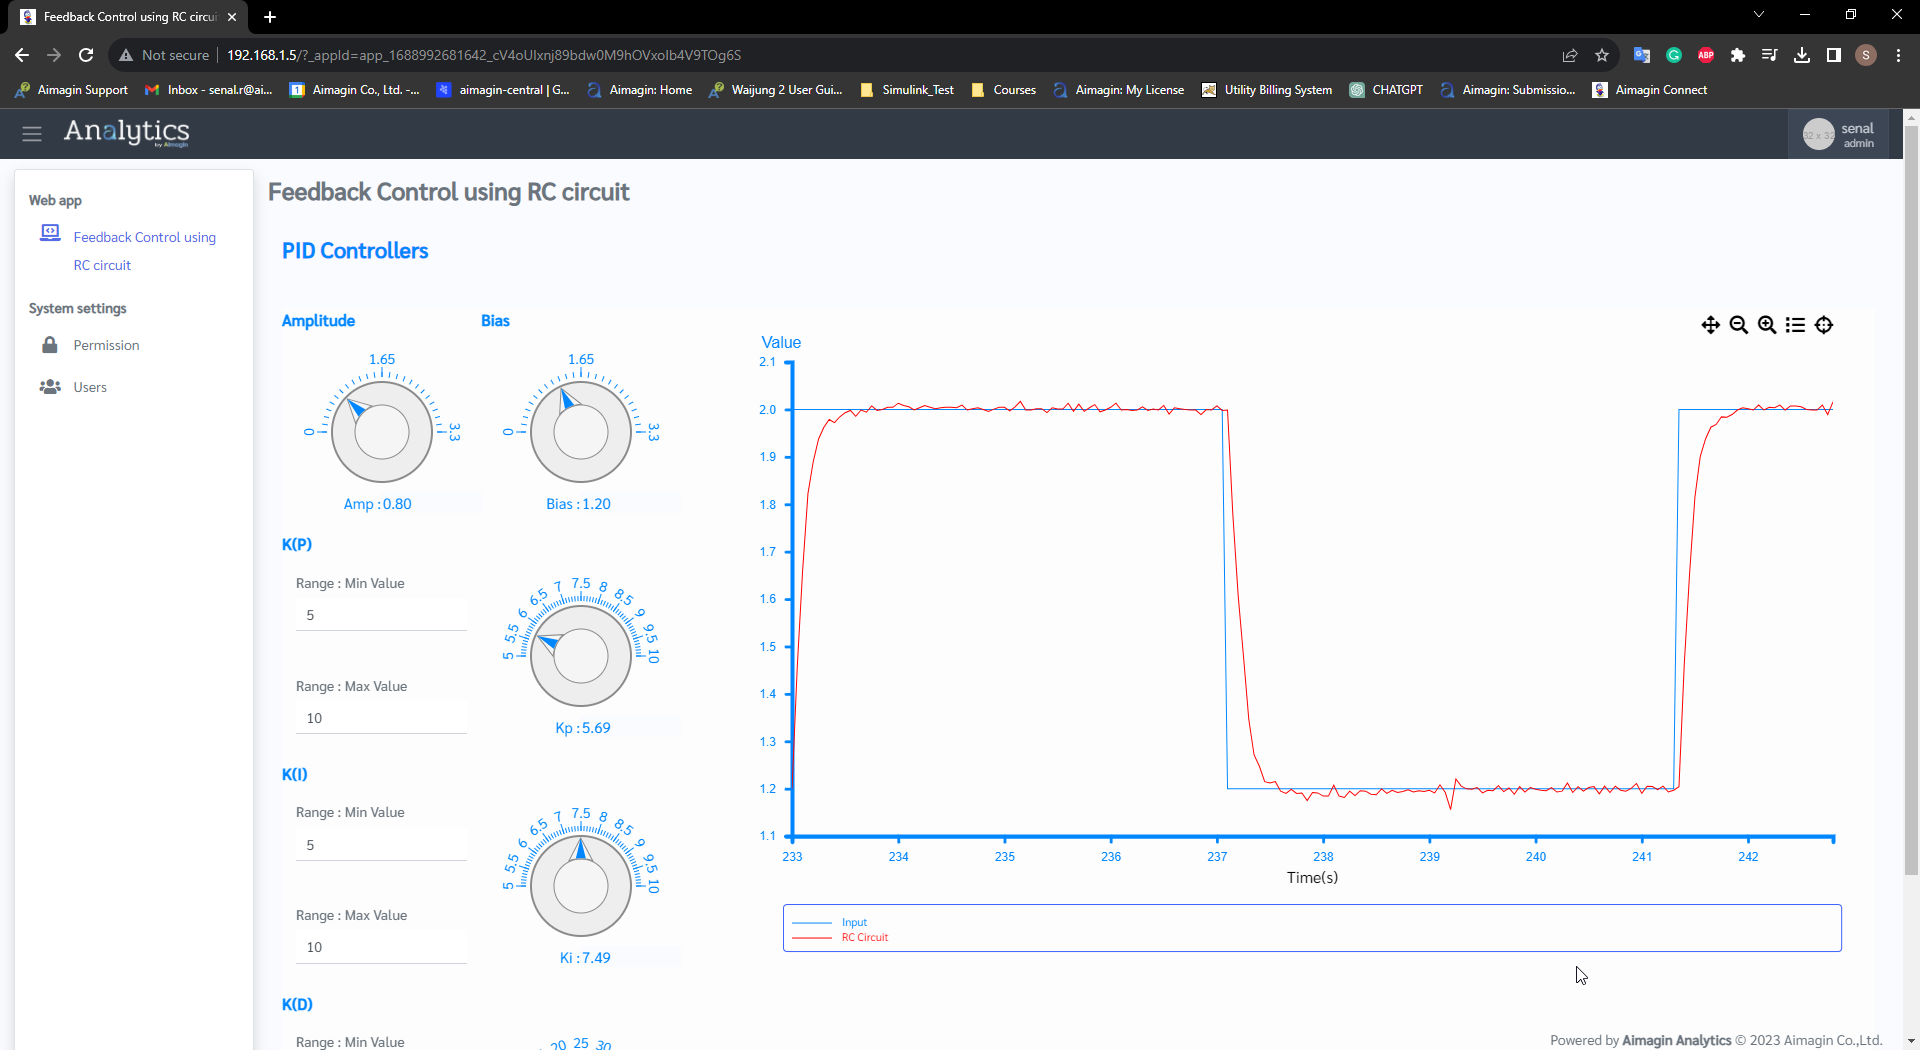
Figure 56: Feedbck Control using RC Circuit Web Page
Stand-alone results with remote control functionality enabled through port forwarding in WIFI STA mode
Step 1: Get a Dynamic Public IP trough you Internet service provider
Requesting placement into a public IP pool from an Internet Service Provider (ISP) is essential to enable external access to a network. Typically, customers are assigned private IP addresses within their local network for security reasons. These private IPs are not accessible from the broader internet, providing a layer of protection against unauthorized access. However, certain scenarios demand remote access to the network, such as for accessing devices or services from external locations. By requesting a public IP, the ISP designates a unique, publicly accessible address for the network, facilitating secure external connections while maintaining internal security.
Regarding public IPs, there are two types: dynamic and static. Dynamic public IPs change periodically, which can complicate remote access since the IP might change, requiring frequent reconfiguration. In contrast, a static public IP remains constant, ensuring consistent remote accessibility. While dynamic IPs are often included in standard ISP packages, static IPs are usually offered as a premium service, requiring an additional fee. The necessity for a static public IP arises from its reliability and stability, ensuring uninterrupted remote access for services like online servers, remote surveillance, or IoT applications.
Step 2: Use Dynamic DNS (DDNS) service and create a hostname
A Dynamic Domain Name System (DDNS) service like No-IP proves advantageous in scenarios involving a dynamic public IP address. Dynamic IPs tend to change periodically, complicating remote access. DDNS resolves this by assigning a fixed domain name to the dynamic IP. This means even when the IP changes, users can still access the network using the domain name.
For remote controlling an RC circuit, DDNS provides a convenient solution. As the dynamic IP changes, users can still connect remotely using the constant domain name associated with the DDNS service. This eliminates the need for frequent reconfiguration or monitoring of IP changes, streamlining remote access and control. With No-IP or similar services, users can ensure seamless and reliable control over the RC circuit regardless of dynamic IP fluctuations.
•Go to https://www.noip.com/
•Create a new account
•Go to "Device Configuration and Assistant" to setup
•Download and install no-ip DUC software and follow the instructions.
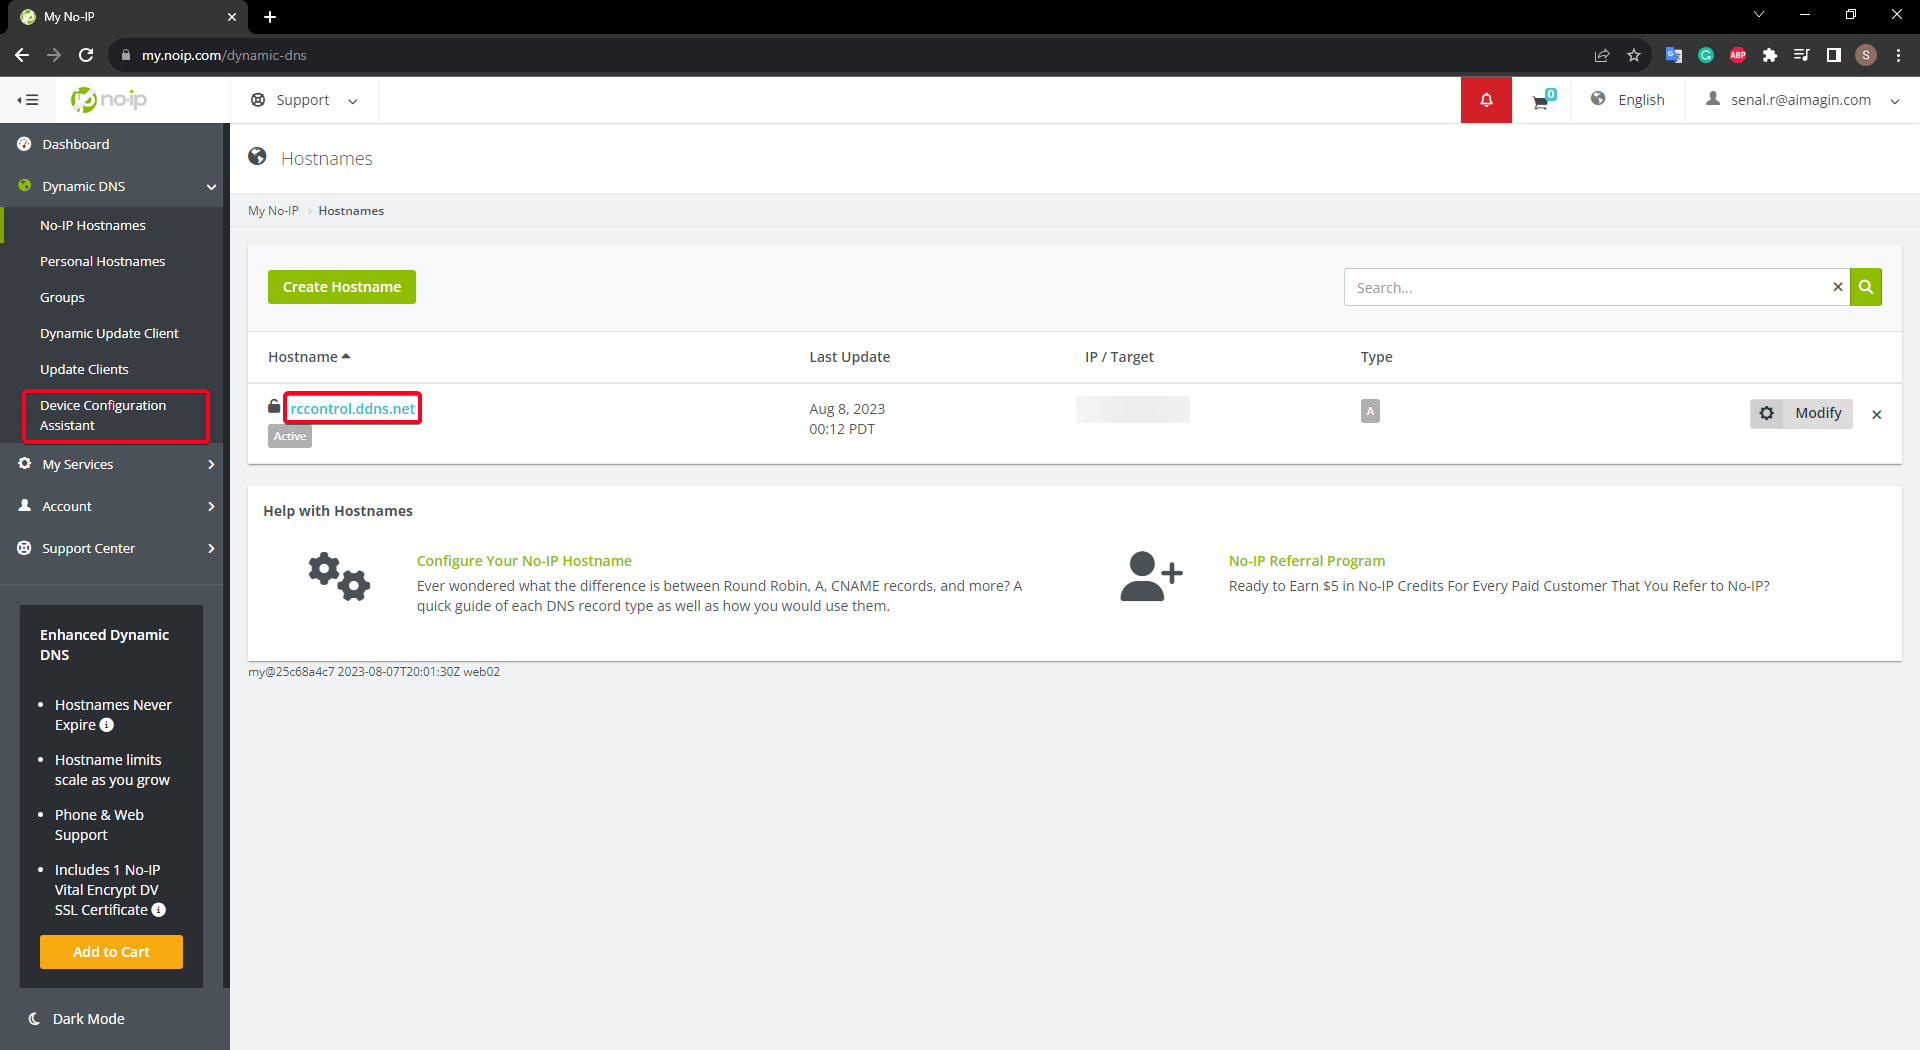
Figure 58: no-ip Device Configration and Assistant
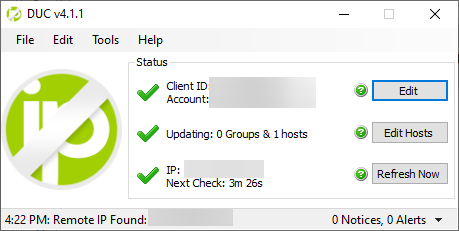
Figure 59: no-ip DUC Software
Step 3: Configure the DDNS and Port Forwarding settings on your router
DDNS Configurations
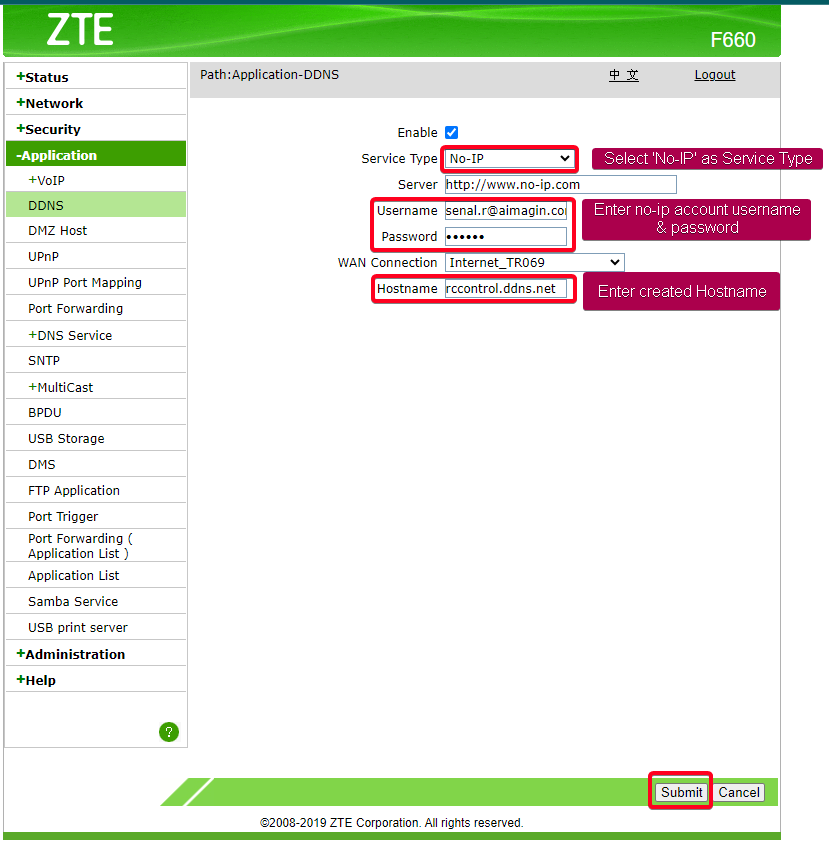
Figure 60: Configure DDNS Settings on the router
Port-Forwarding Configurations
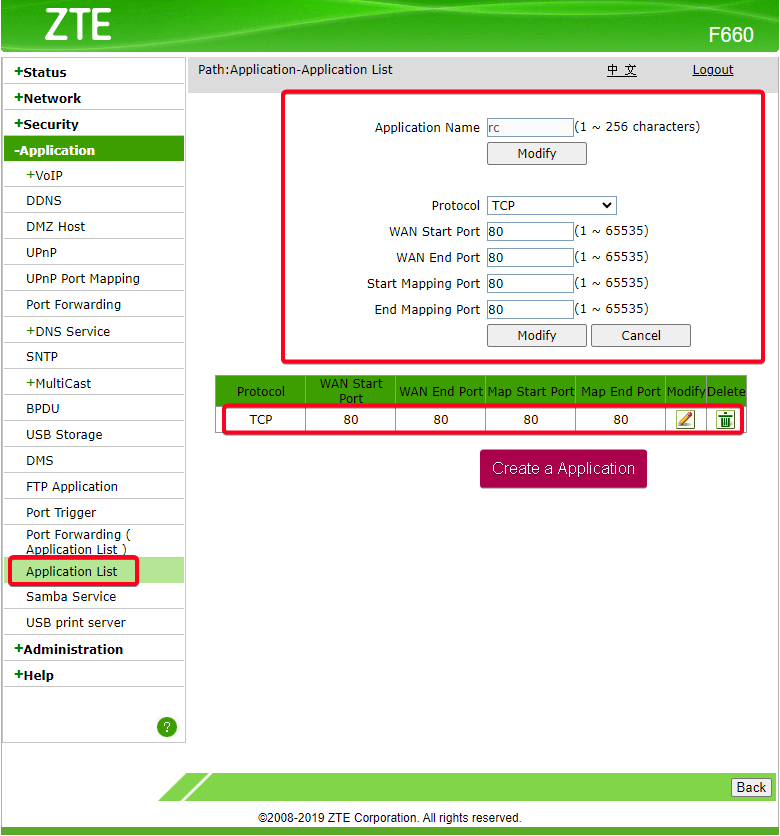
Figure 61: Create application to port forward
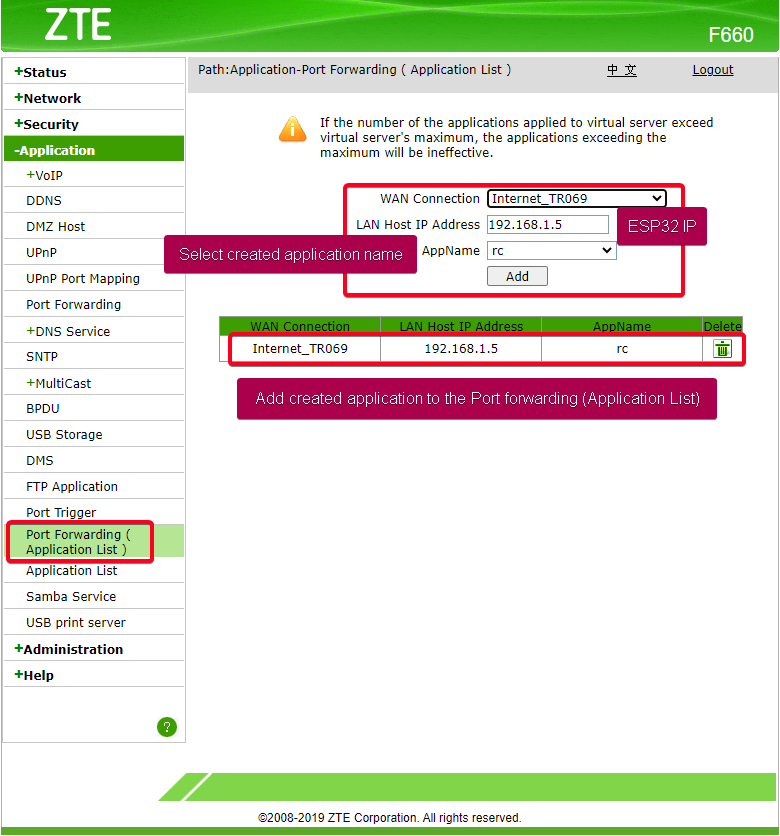
Figure 62: Port Forward Created Application
Step 4: Open web browser and enter the Hostname (rccontrol.ddns.net)
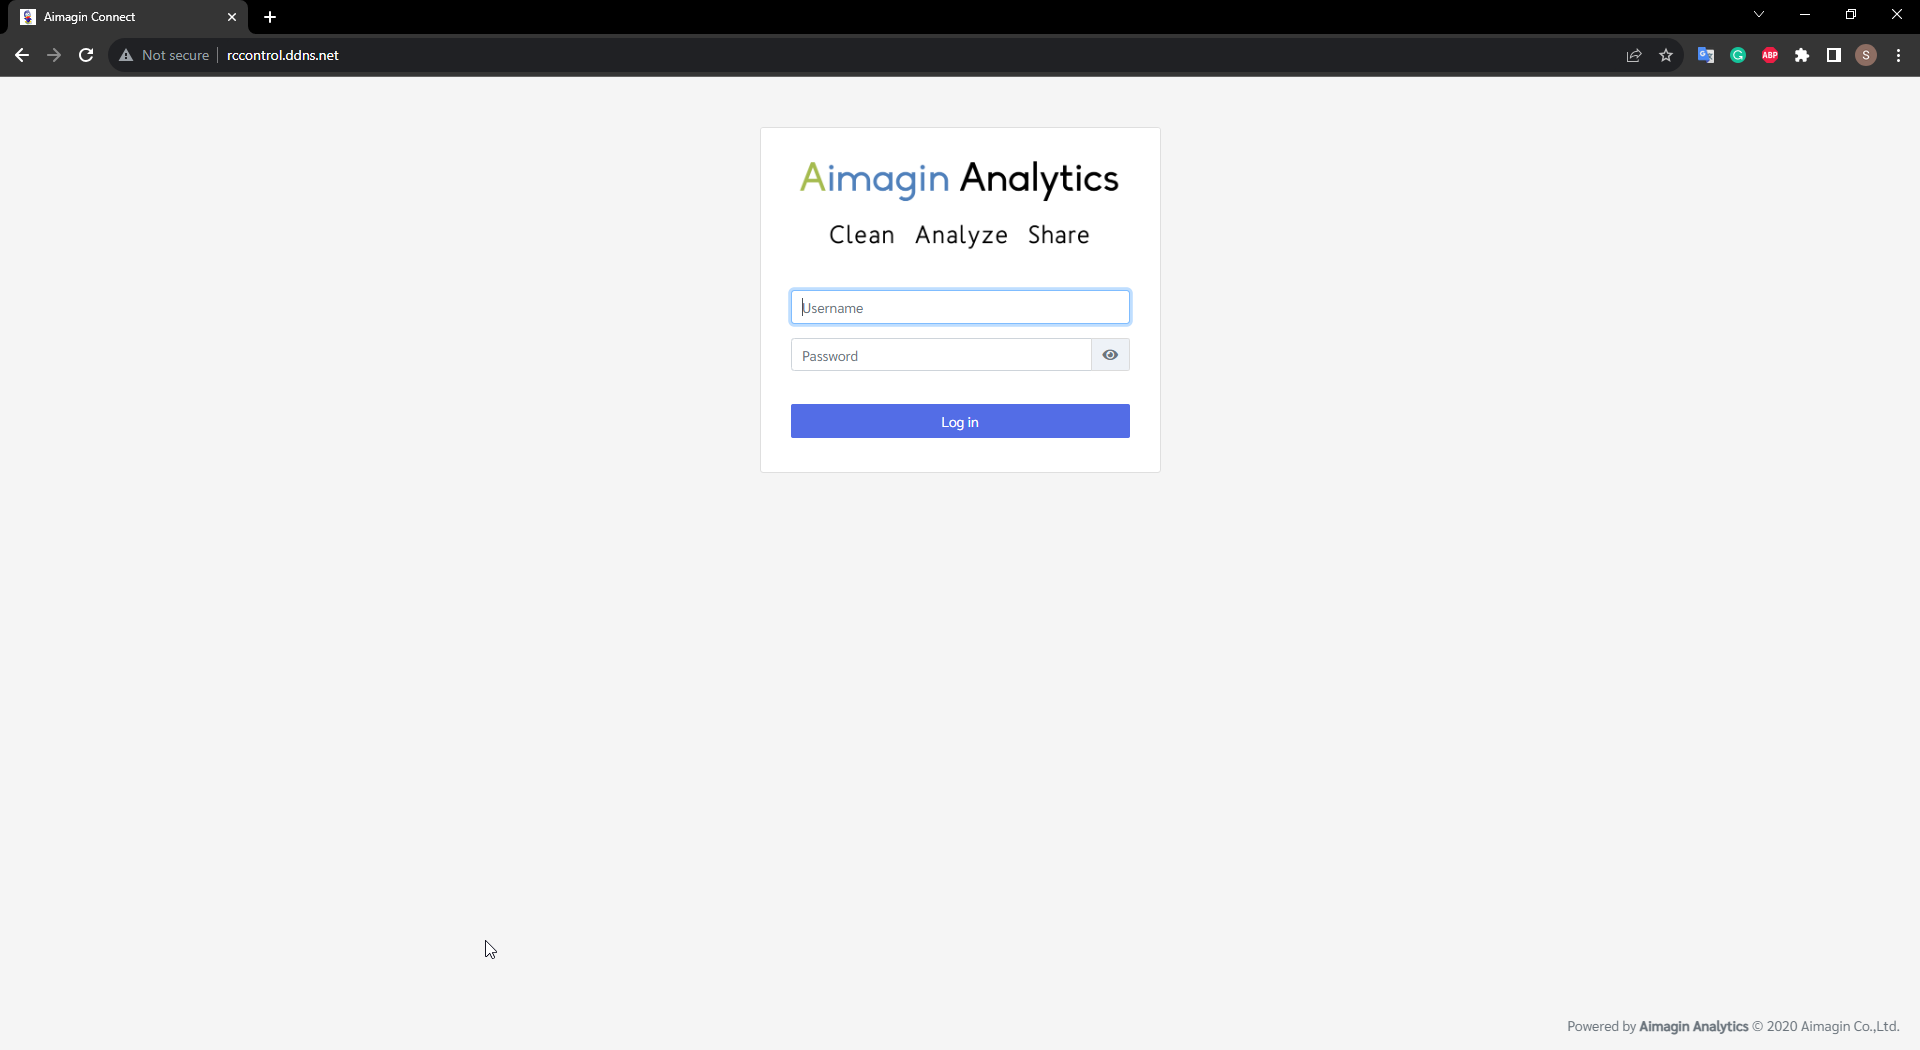
Figure 63: Use created hostname in the web browser
Step 5: Log in to your Aimagin Connect account and Select the 'Feedback Control using RC Circuit' app
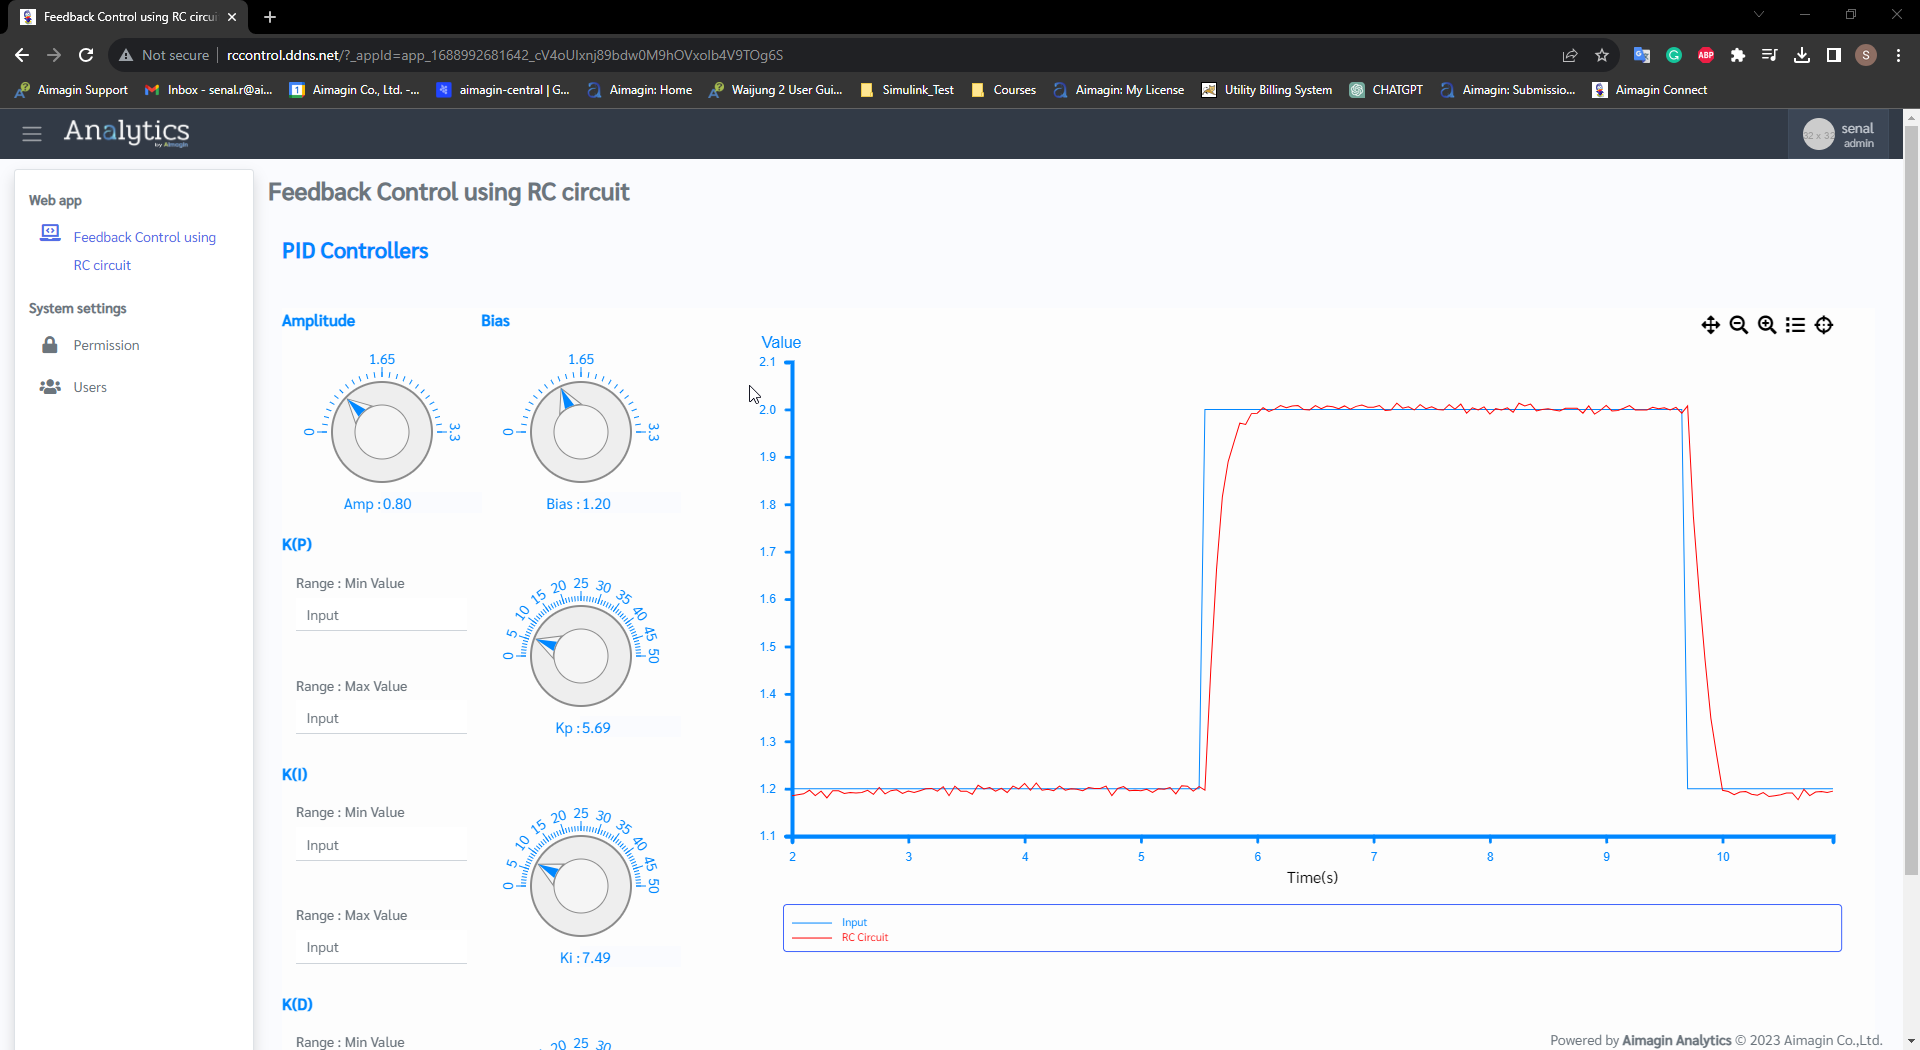
Figure 64: Results of the Stand Alone mode Feedback control using RC circuit
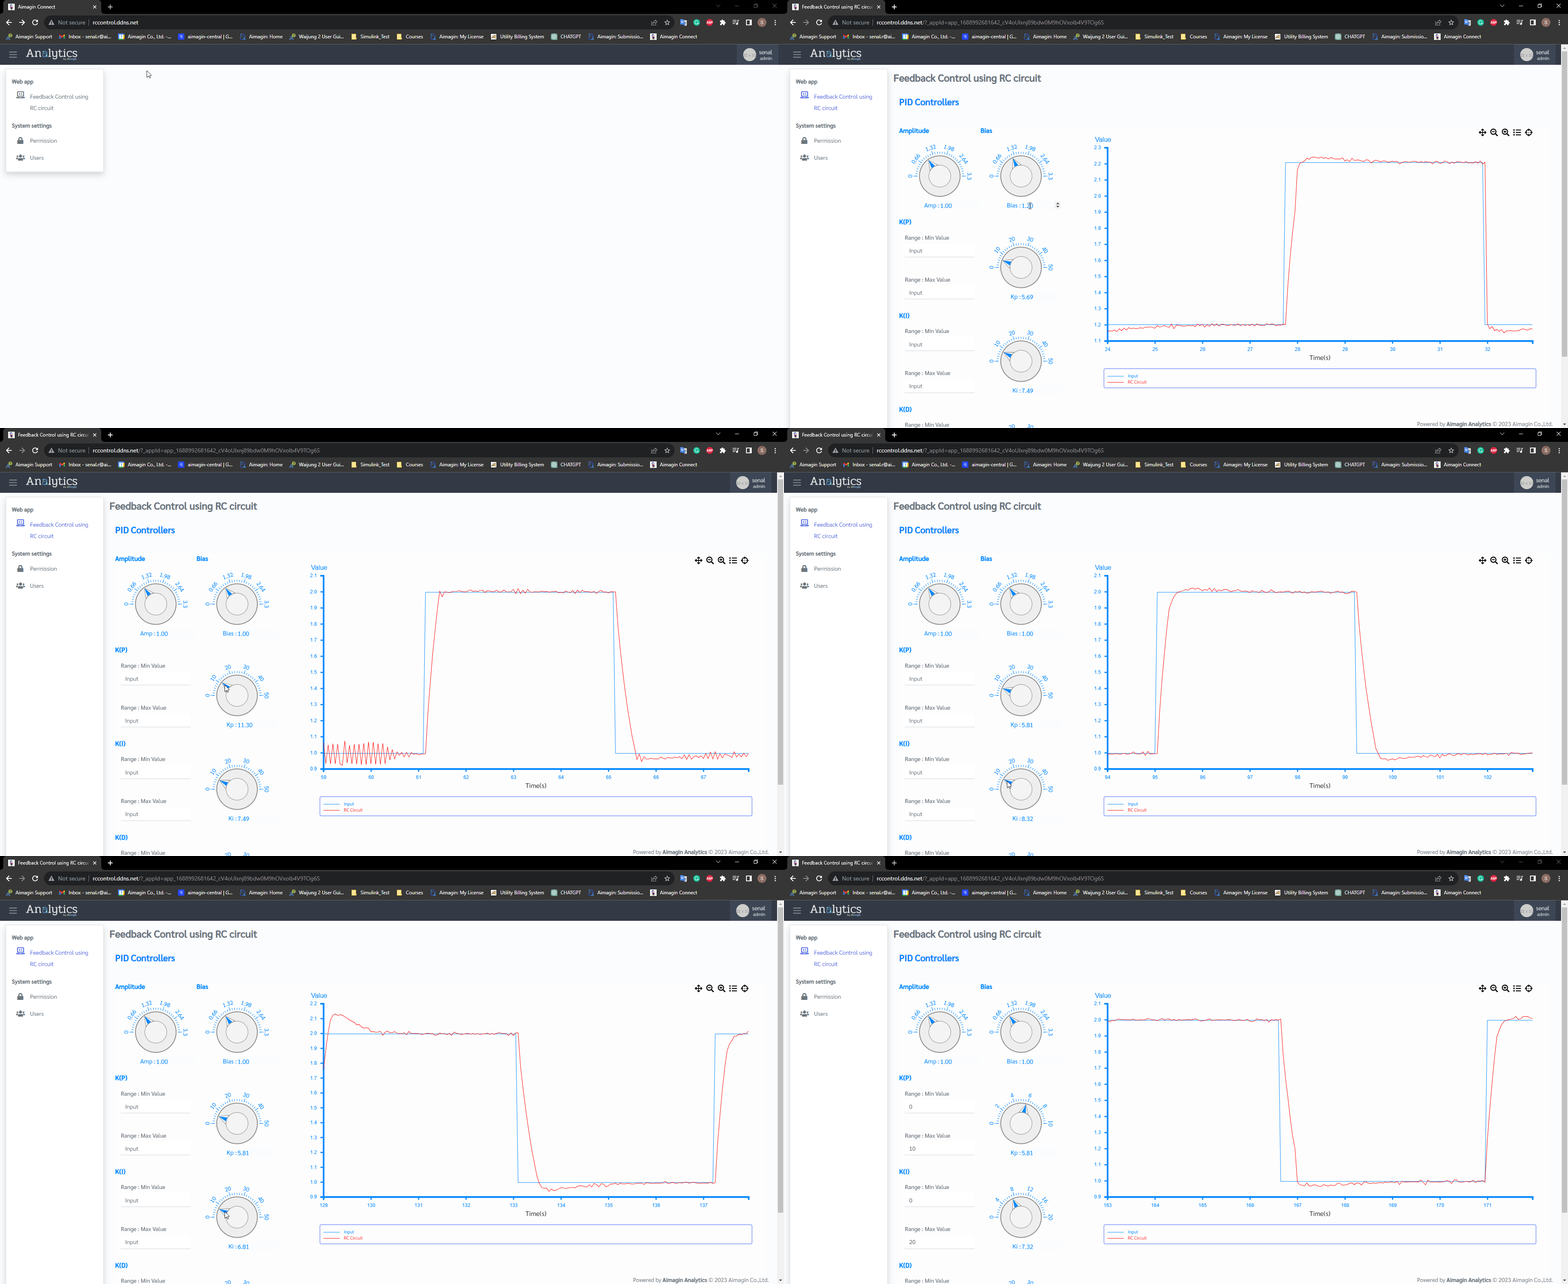
Figure 65: Results of the Stand Alone mode Feedback control using RC circuit (GIF)