Note: The purpose of this document is not to explain every single feature of the alert system. It is to demonstrate the working of the most important features to help you get started.
Alert channels available:
1.Email
2.LINE
3.SMS
Before setting up the alert channels, you need to register the users on the system with details such as email address, phone number, etc who you would like the alerts to be sent to.
1.Go to the gateway’s web interface at 192.168.10.10 after connecting to the gateway’s access point.
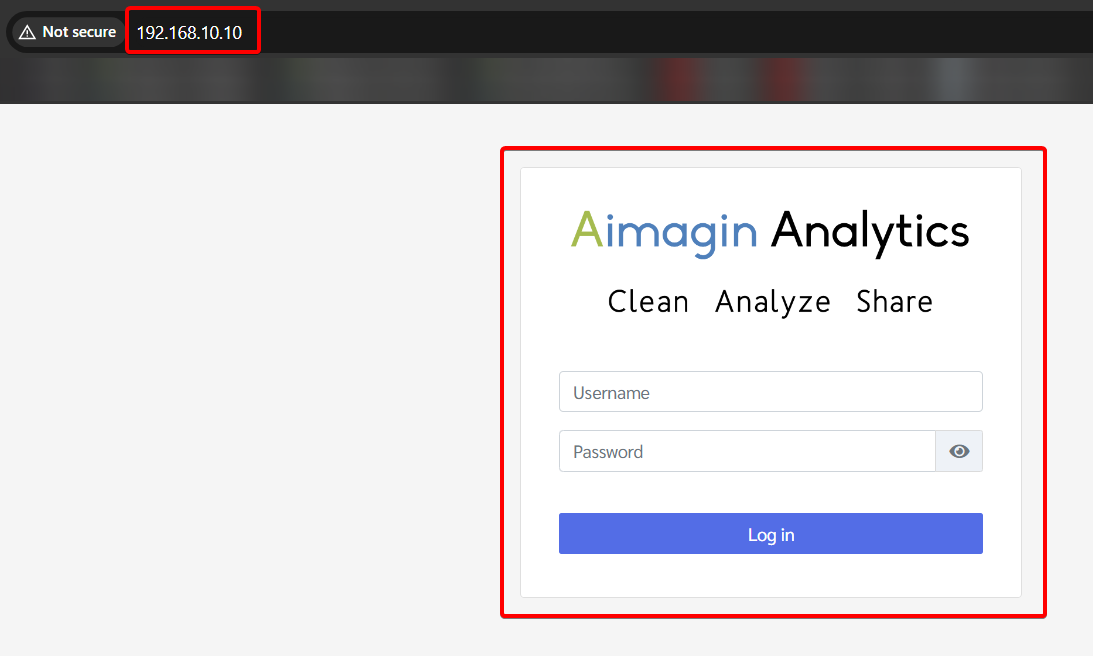
2.Log in [default username: admin, default password: 1234]
3.You will be forced to change the password upon first login for higher security.
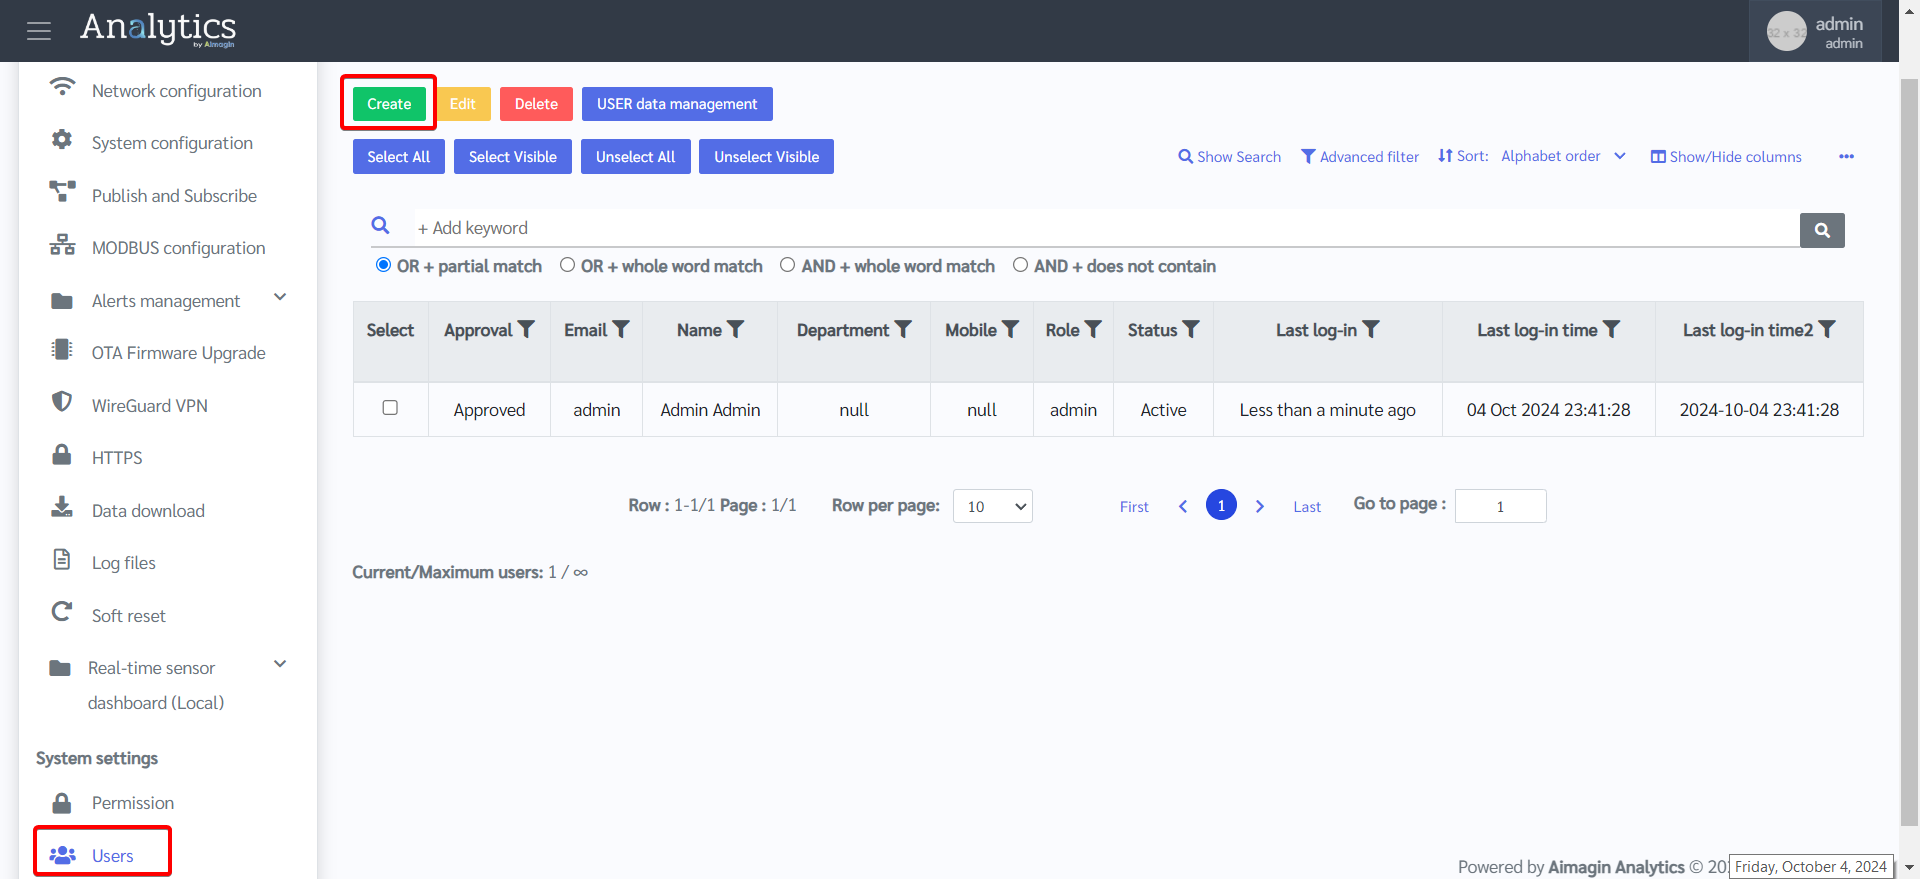
4.Create a new user under System settings > Users
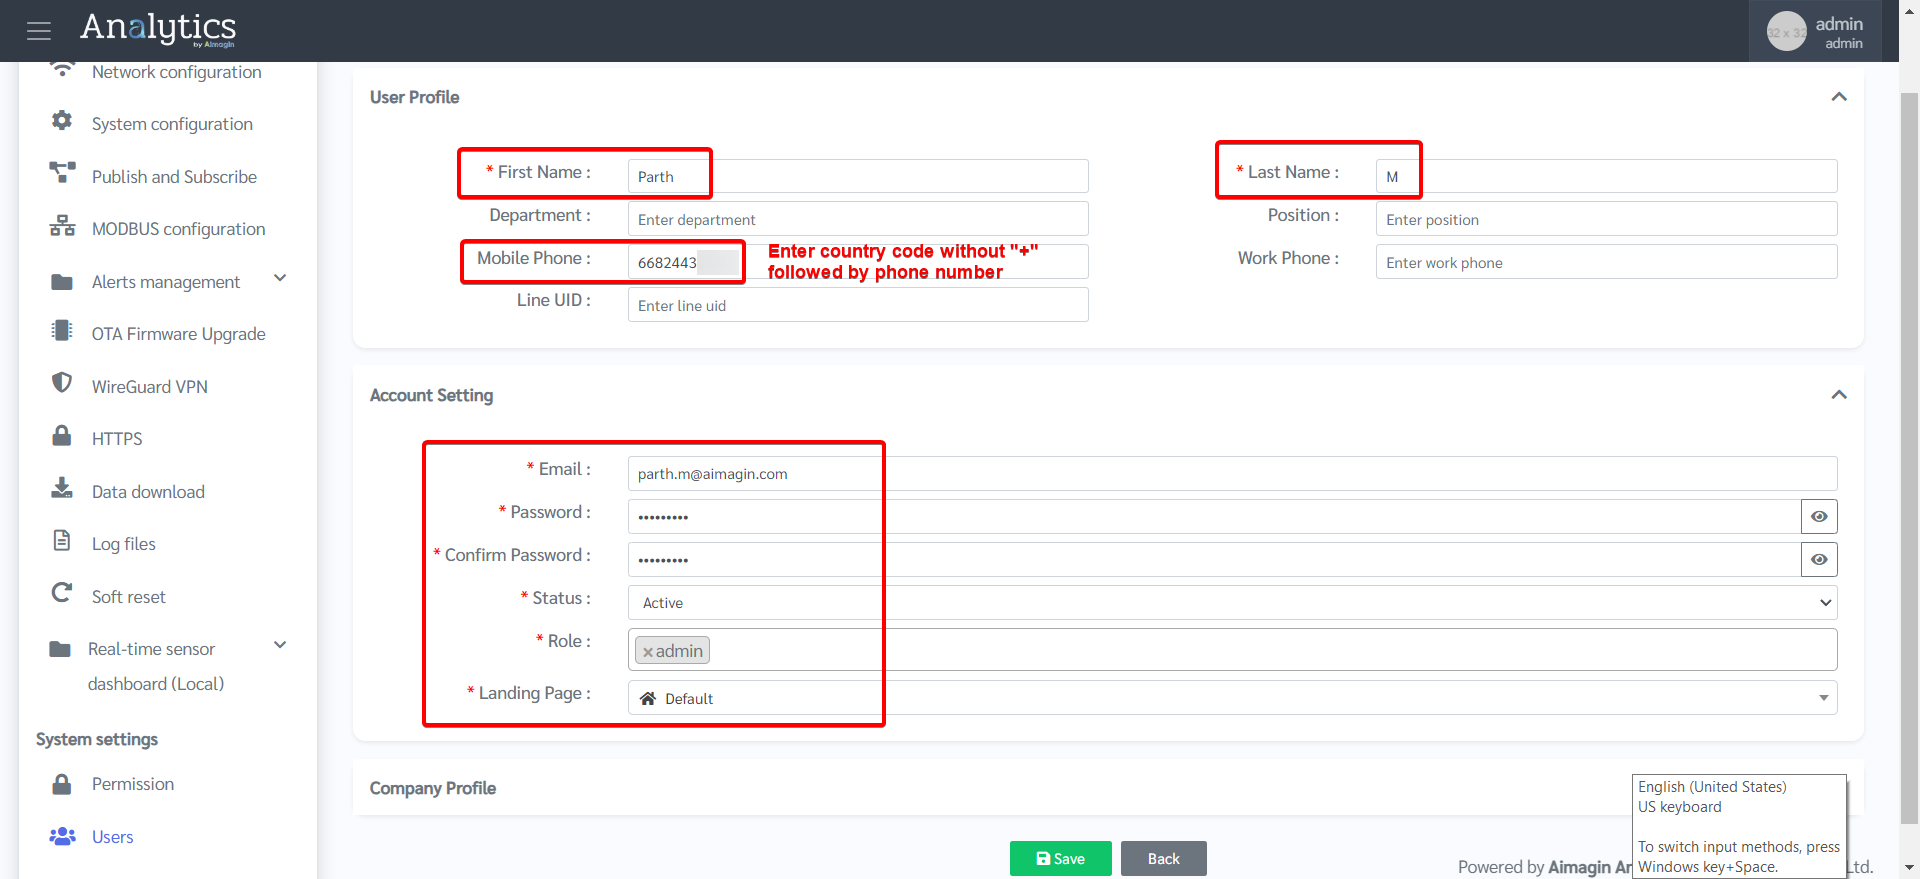
5.Add personal details so you can receive email, LINE and SMS alerts. Leave "Line UID" empty for now. We will show you how to generate it later on in this document. Can select role to be "admin" (especially if you are registering yourself). Remember, all registered users can access your device locally or remotely (via VPN) once they are given their username and password. They will then be able to configure the device via the webapps without restrictions if they are given the "admin" role. The role will determine whether the registered user has partial access or full access to the device. Roles and permissions details can be edited under System settings > Permission.
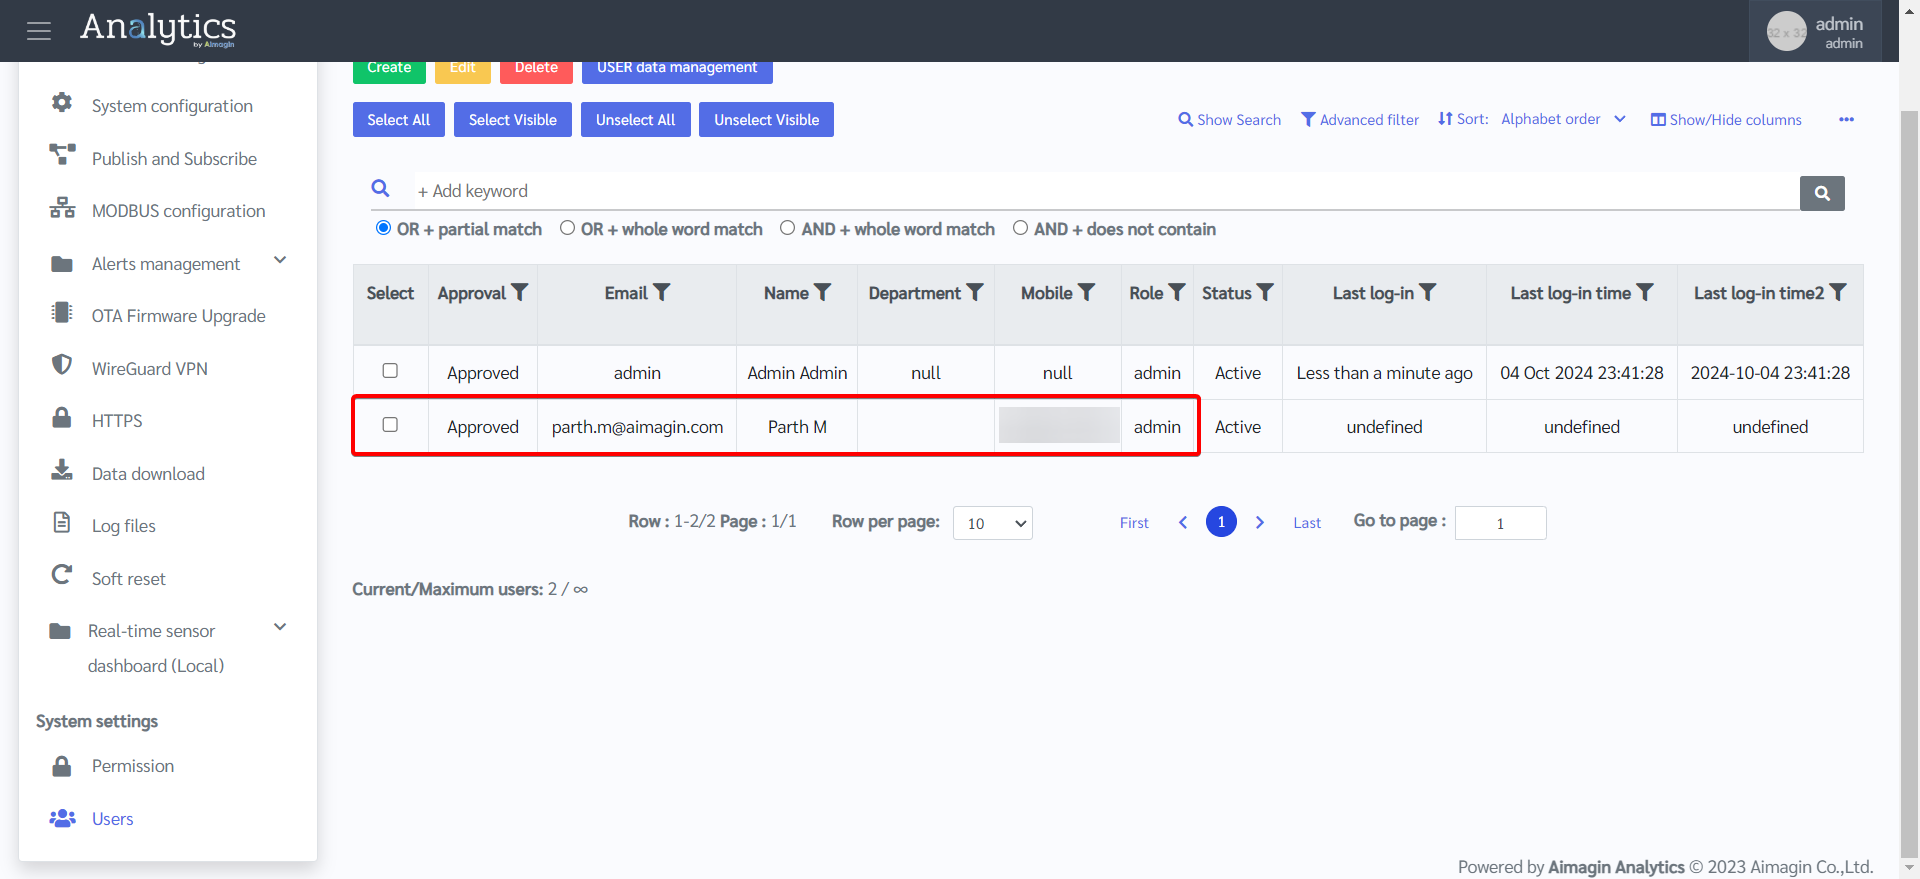
6.Save. You will see the registered user in the table.
Setting up email alerts
Part 1: Creating a SMTP server
You will need to create a SMTP server account. For that, we highly recommend creating a new Gmail account and using Gmail’s SMTP server to send the emails. Do not use your main personal email to send emails via the gateway. If something goes wrong in the code or if you make too many requests by mistake, you can be banned or have your account temporarily disabled.
Once the account is created, you need to create an app password so that the gateway can send emails using your Gmail account. An app password can only be used with accounts that have 2-step verification turned on.
After enabling 2-step verification, you can create an app password.
1.Open your Google Account. Please make sure you are signed in to the new account you just created.
2.In the navigation panel, select Security.
3.Under “How you sign in to Google” select App Passwords.
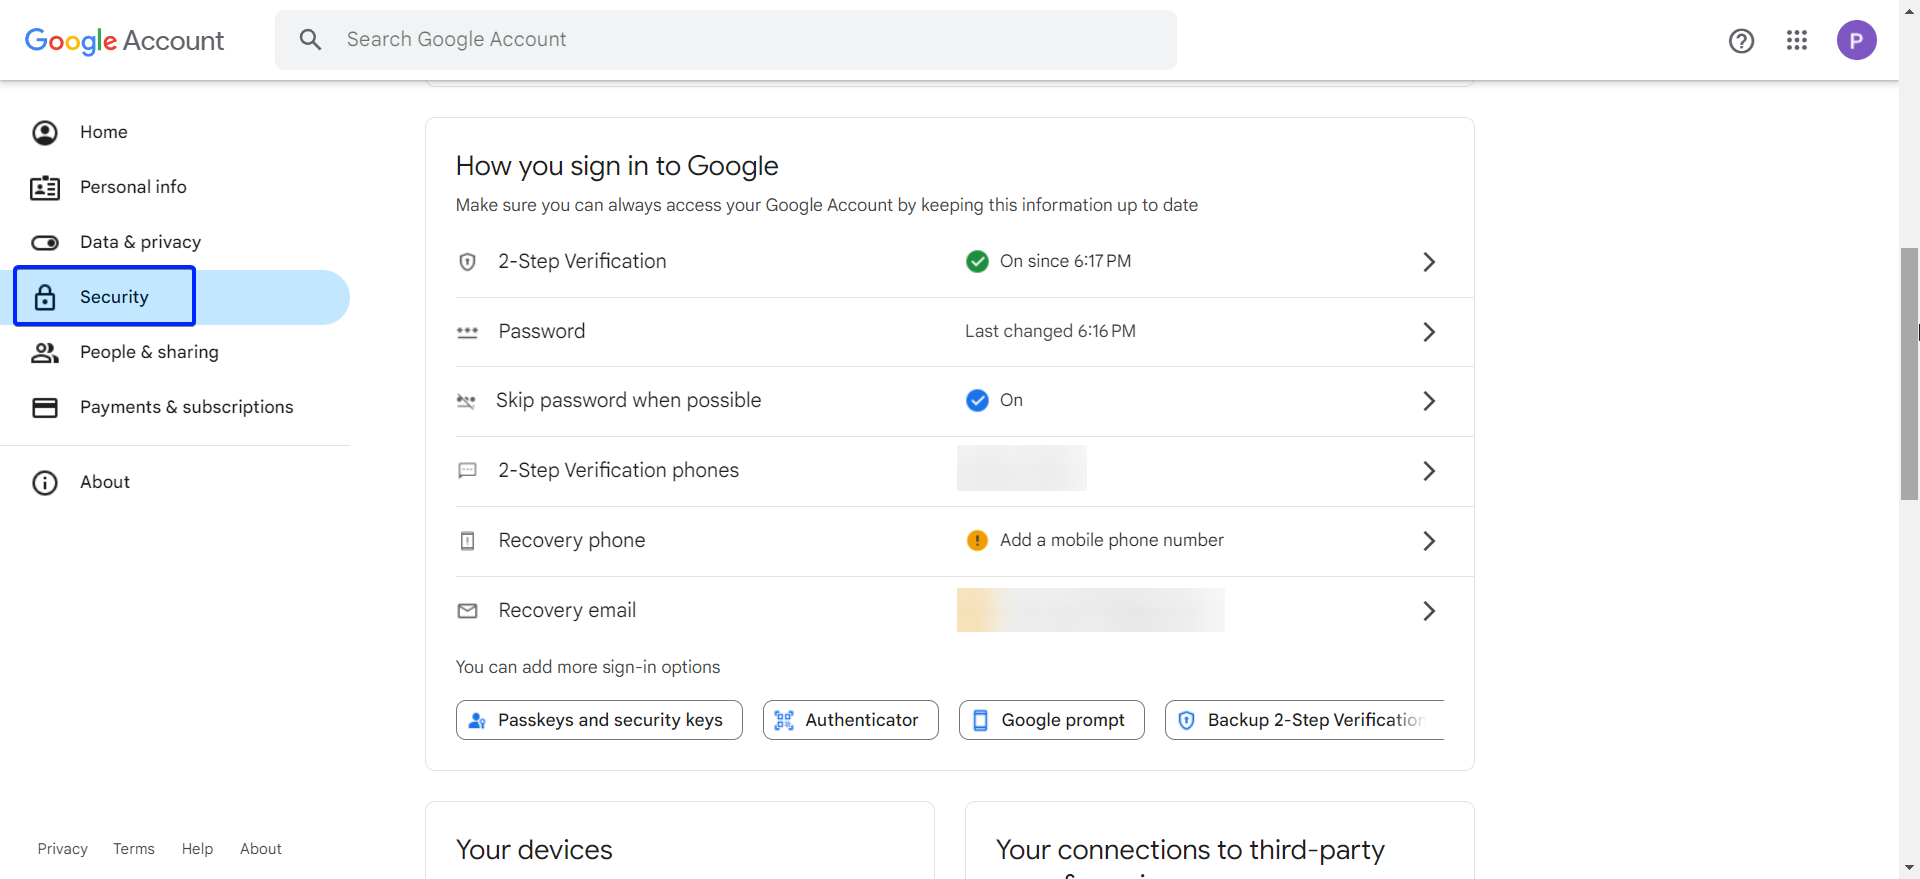
4.If you cannot find “App Passwords” in the list search for it.
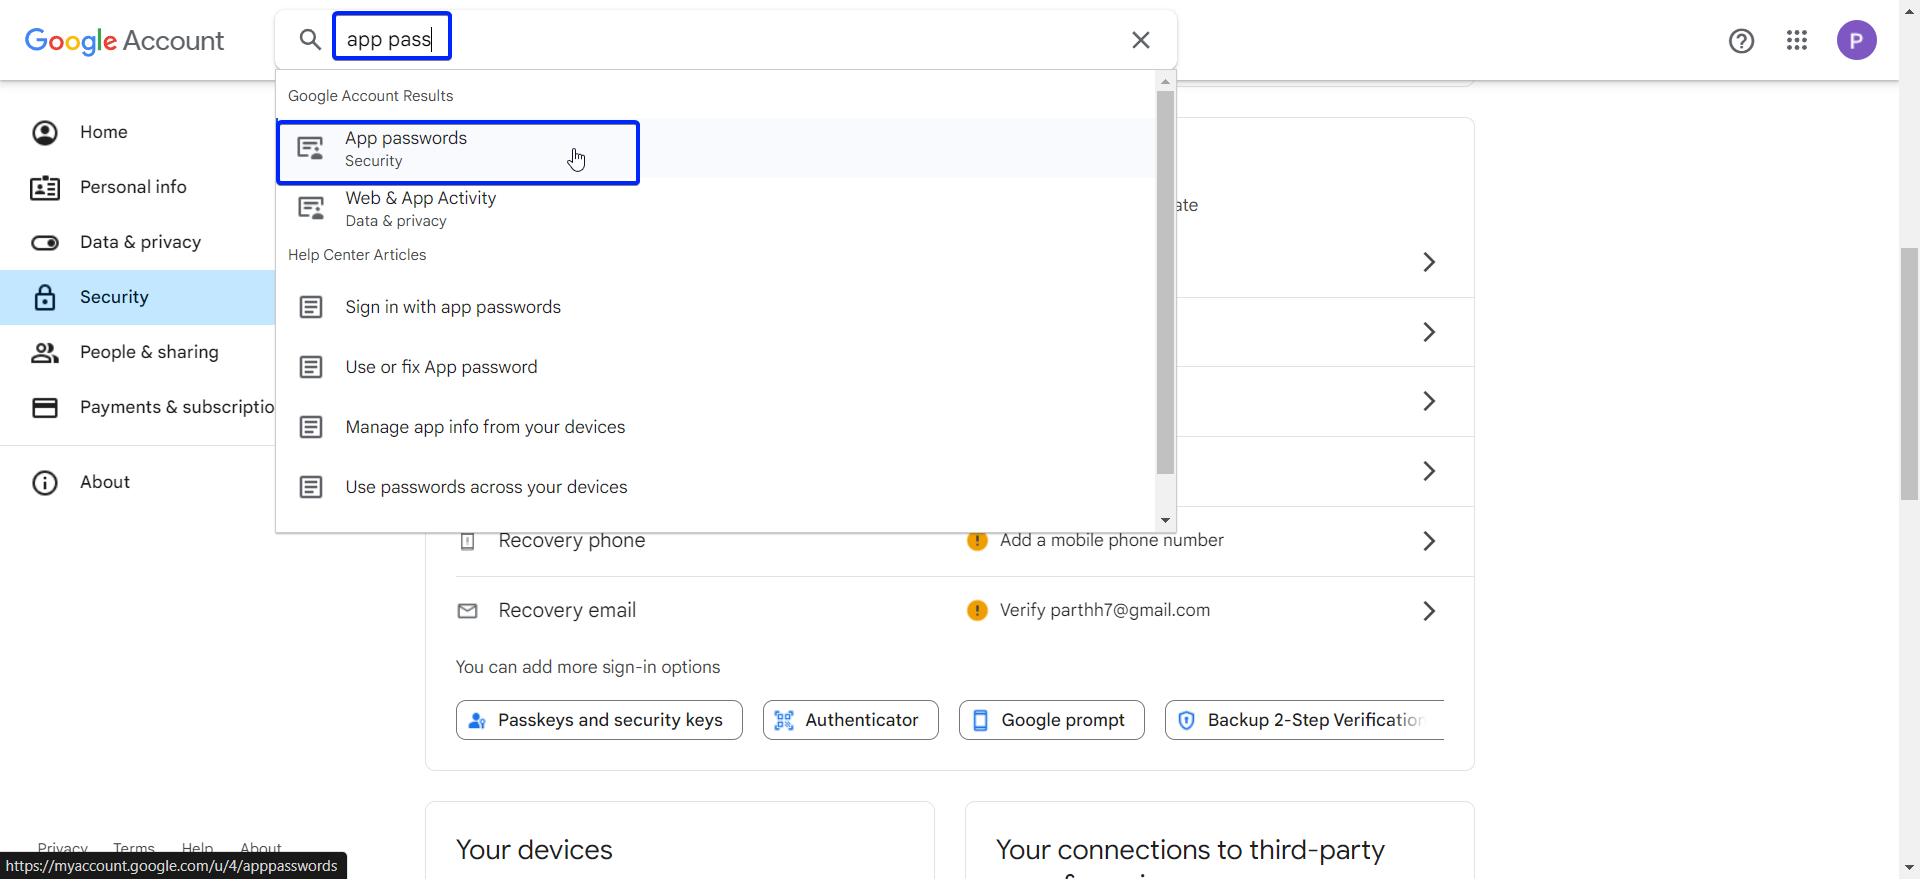
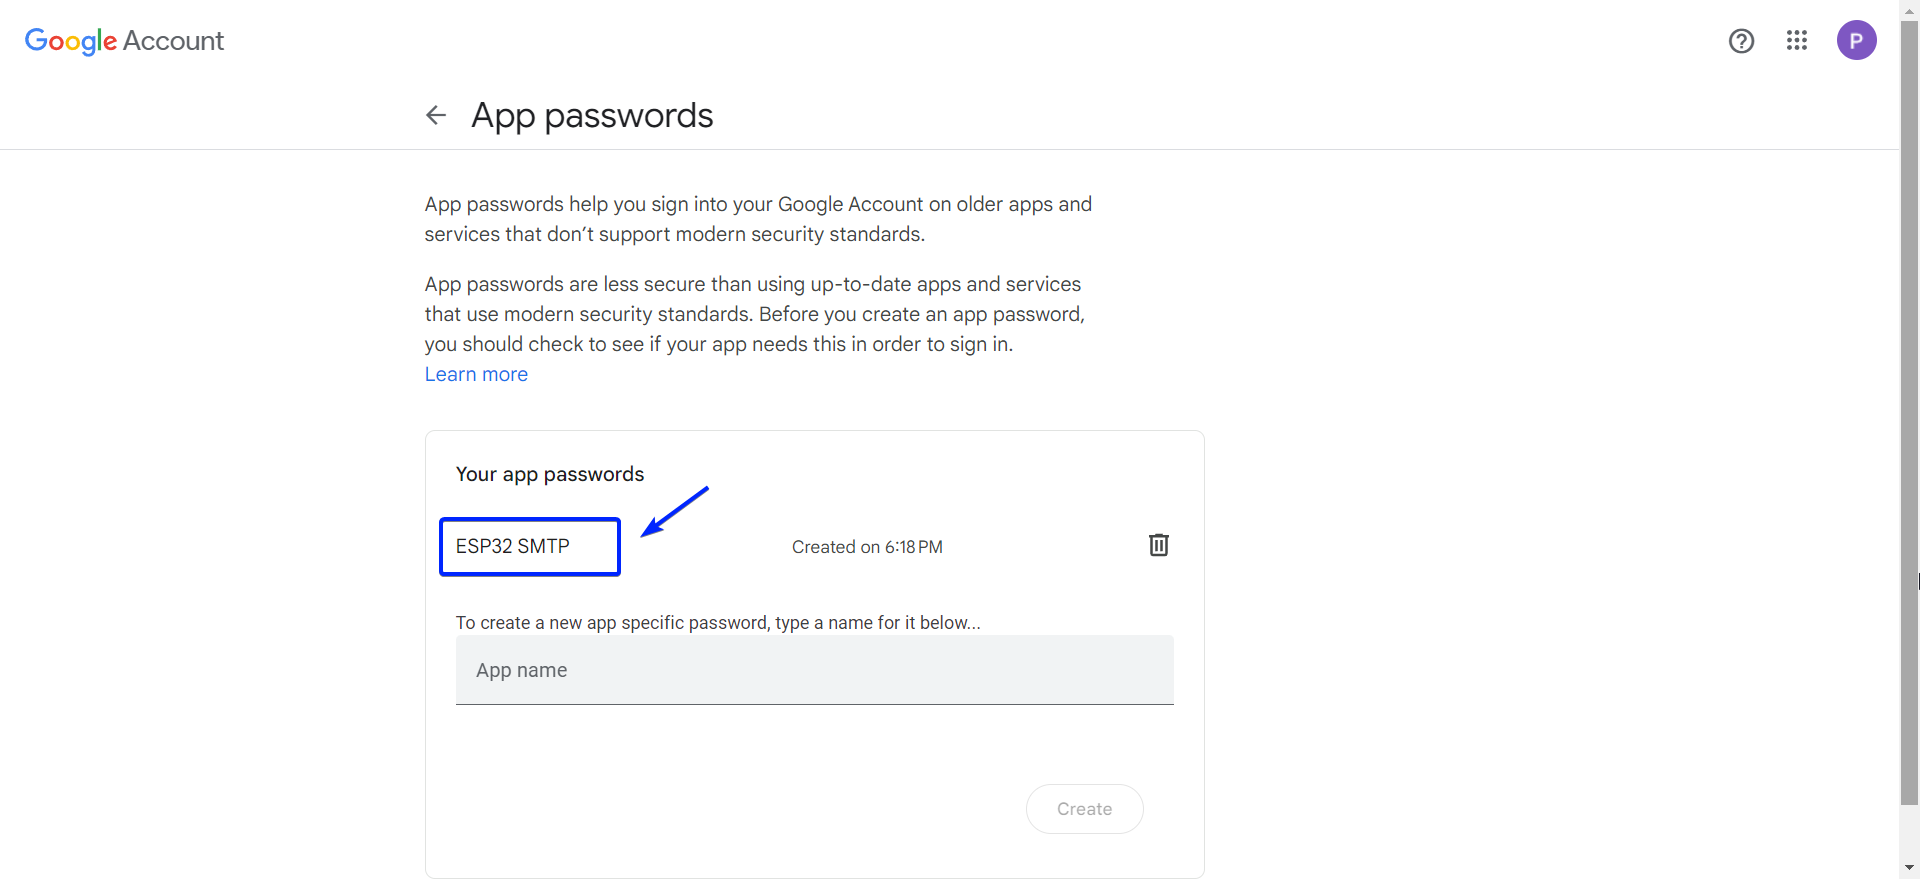
5.Give an App name and click “Create.”
6.Save the 16-digit password, you will need it later.
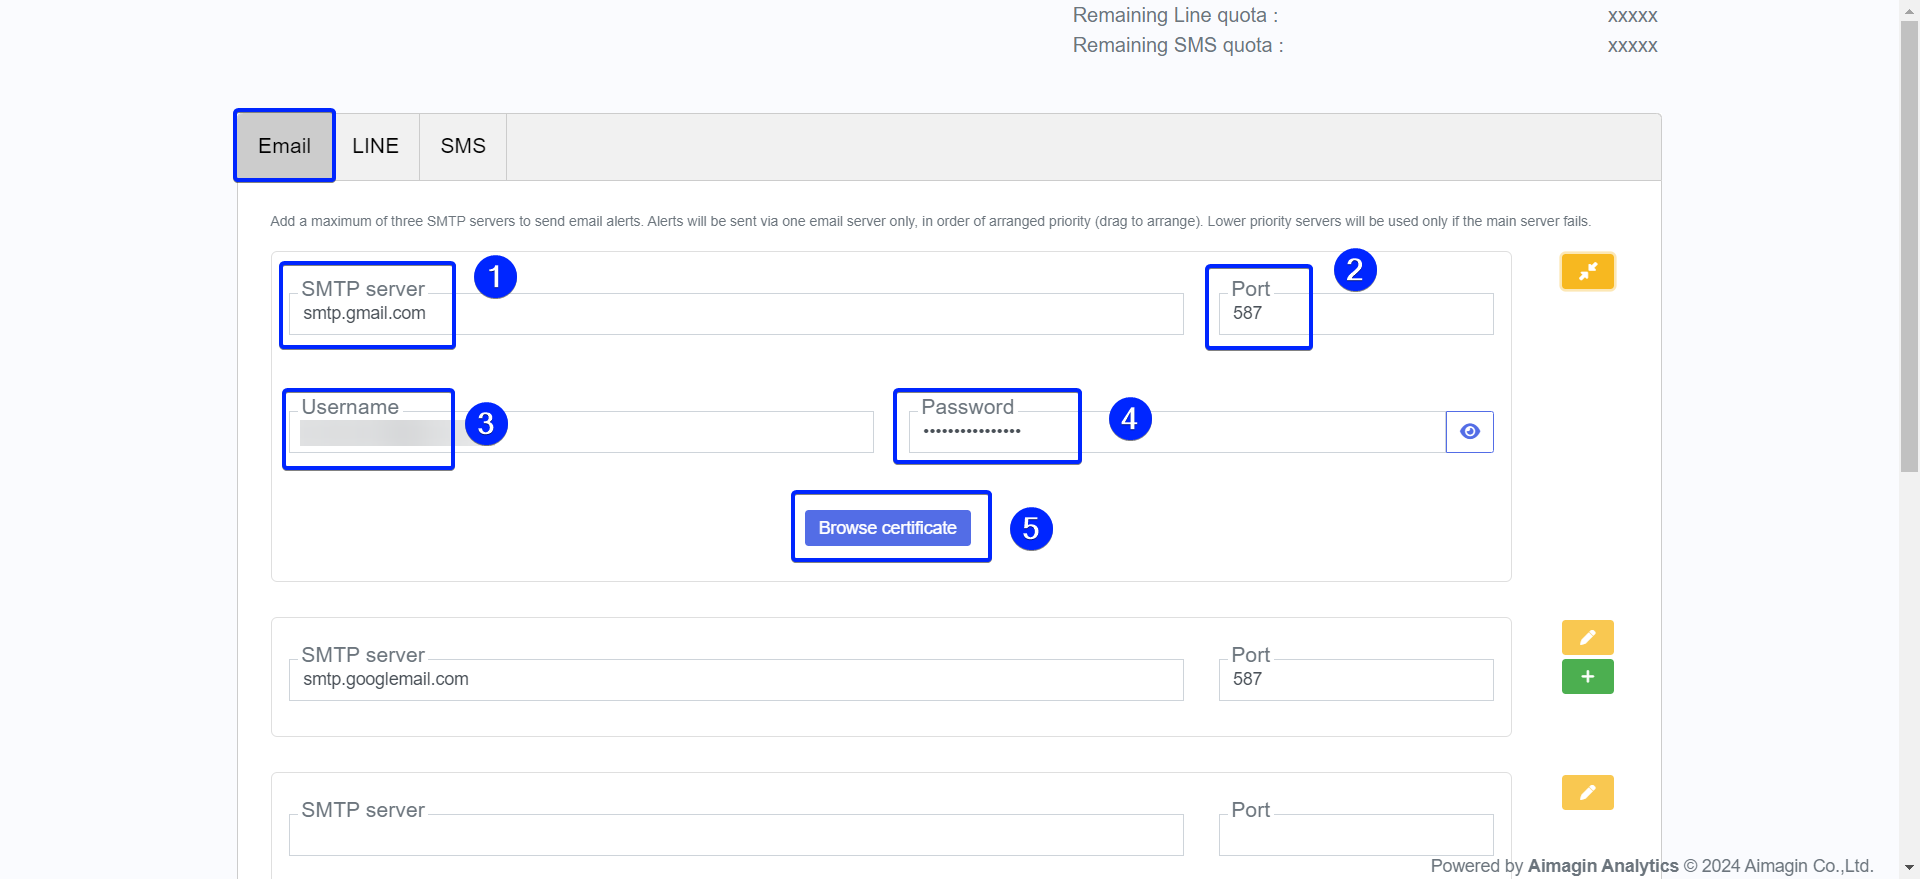
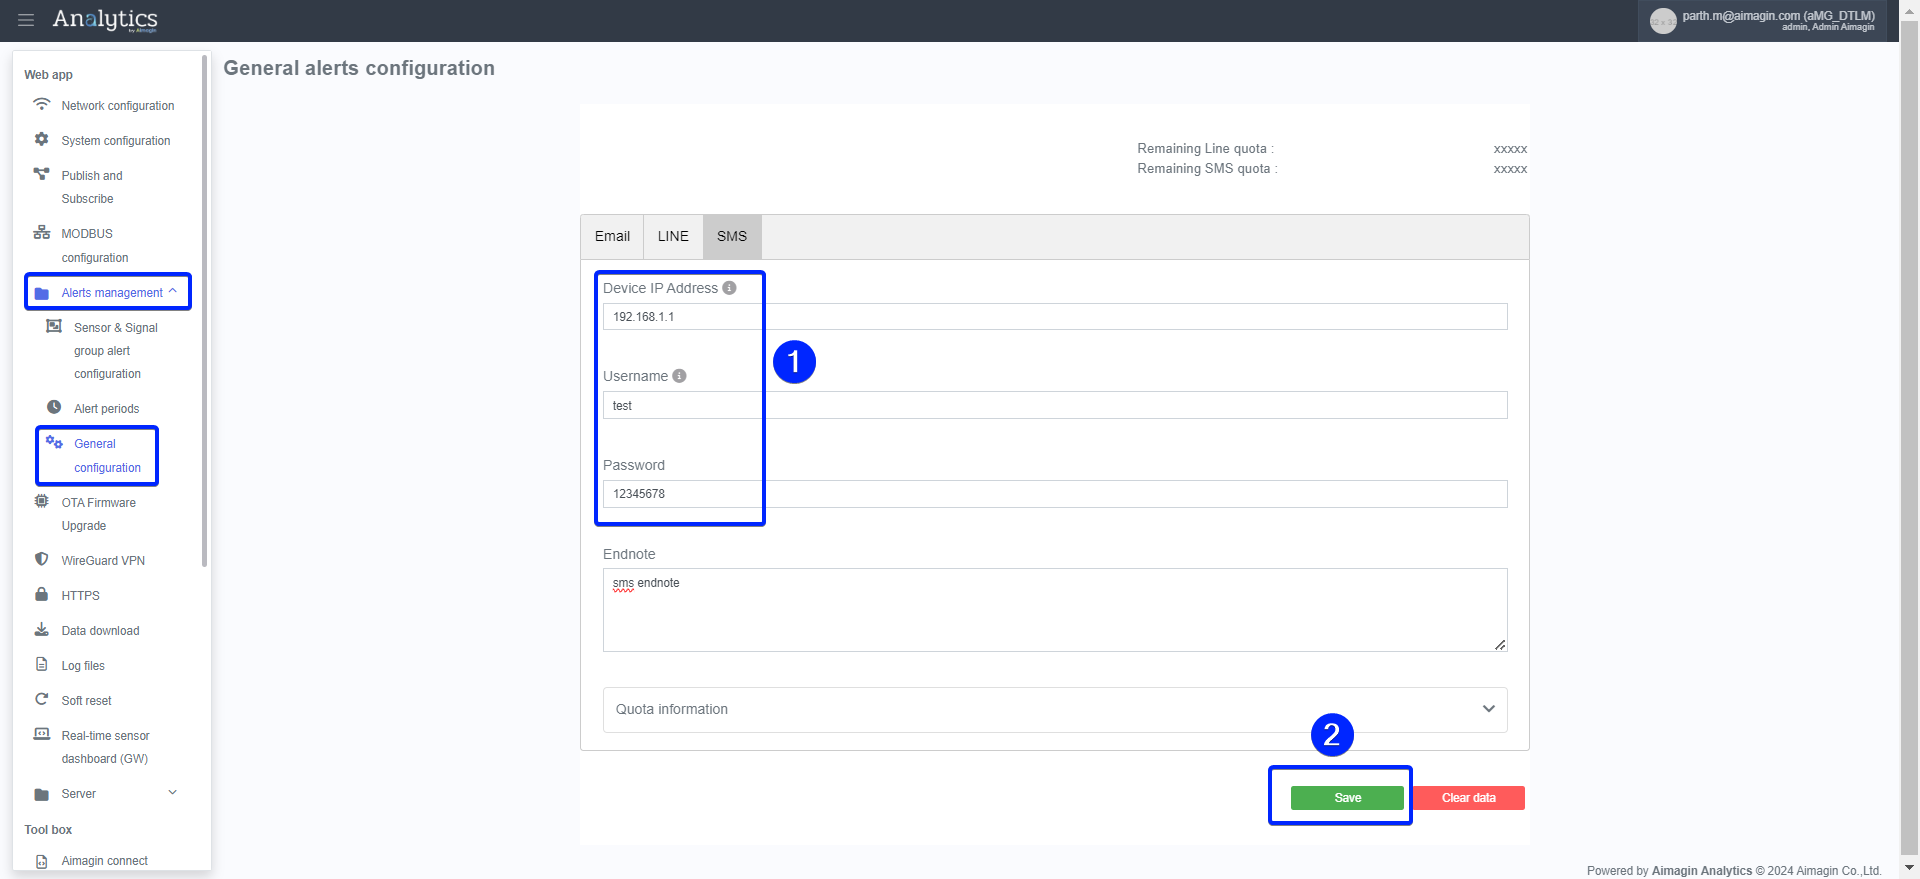
7.Go to the gateway’s web interface at 192.168.10.10 after connecting to the gateway’s access point. Enter the following details Under Web app > Alerts management > General configuration > Email tab
▪SMTP Server: smtp.gmail.com
▪Port: 587
▪Username: Gmail address
▪Password: 16-digit code
▪Browse certificate: Upload this file. This will be used to establish a secure TLS connection between the gateway and your Gmail SMTP server account.
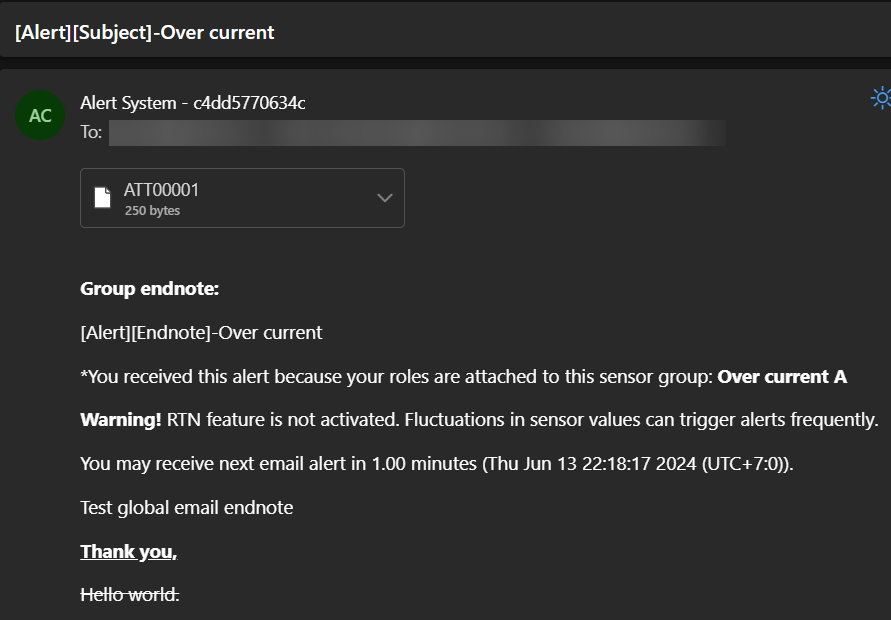
8.Enter an endnote of the email (optional). This will appear at the end of all email alerts.
9.Save.

Part 2: Selecting the sensors and setting alert conditions
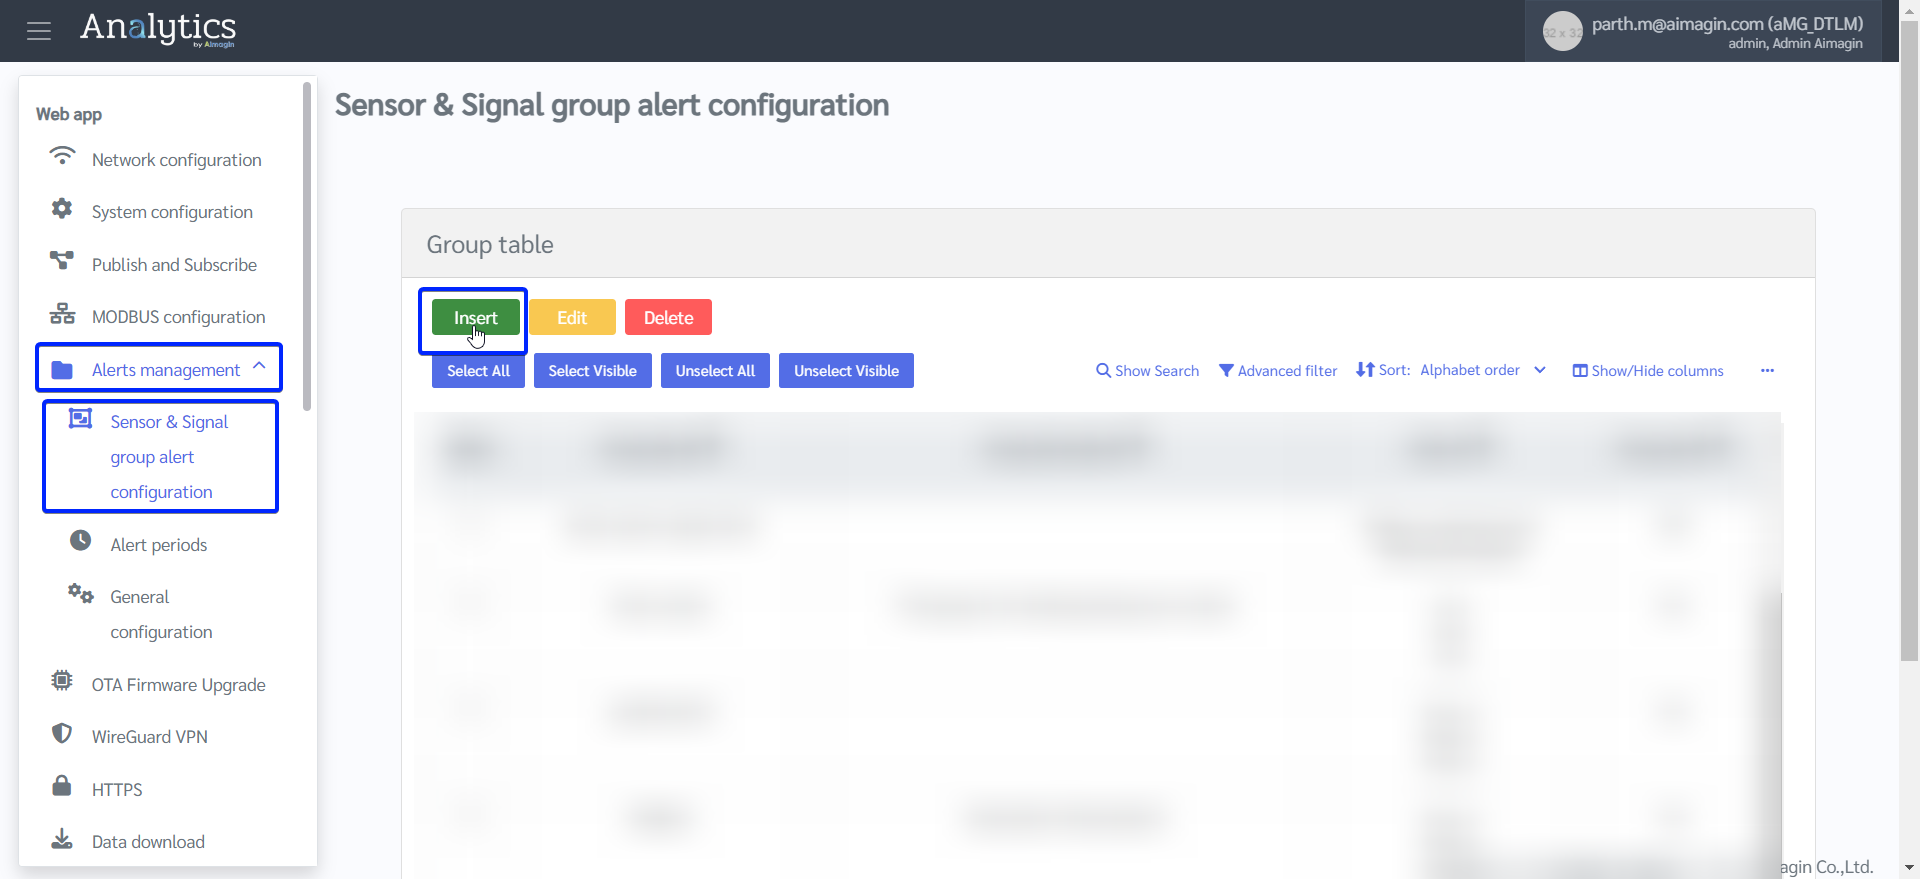
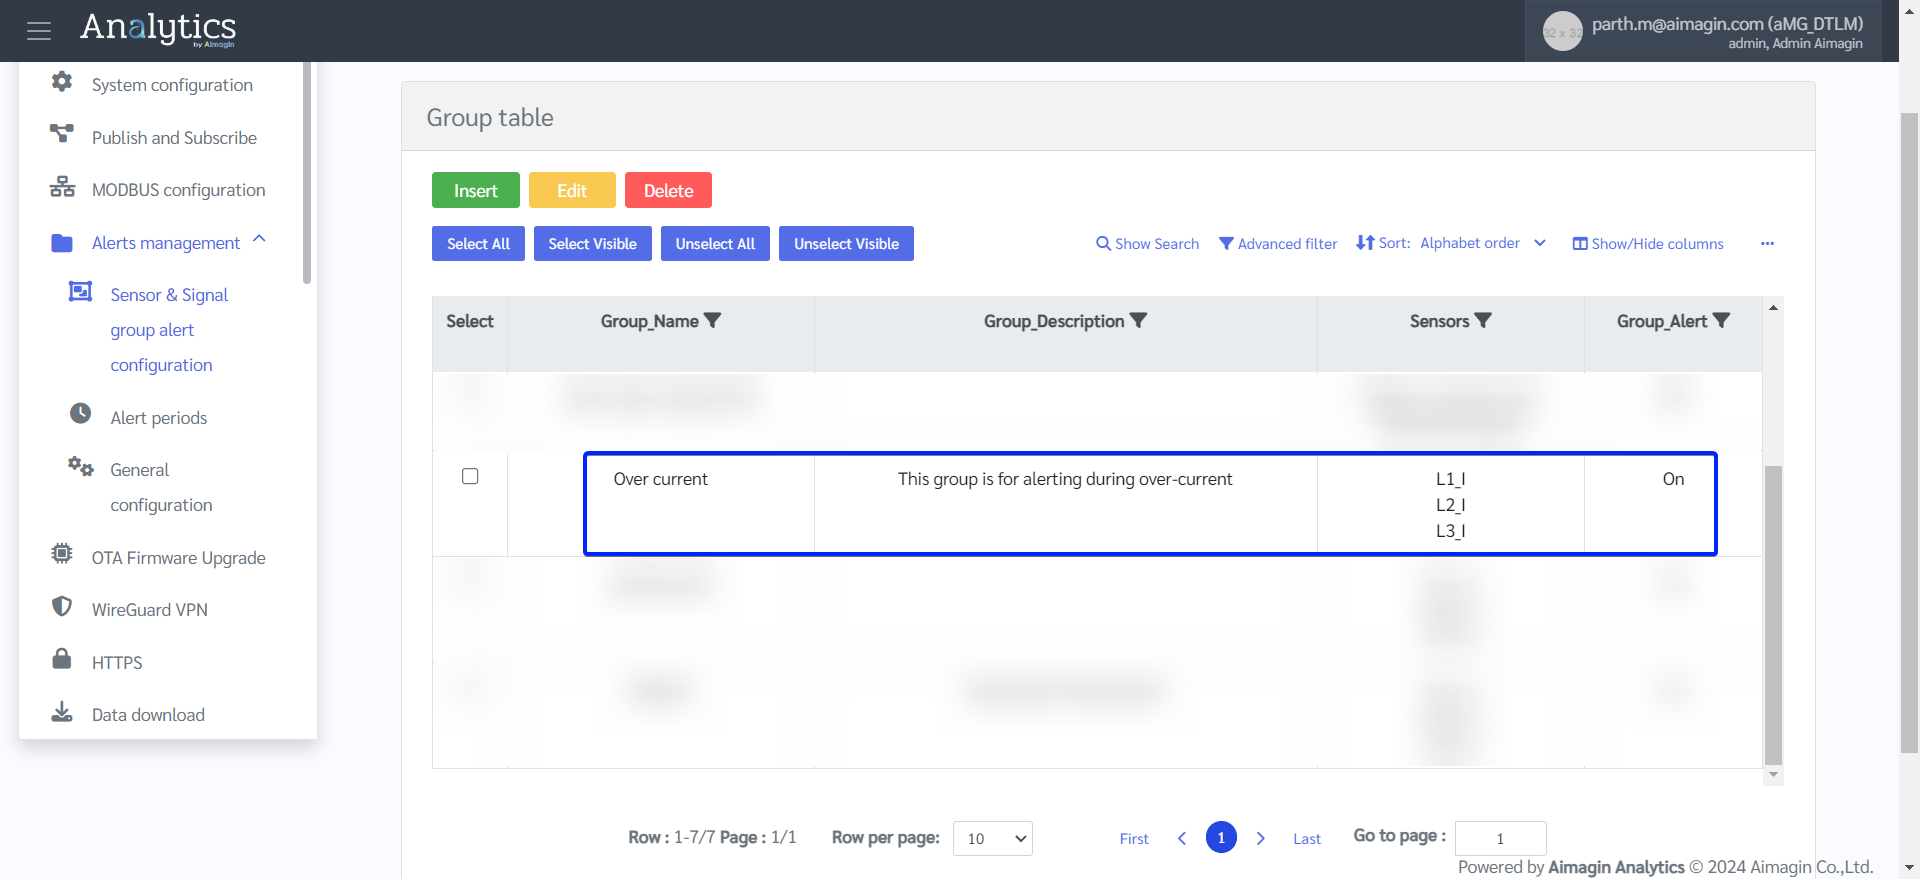
1.On the gateway’s web interface, go to Alerts management > Sensor and Signal group alert configuration. On this page you will group the sensors (a group must be created even for just 1 sensor) that you want to receive an alert for and set the conditions. There will usually be an existing group on the webapp for you to understand what a group alert looks like. We will show you how to create a new sensor group as an example for alerting during over-current.
2.Click on “Insert” to create new sensor group.
a.Give a group name, description, and select the sensors.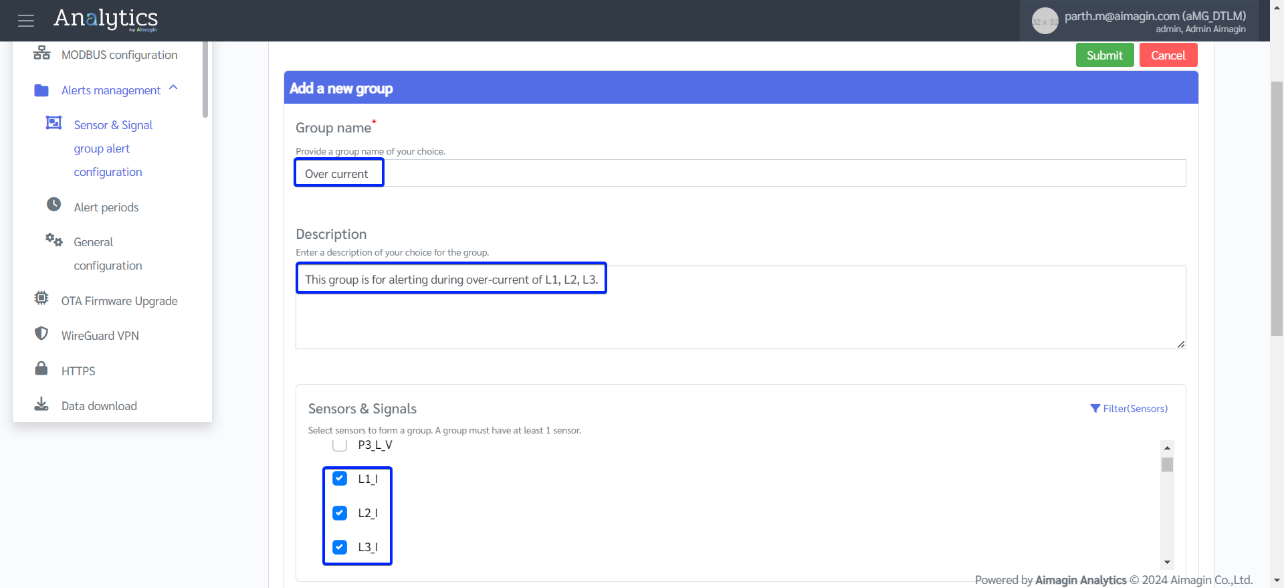
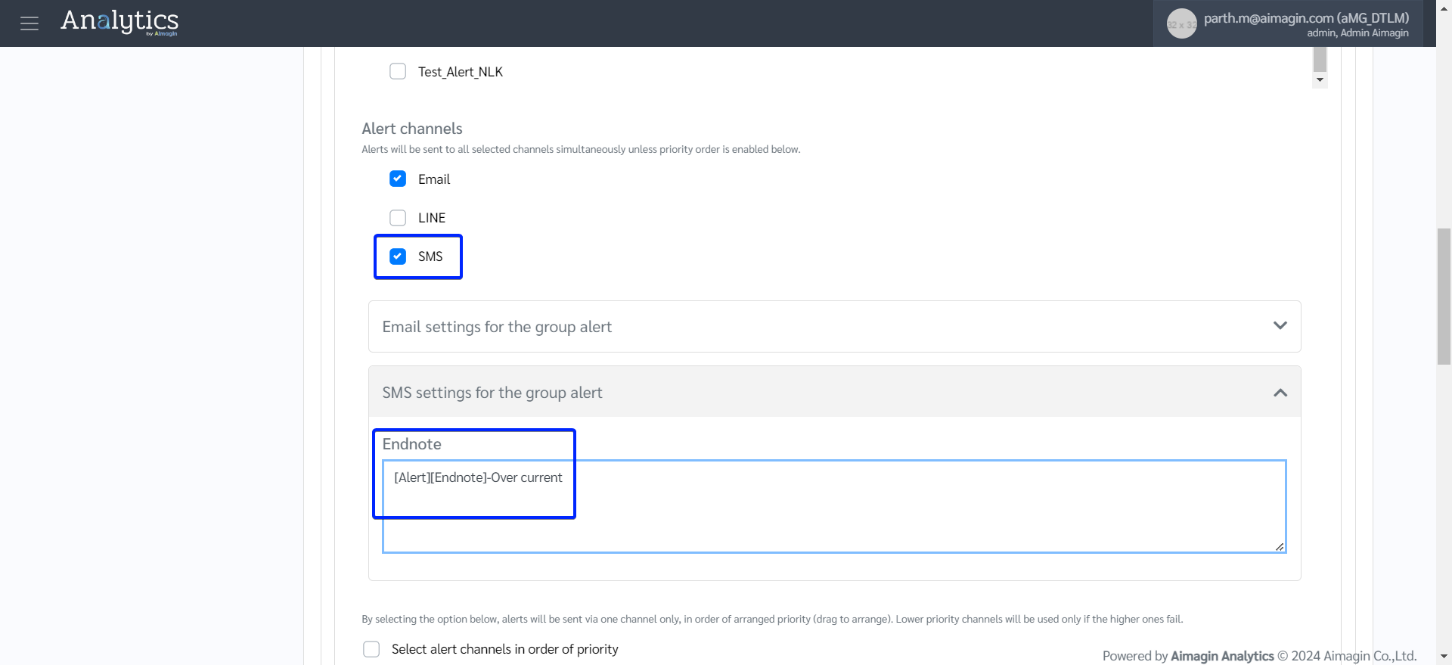
b.Turn the alert status ON, select user roles that you would like to alert for this created group (note: users are identified by their user roles. Refer back to the step to check which user roles you have assigned to the users registered on your device. If "Viewer Customer" is selected, all users with this role will be alerted). Enable the Email alert channel.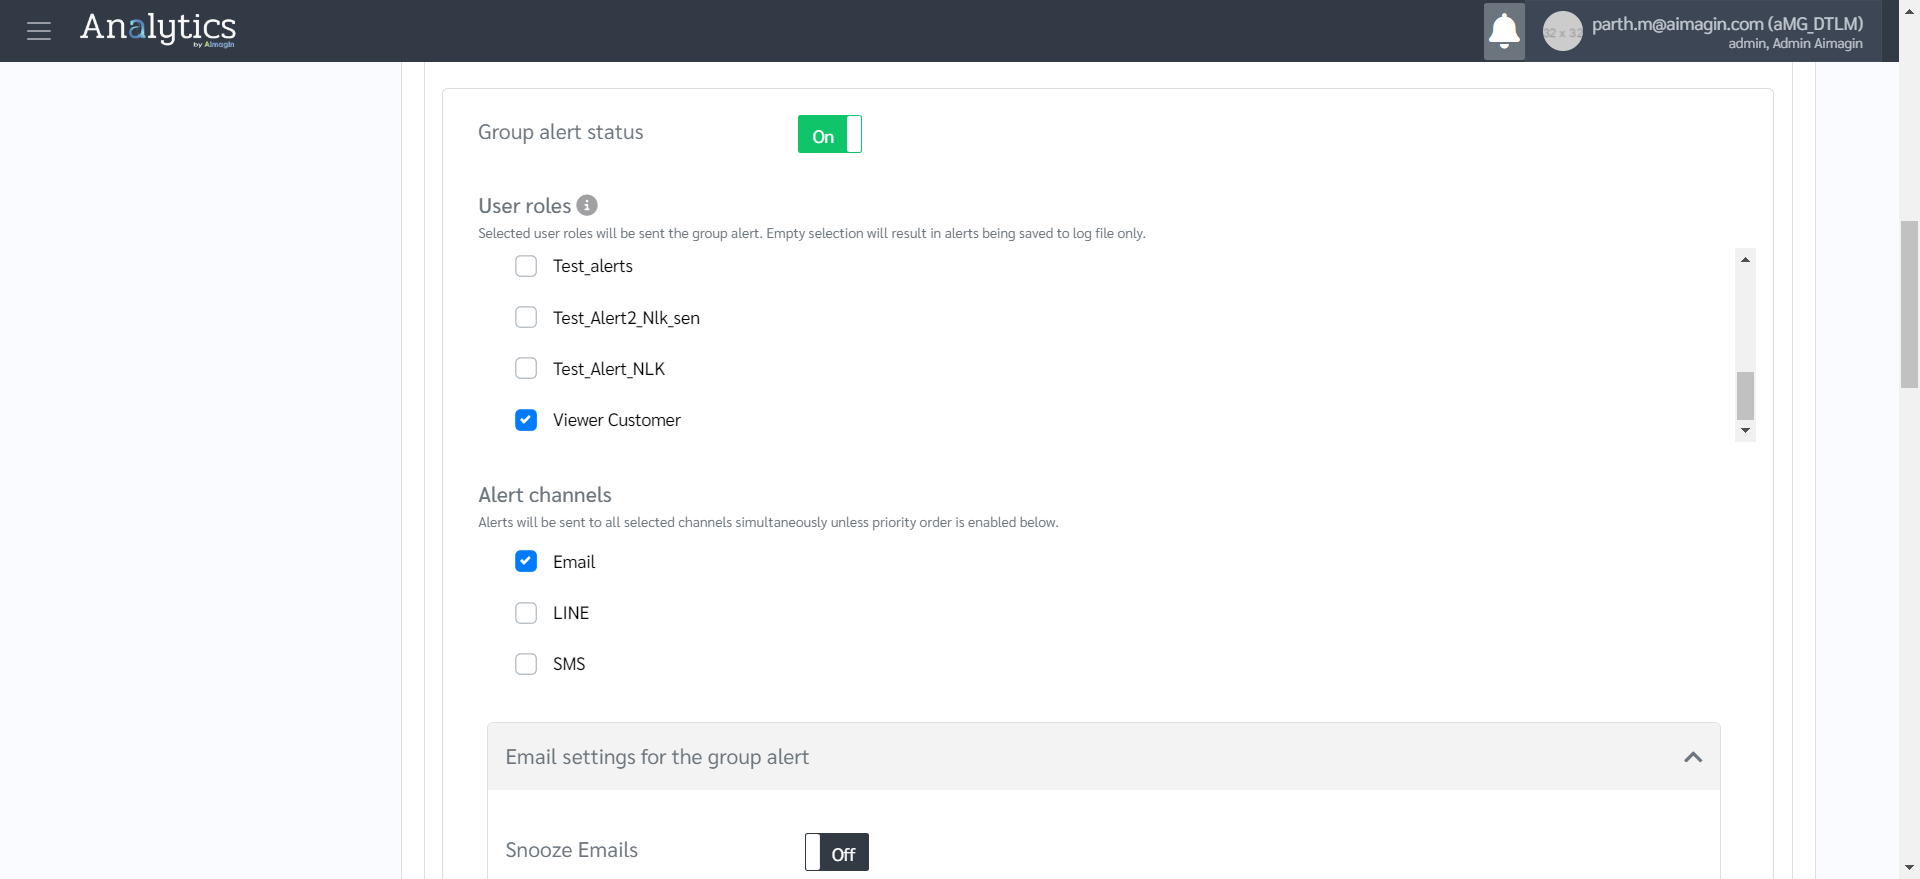
c.Specify email addresses to CC/BCC if those persons are not registered on Aimagin’s Database. Specify email subject and endnote.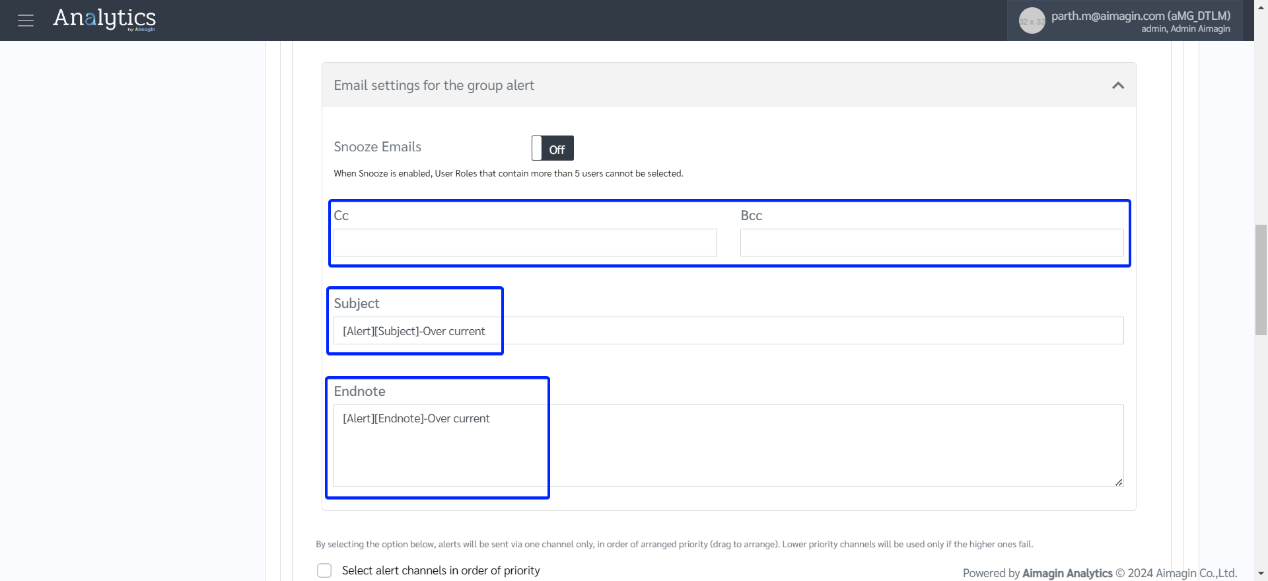
d.Specify Smart filter values. Please refer to the information icon next to the “Smart filter” label.
e.Specify Return to Normal (RTN) value. Fluctuations in sensor values can trigger alerts frequently. In such a situation, the system will wait for the specified RTN time to recheck the condition. For example, if the set condition is to alert when Temp > 40, and the RTN time is set to 2 minutes, the system will alert only if the Temp > 40 for 2 minutes or more. If you would like to receive an alert as soon as Temp > 40 (even if it is only exceeds 40 for a few seconds), then set RTN value to 0.
f.Specify Group alert description.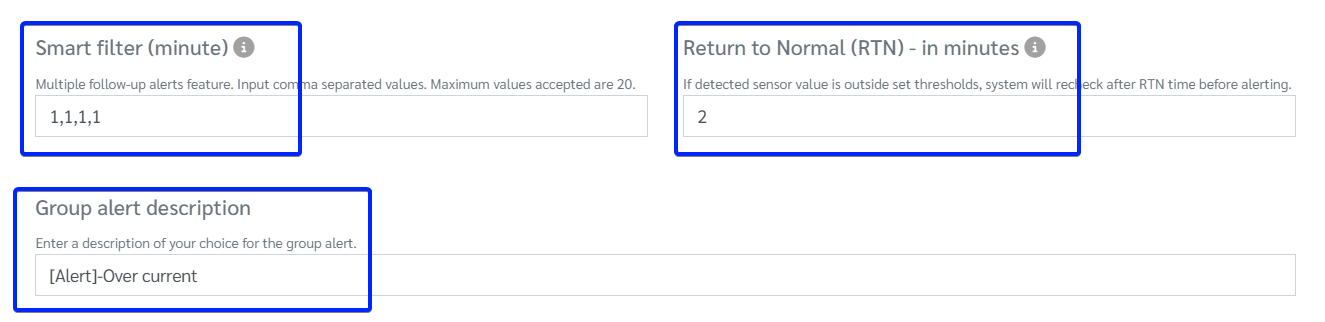
g.Set the alert conditions based on an advanced filter and click on “Apply”. For example, we set the condition to if L1_I or L2_I or L3_I > 1800, but any complex conditions using a combination of AND & OR logic can be set up easily as well.
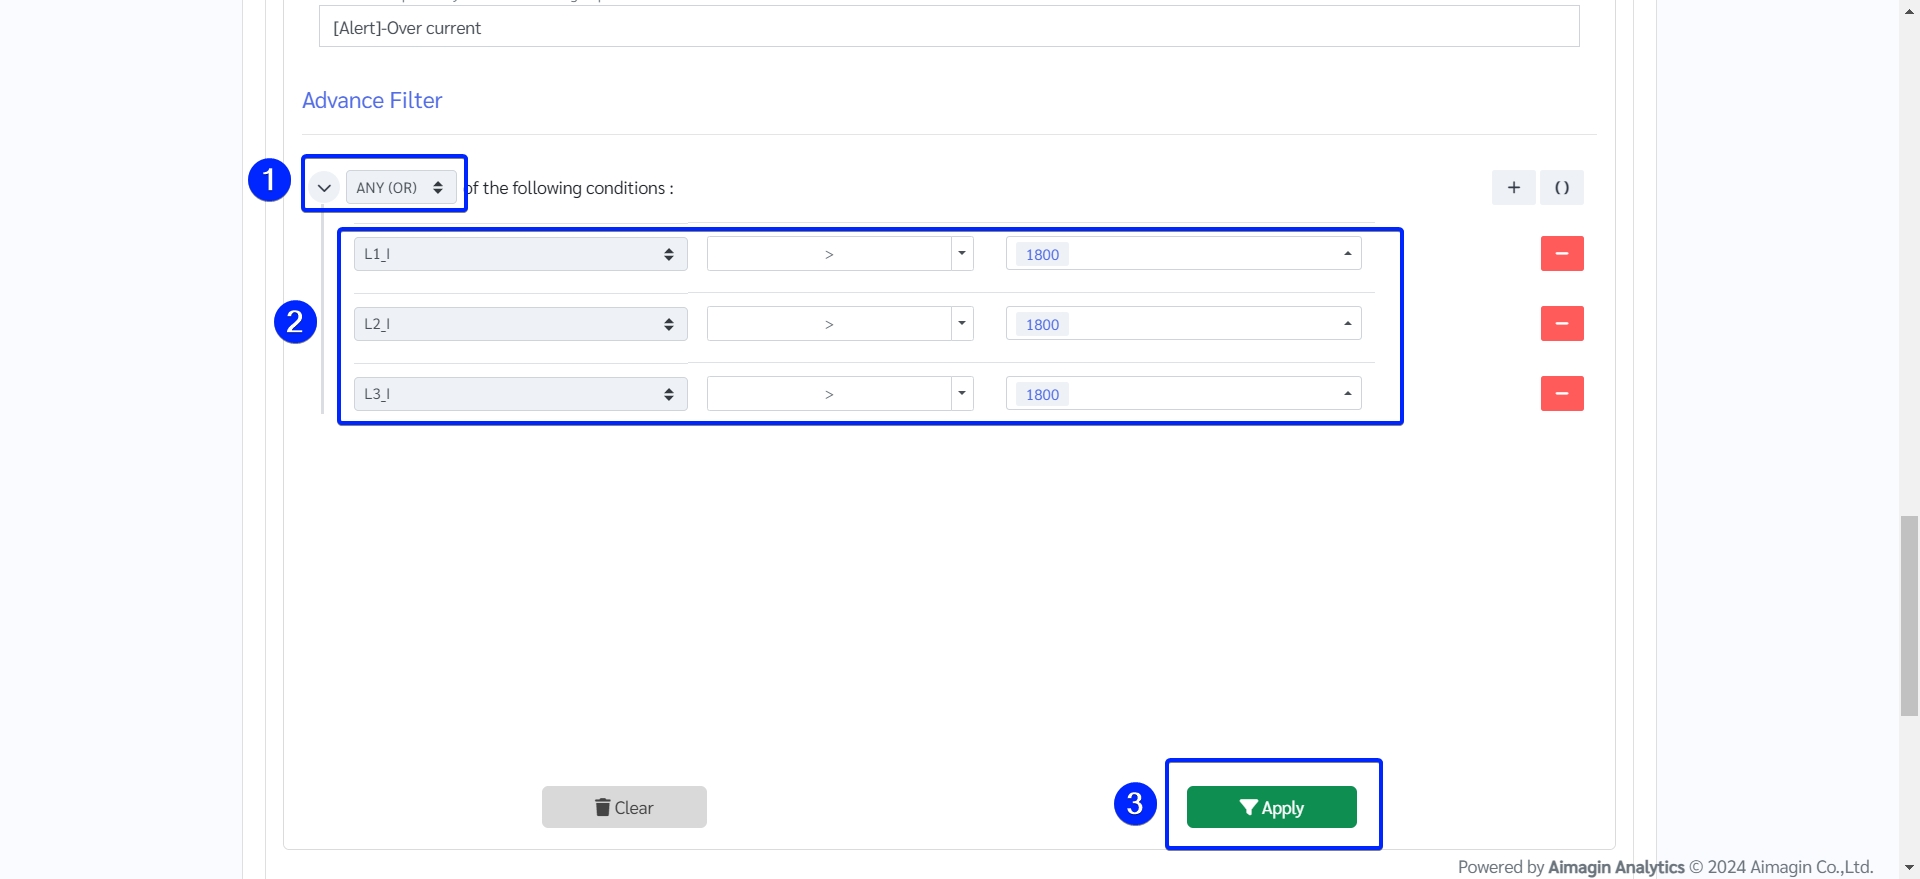
h.Click on “Submit” to save the data.
i.Once submitted, it will be registered in the table on the web app.
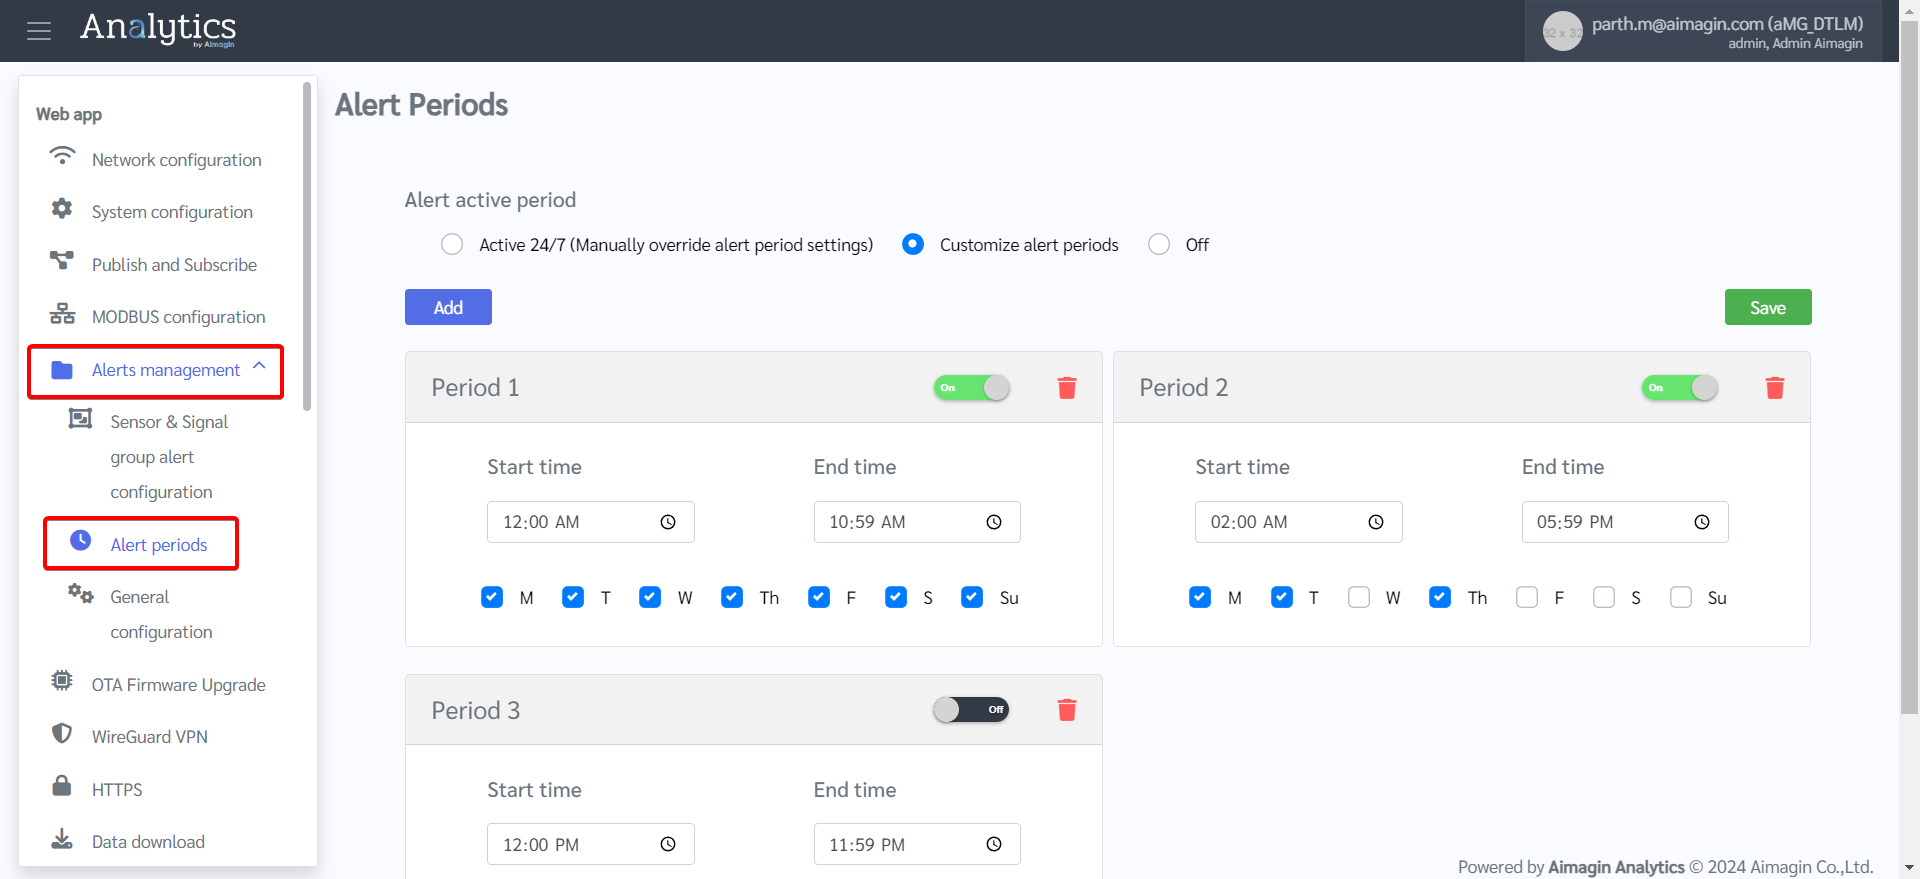
3.On the gateway’s web interface, go to Alerts management > Alert periods. On this page you can customize the time periods during which you want the alert to be enabled/disabled. Some examples are shown. You may also choose to keep alerts active 24/7 if you would like to receive an alert whenever the sensor reading is outside the set threshold.
4.Once everything has been configured correctly, log out of the web app. If sensor value outside the threshold is detected, you should be receiving an email alert on your email registered on the Aimagin server or the CC/BCC email.
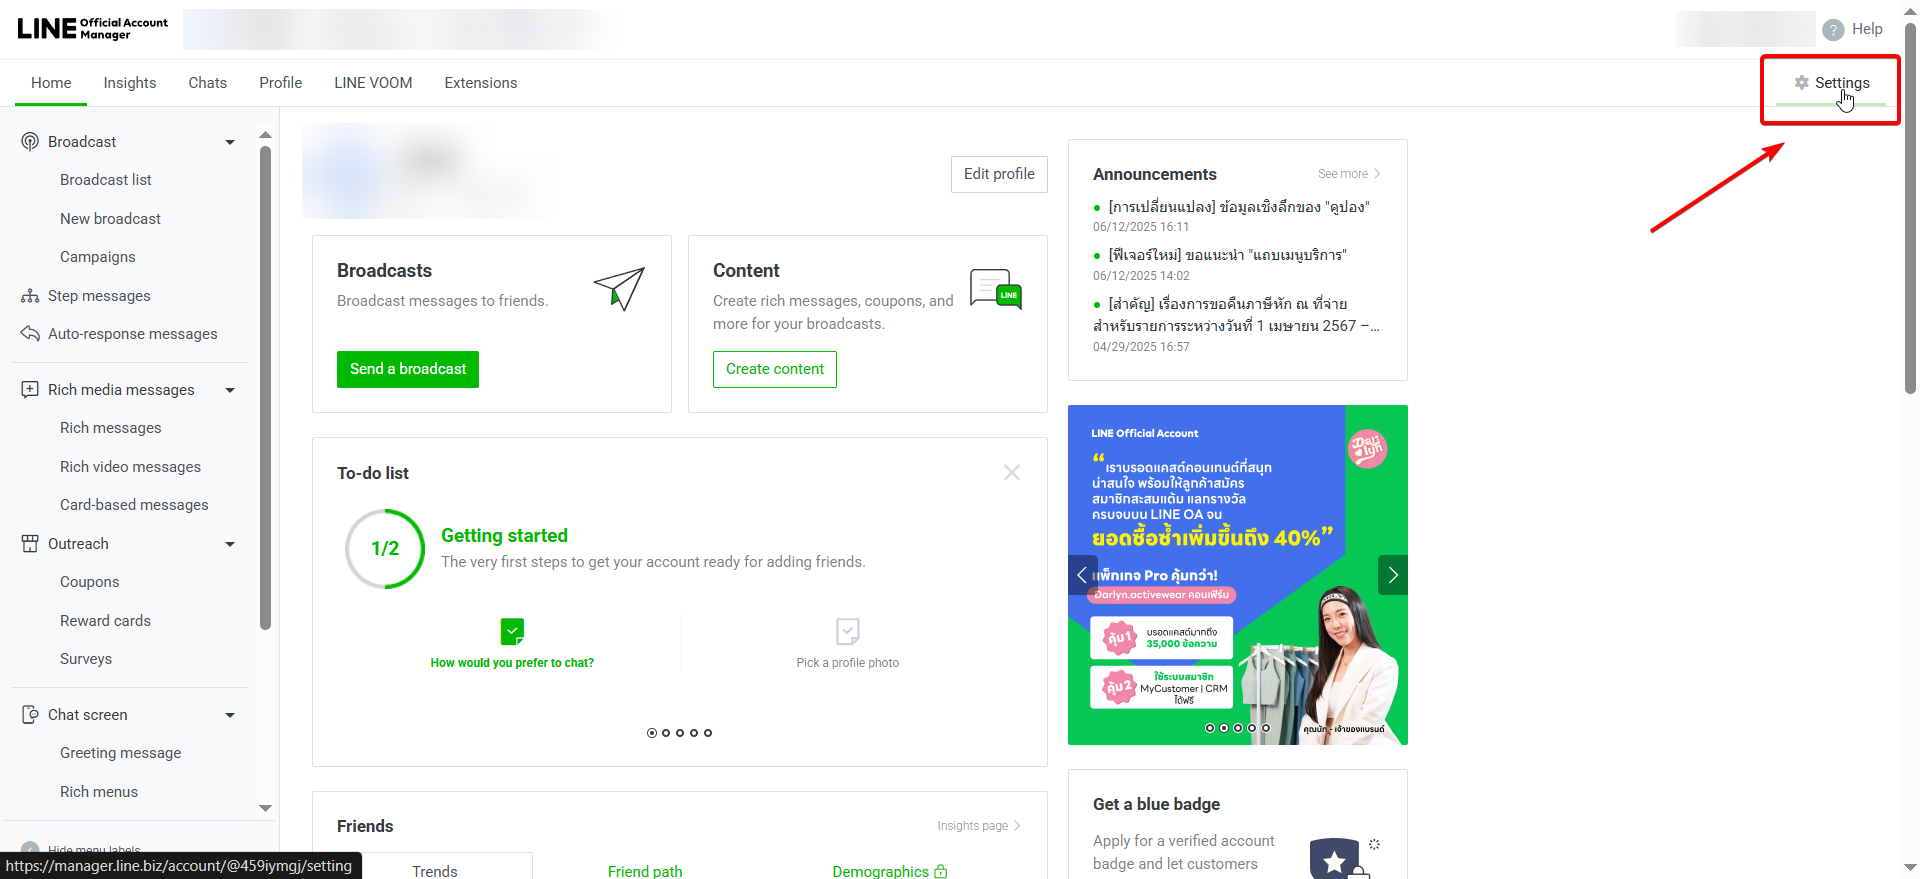
Setting up LINE alerts
Part 1: Creating a LINE Developer account
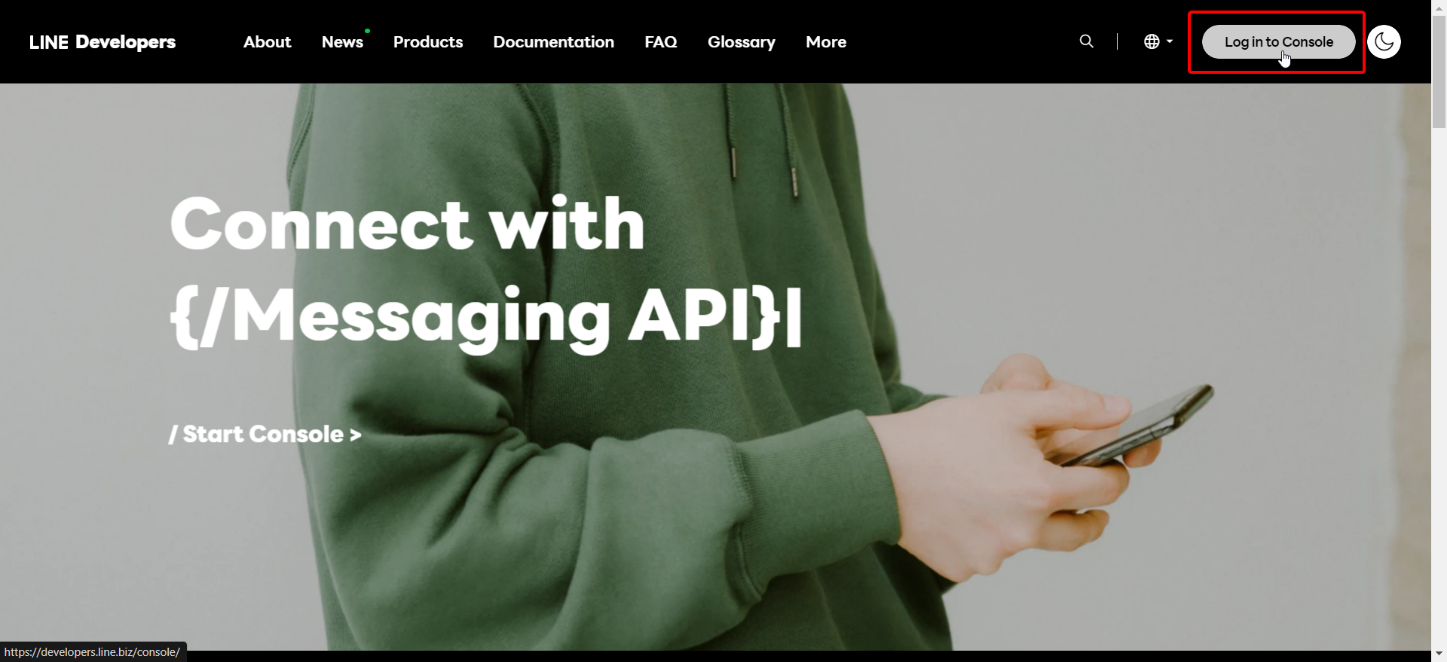
1.Go to https://developers.line.biz/en/ and create a new account or log in with existing account. Check this for more details.
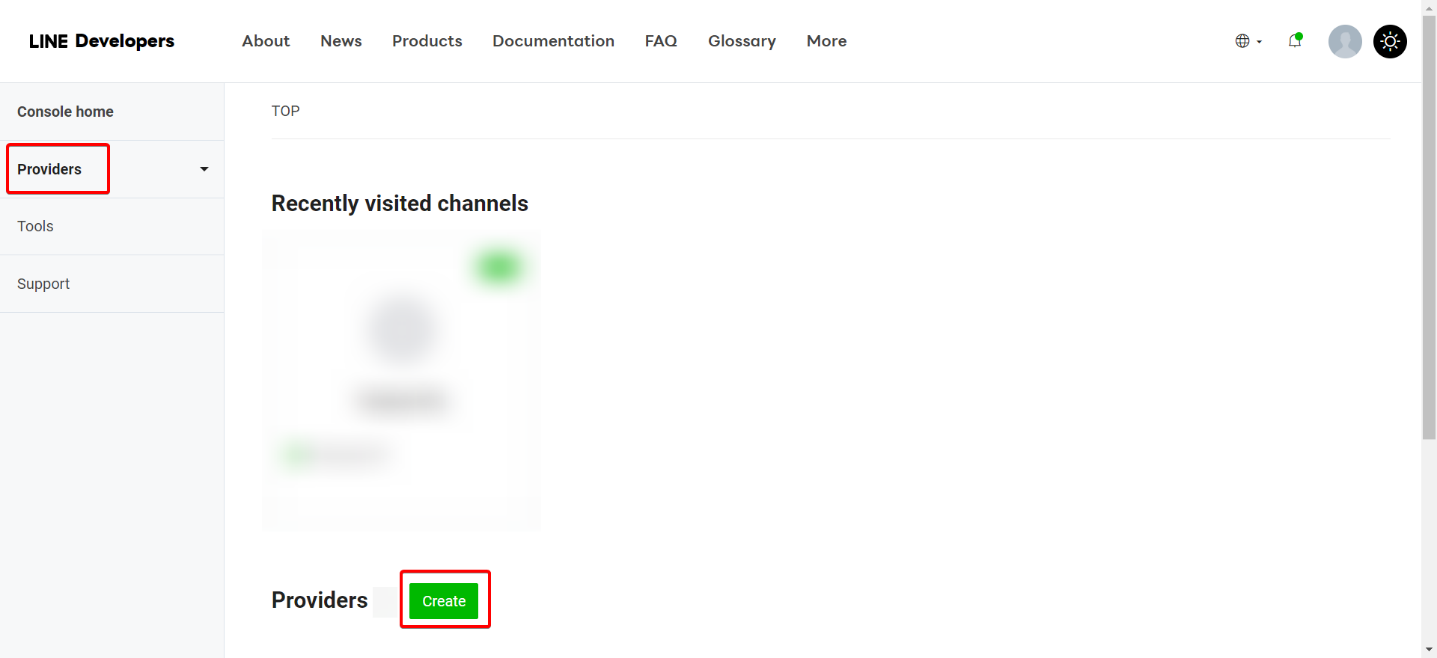
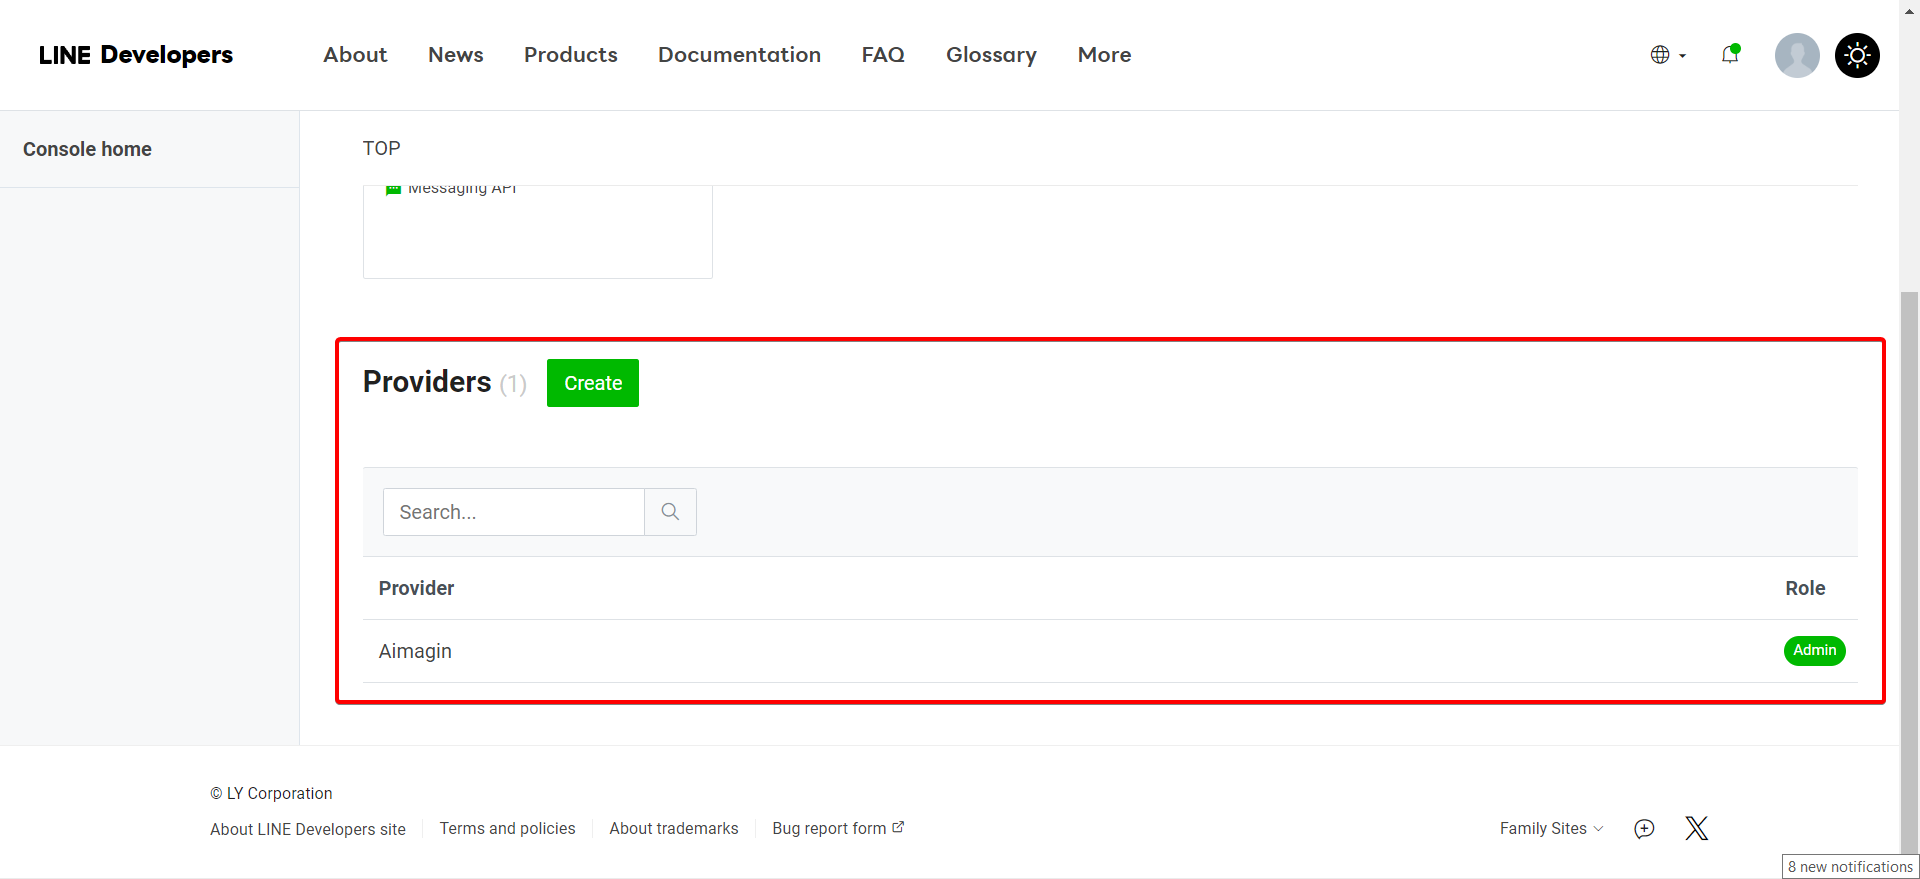
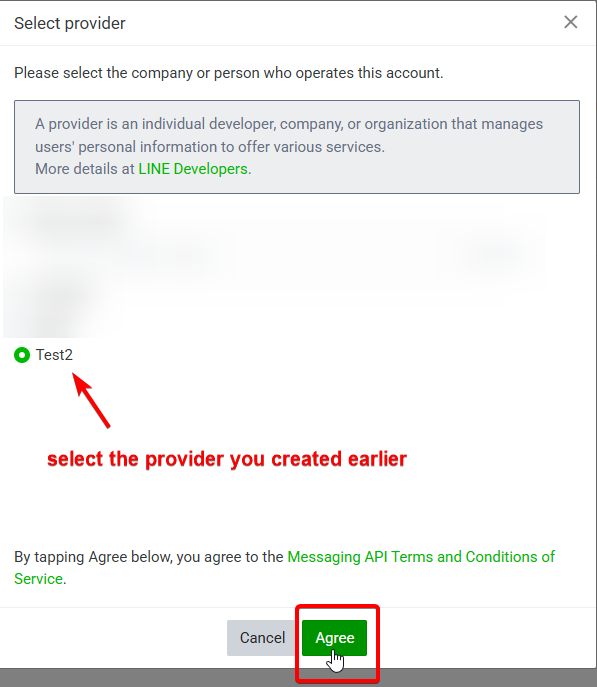
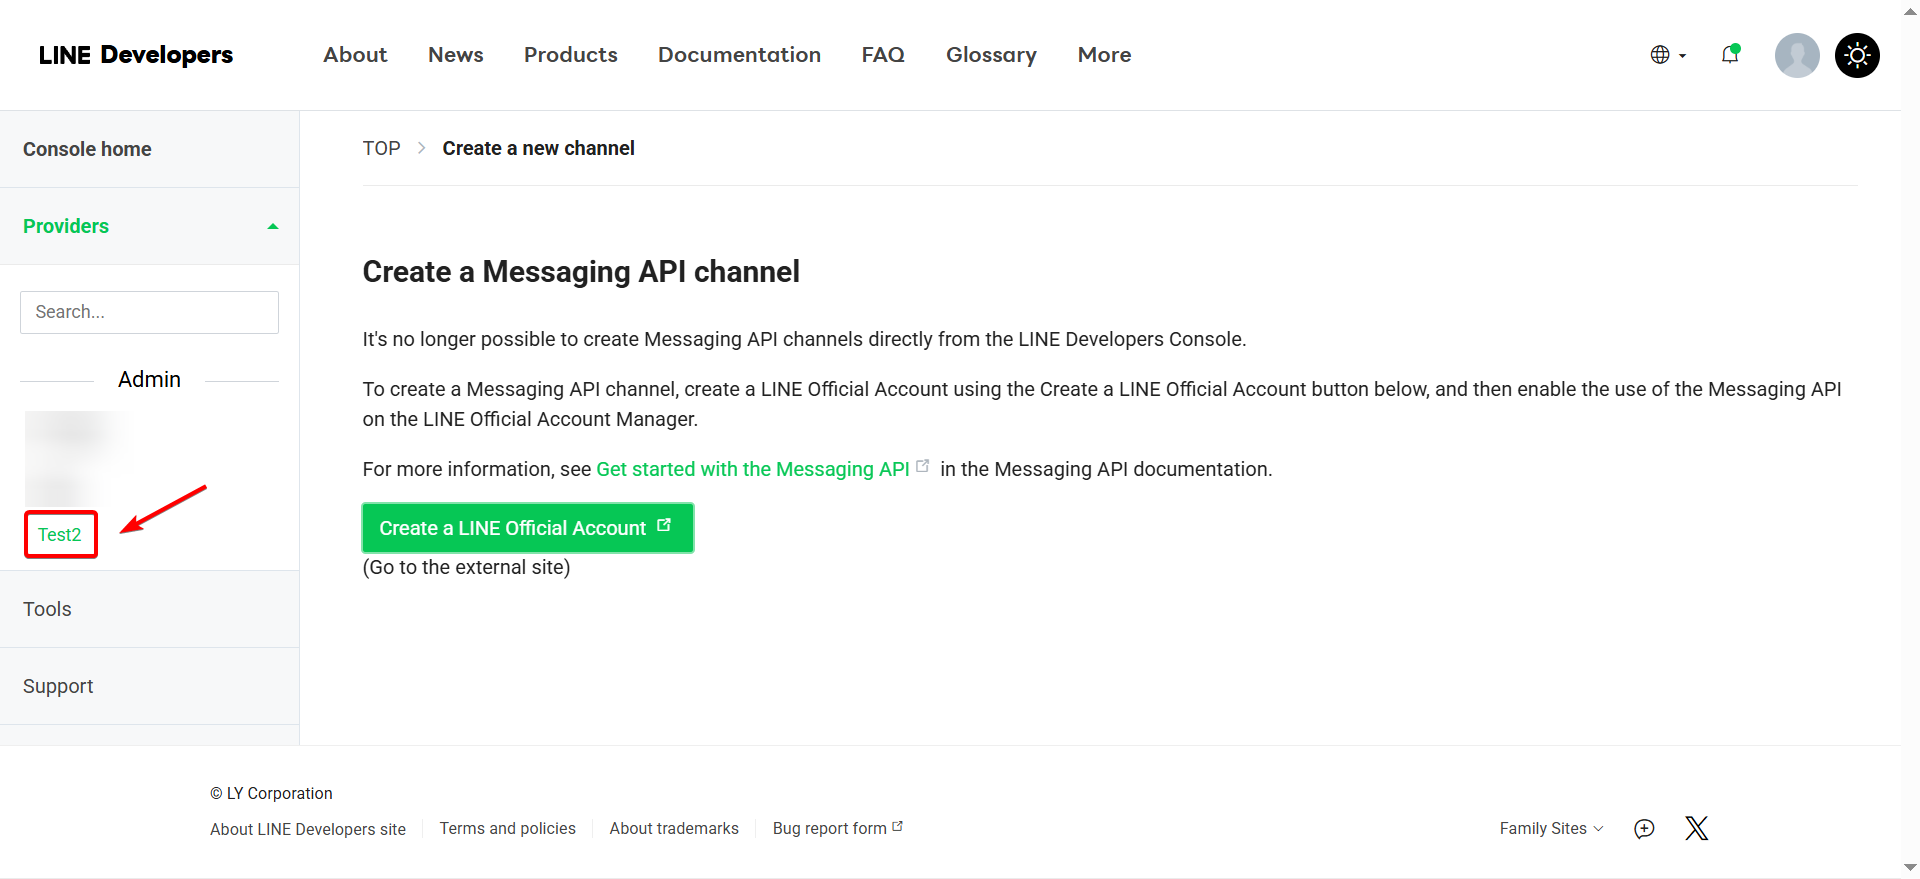
2.Create a new Provider.
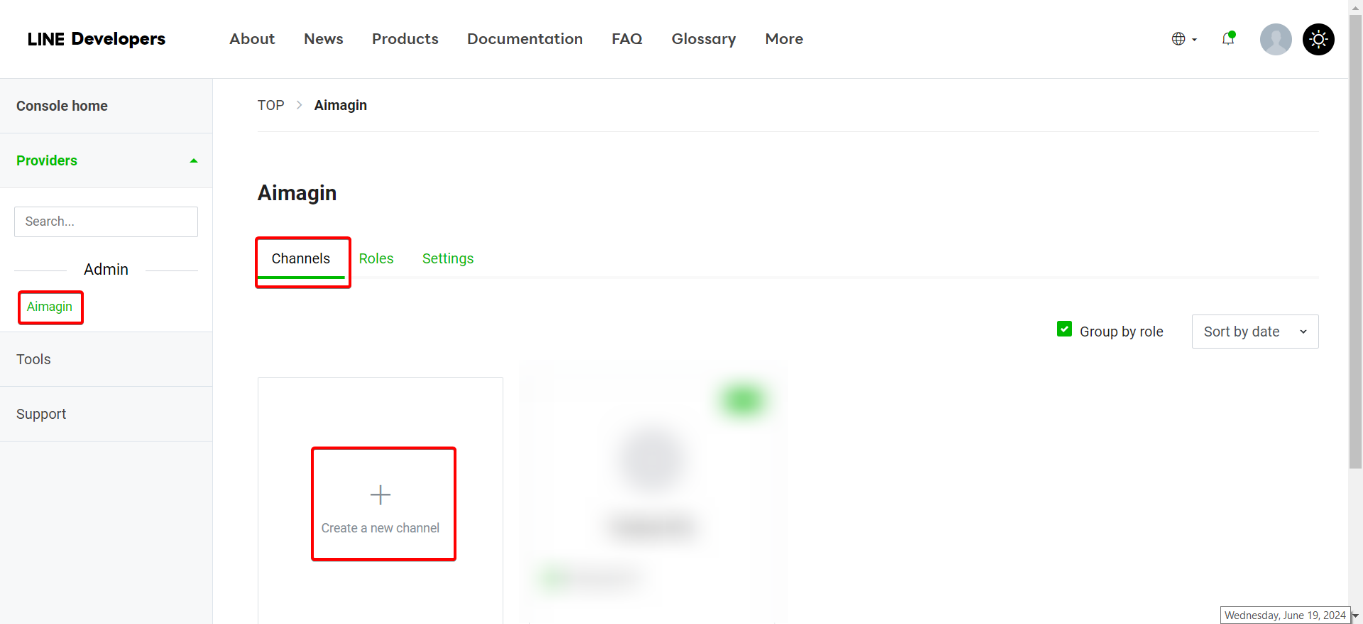
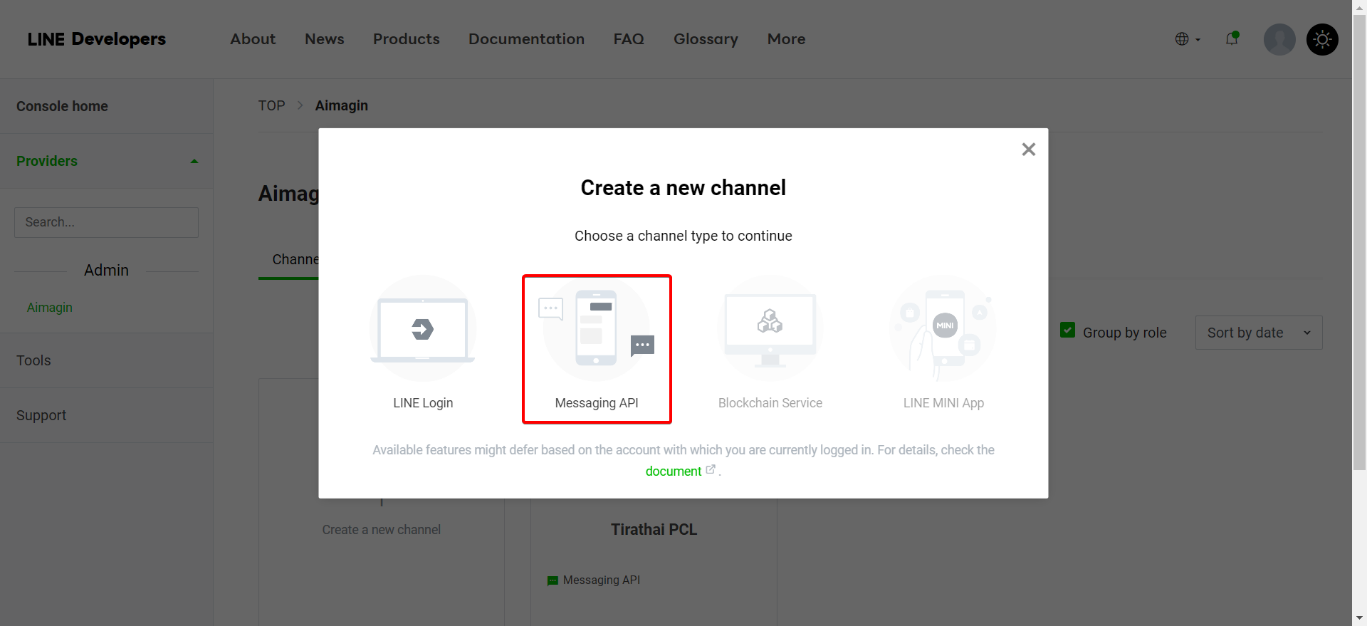
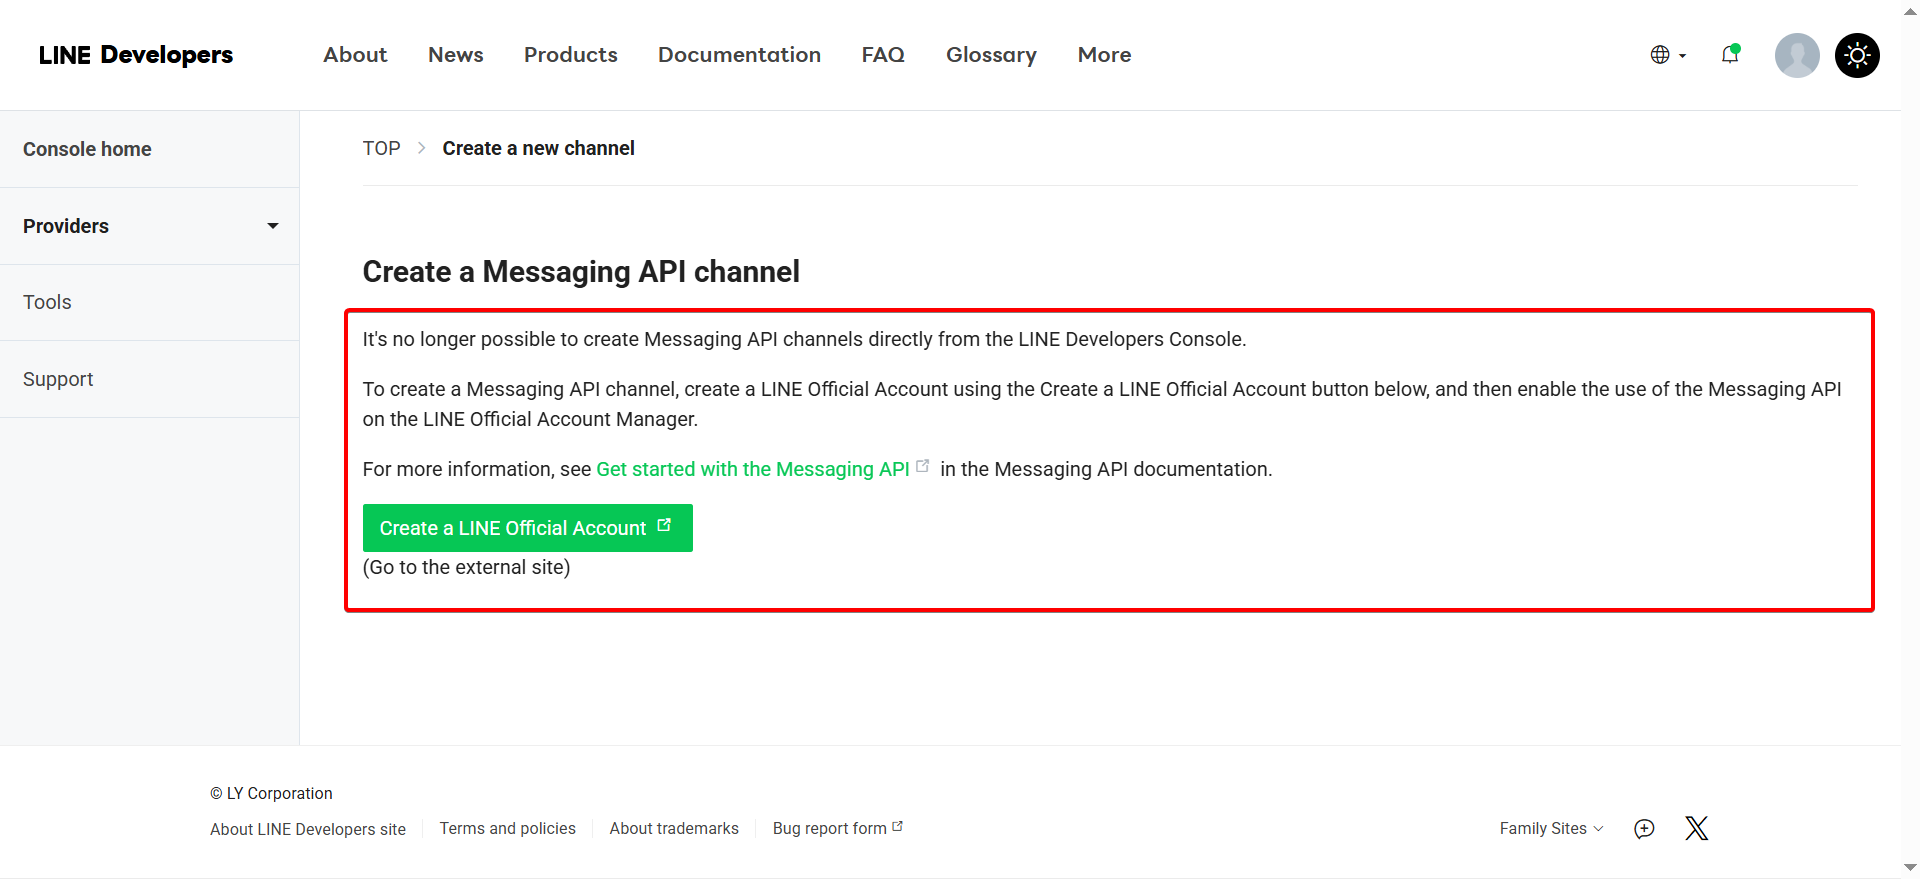
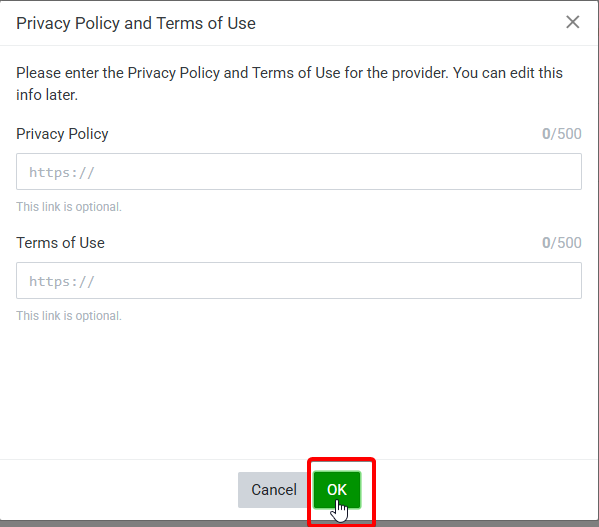
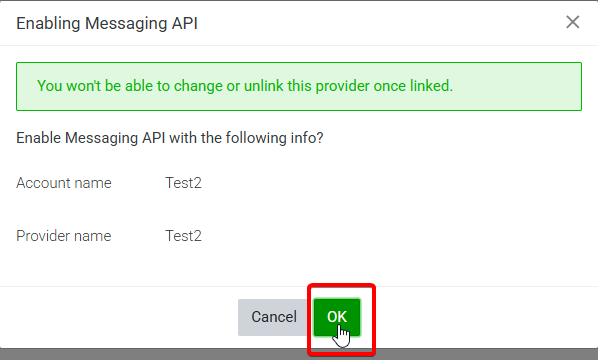
3.Create a new messaging API channel under the new provider by filling in channel name, description, etc. You may also need to create a LINE Official Account and put in some extra details in order to enable the messaging API channel as LINE has changed their rules and policies.
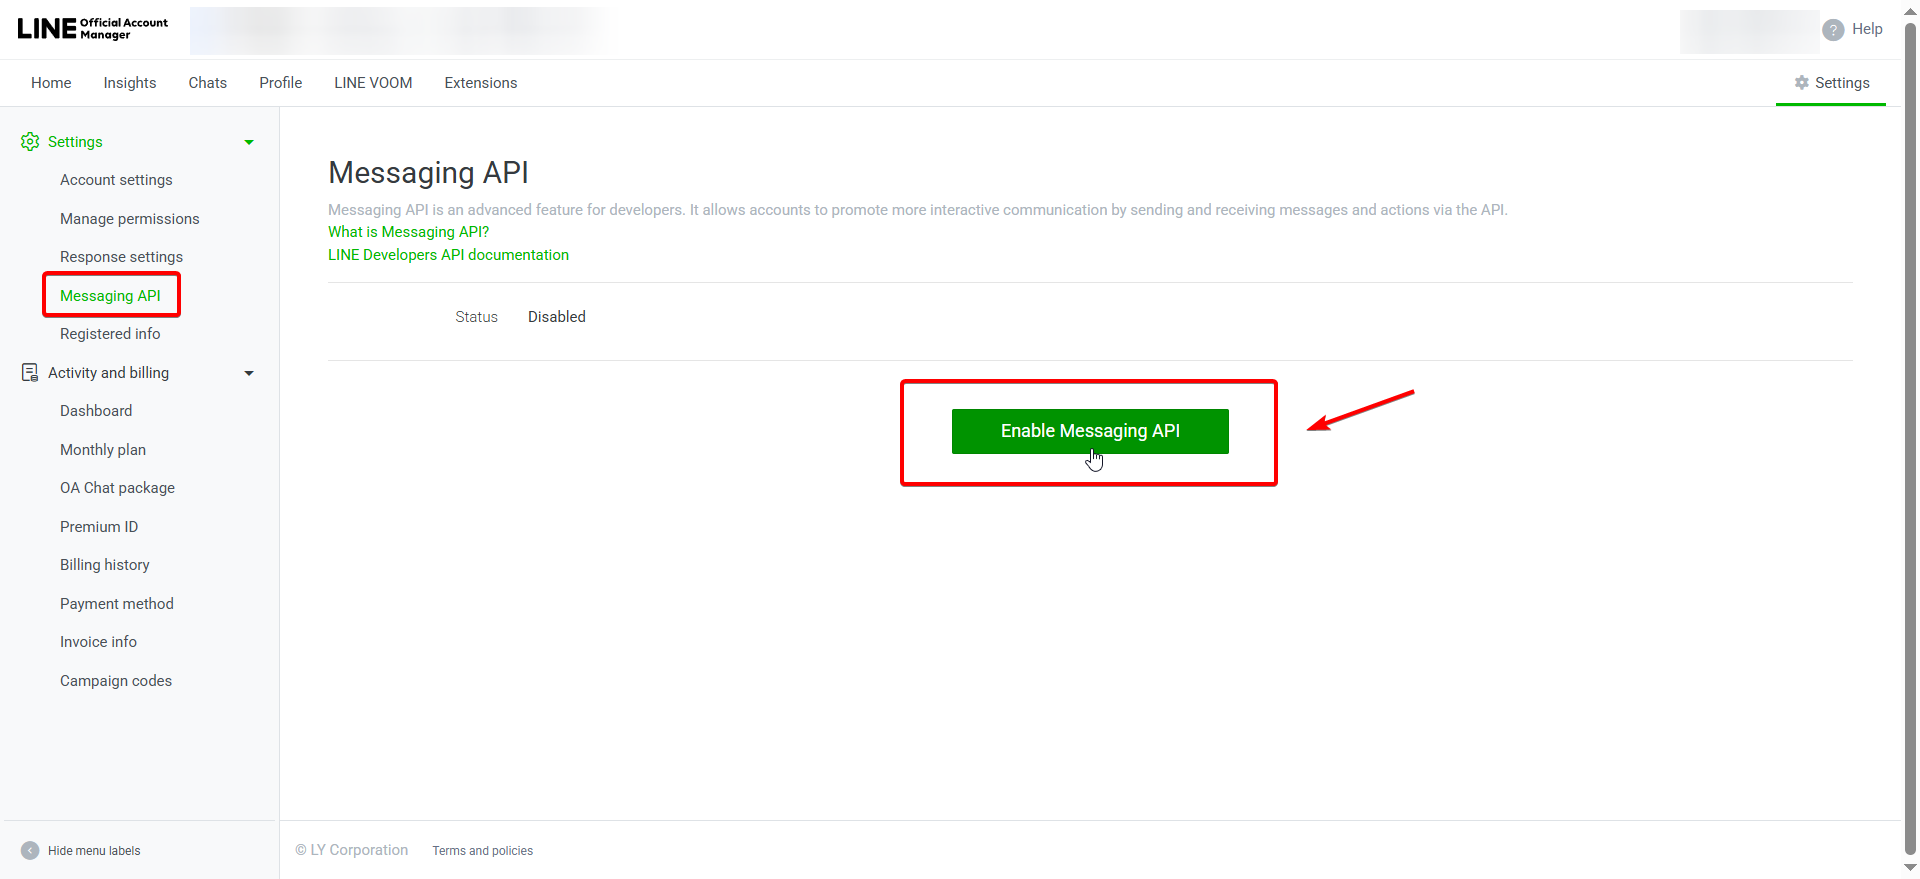
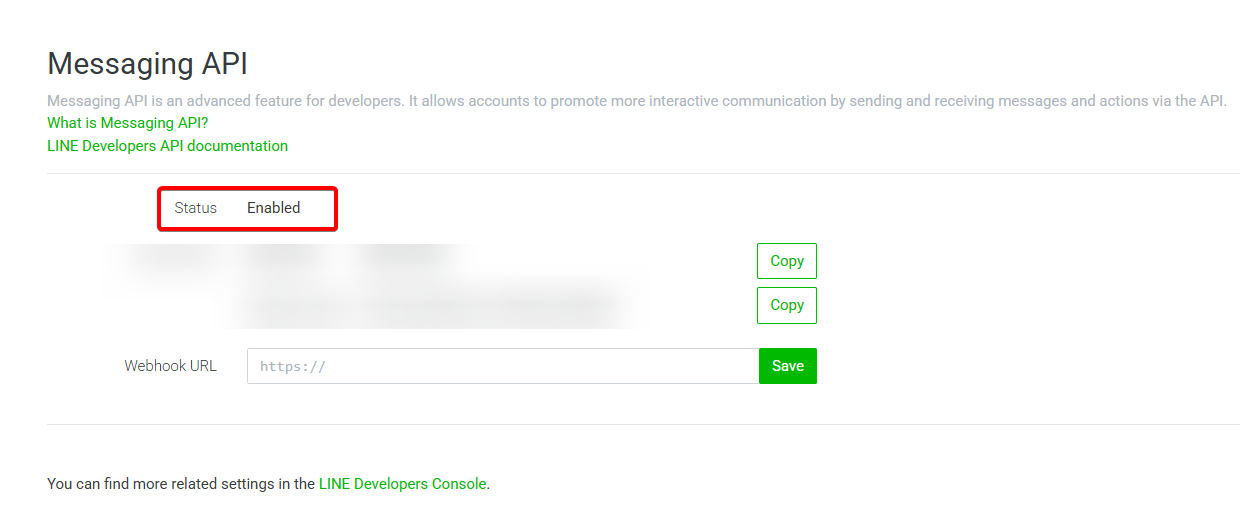
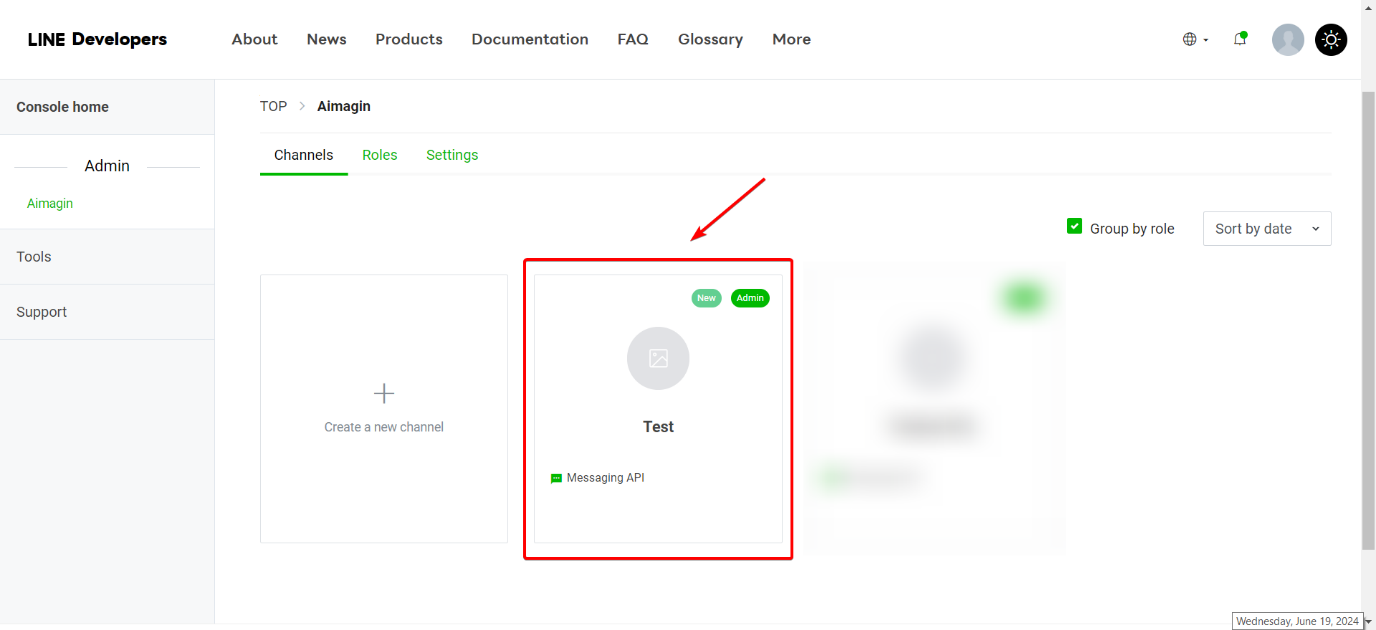
4.After enabling the messaging API channel, go back to the LINE Developers page and refresh the page. You should be seeing the provider and channel you created.
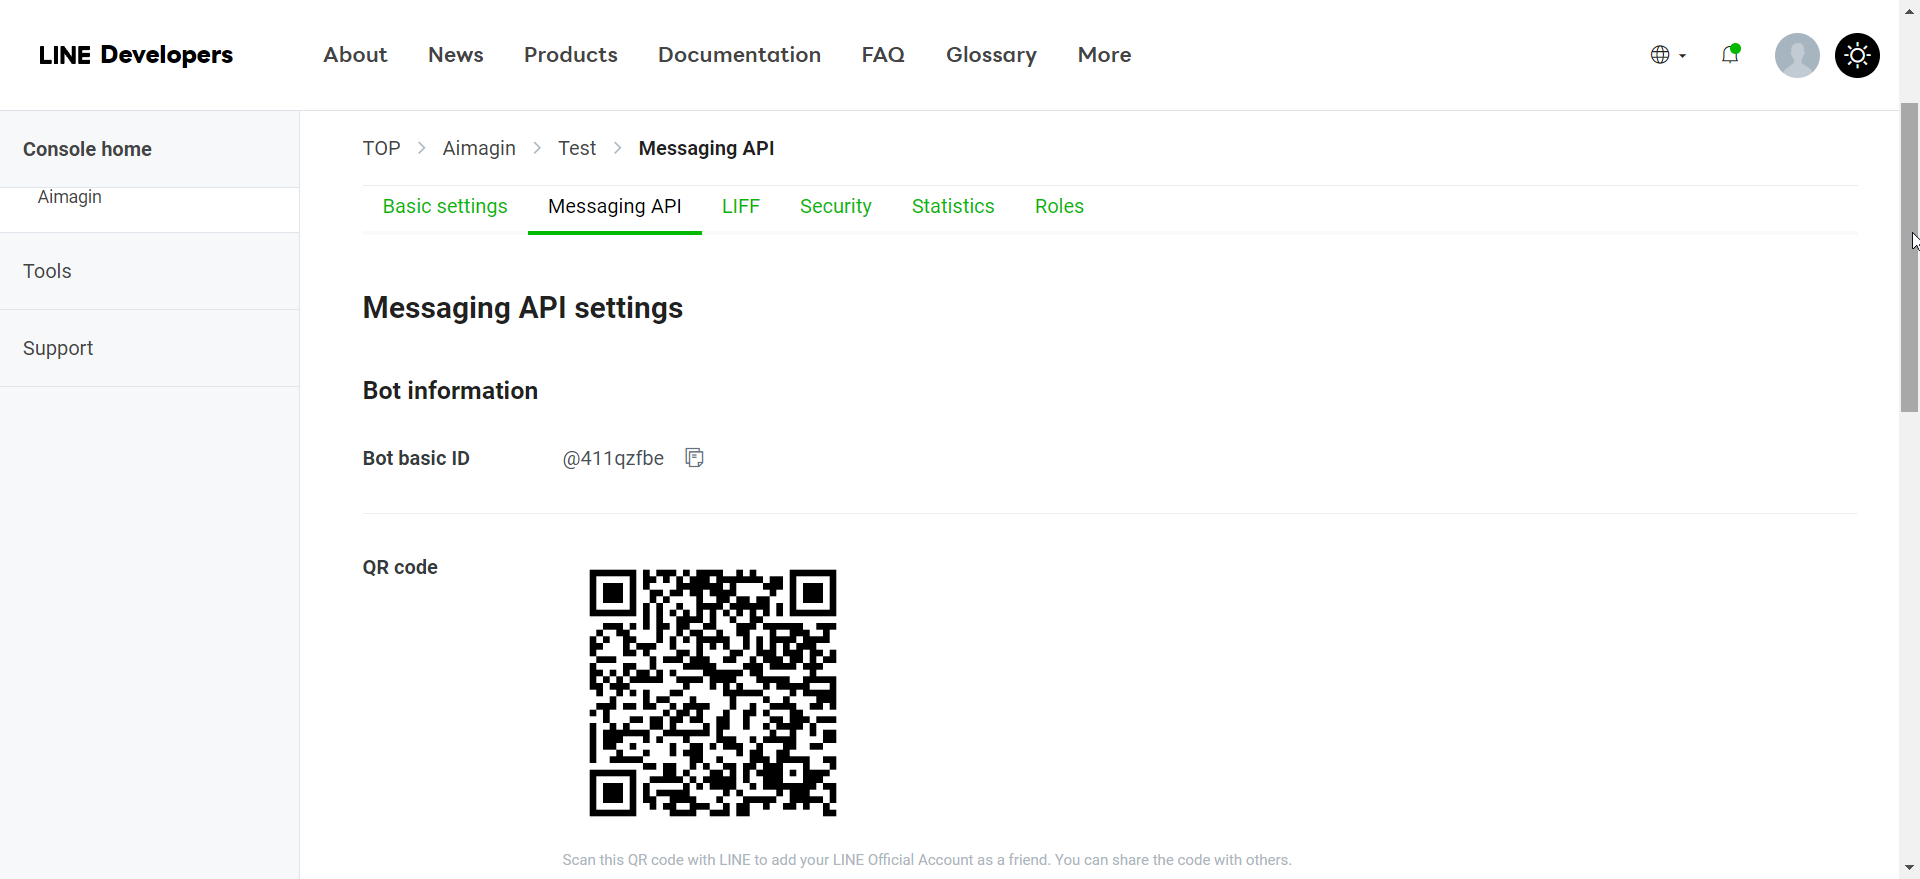
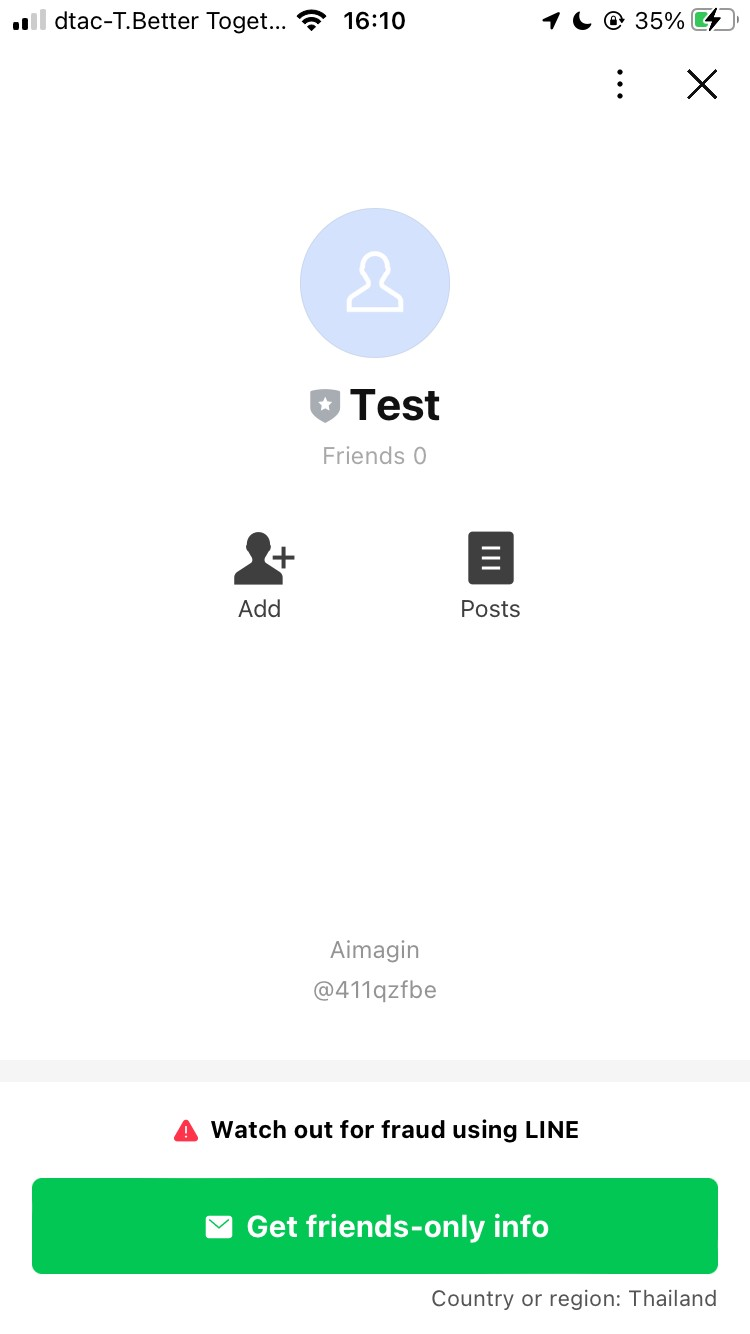
5.Under Messaging API settings, scan the QR code with LINE to add this newly created LINE Official Account as a friend.
6.Login to the Aimagin server or your own server that Aimagin has created for you. Only Aimagin can generate the login credentials for you.
7.After logging in, go to System settings > Settings > Line
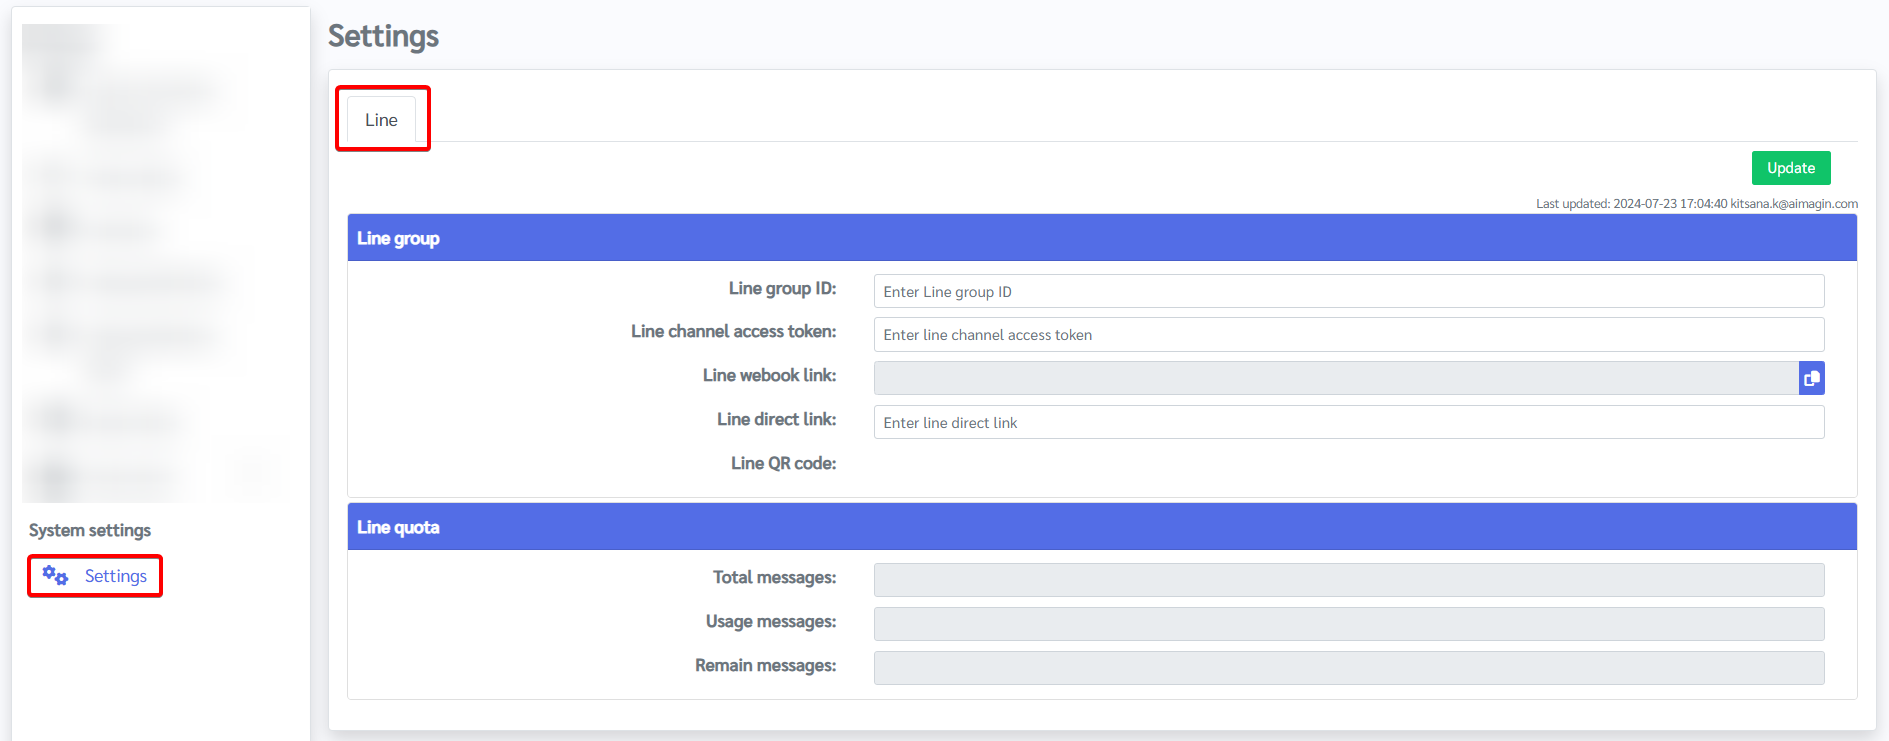
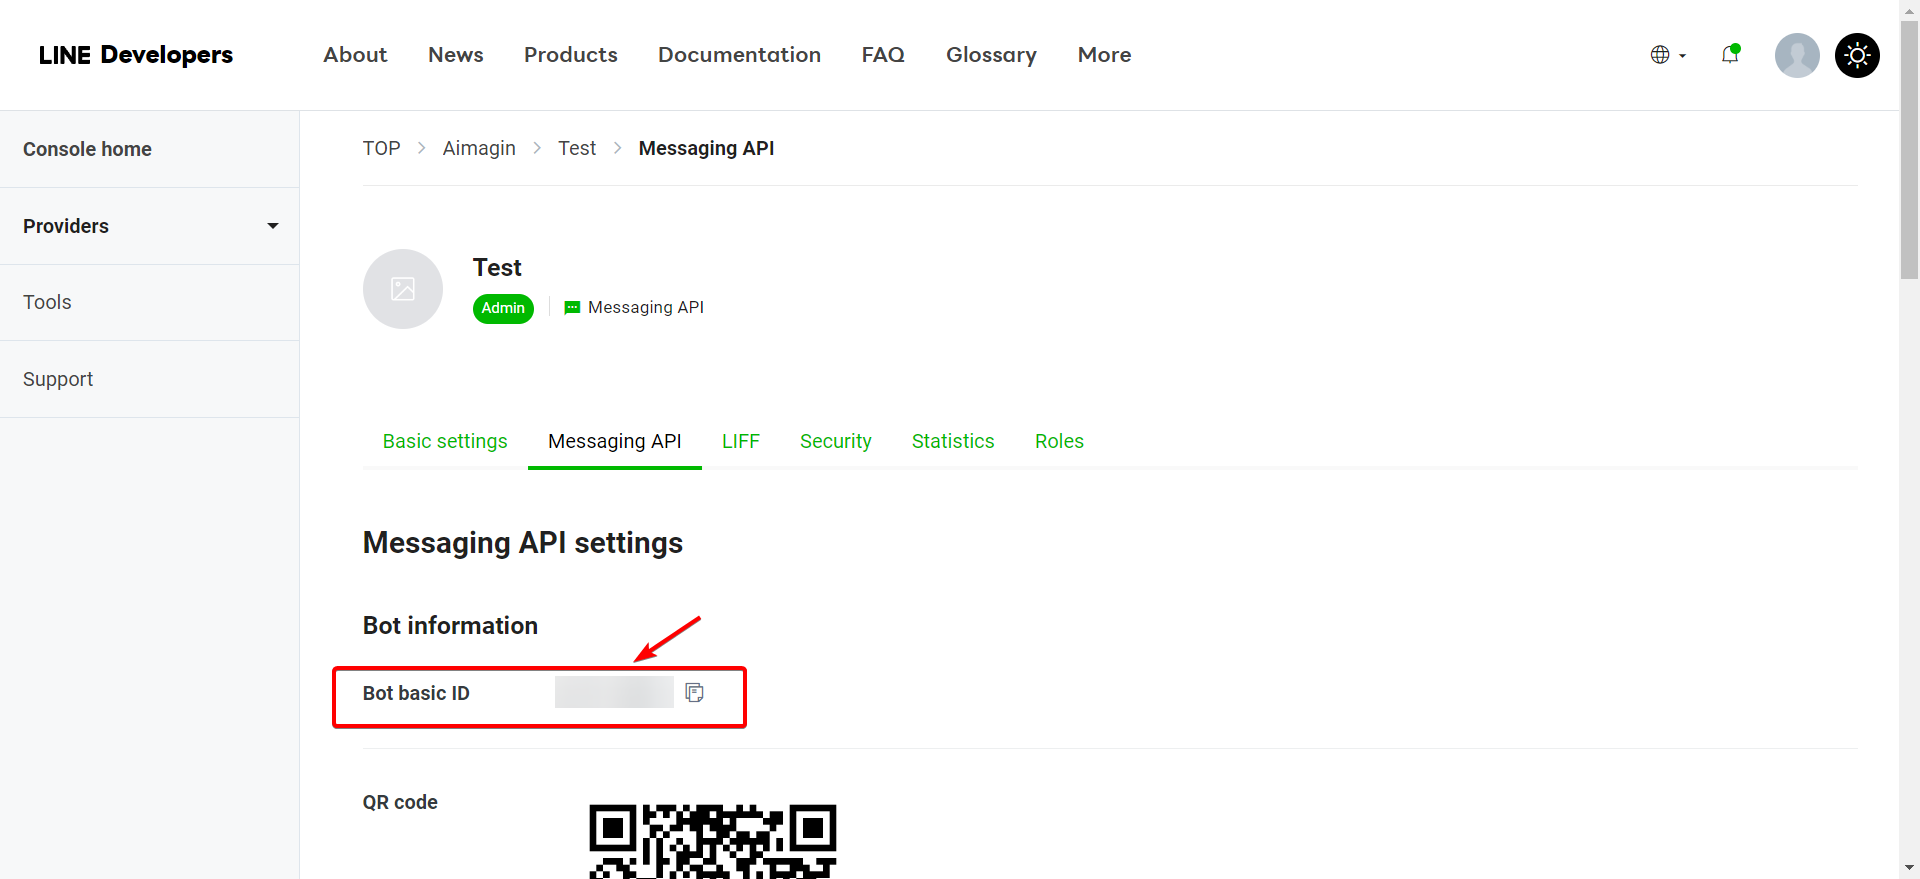
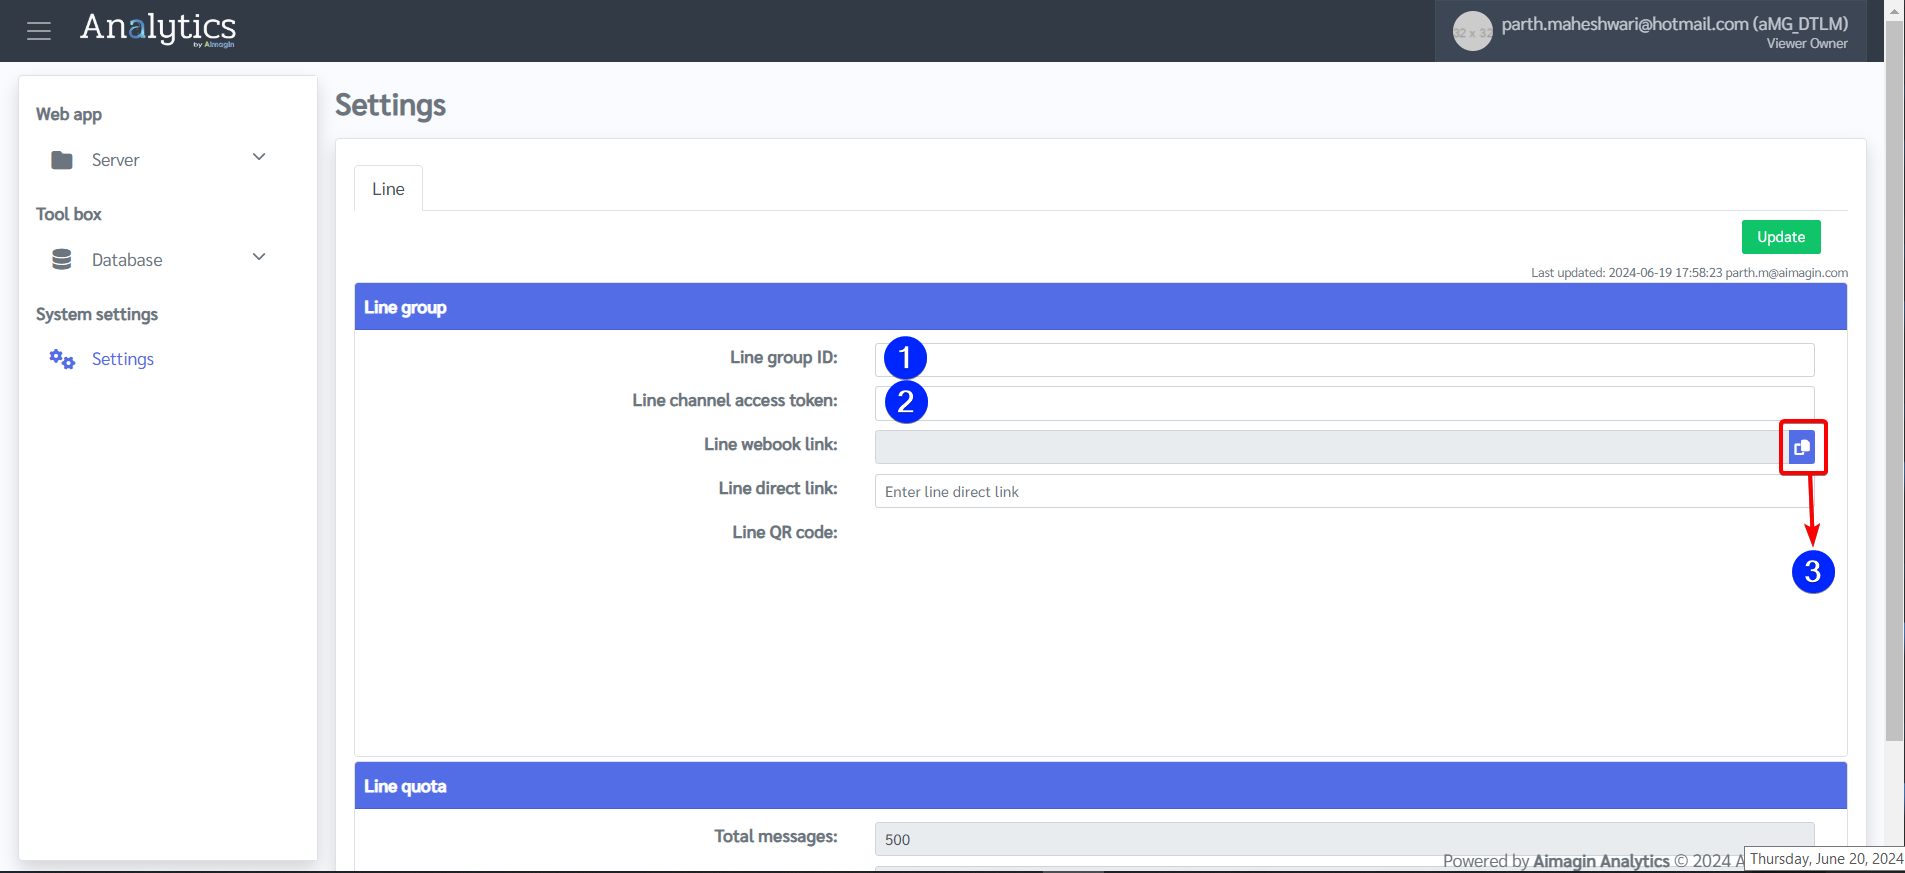
a.From the Messaging API settings, copy the Bot basic ID --> paste into Line group ID on the Aimagin server.
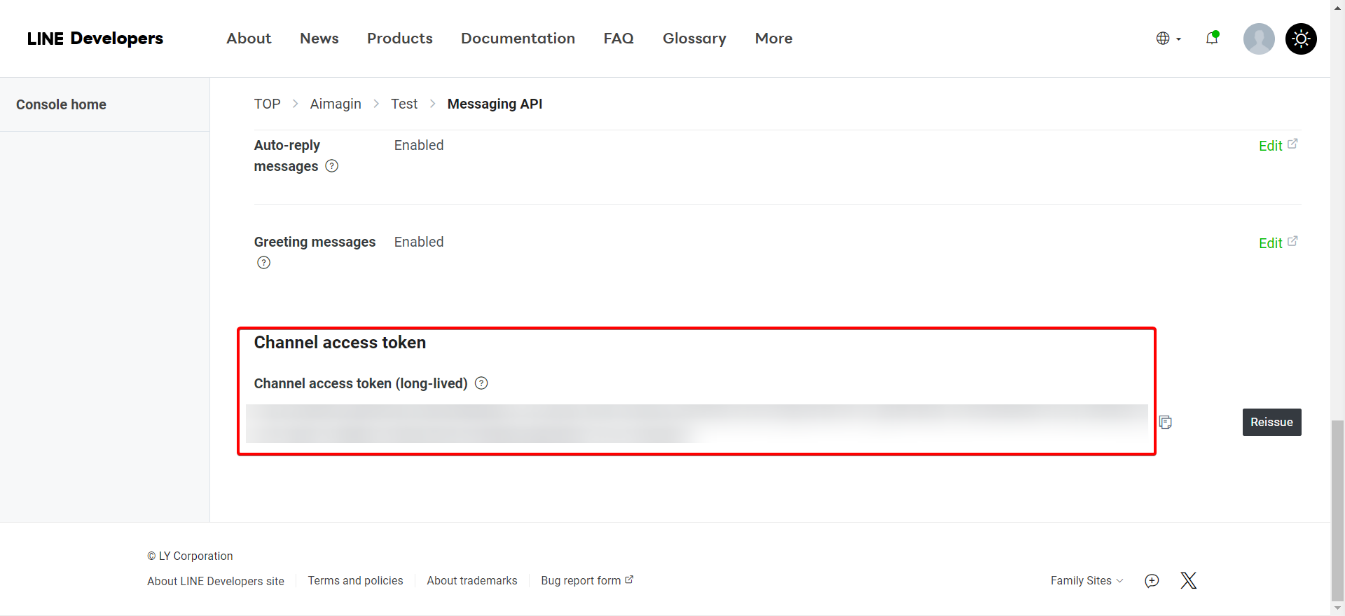
b. From the Messaging API settings, Issue the channel access token and copy it --> paste into Line channel access token on the Aimagin server.
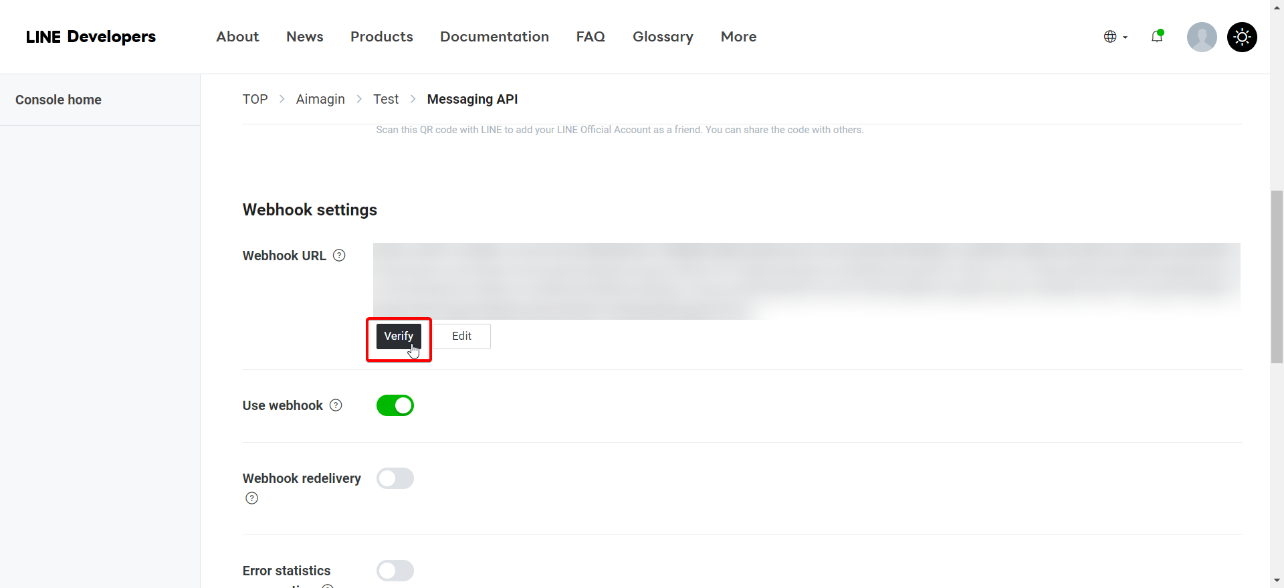
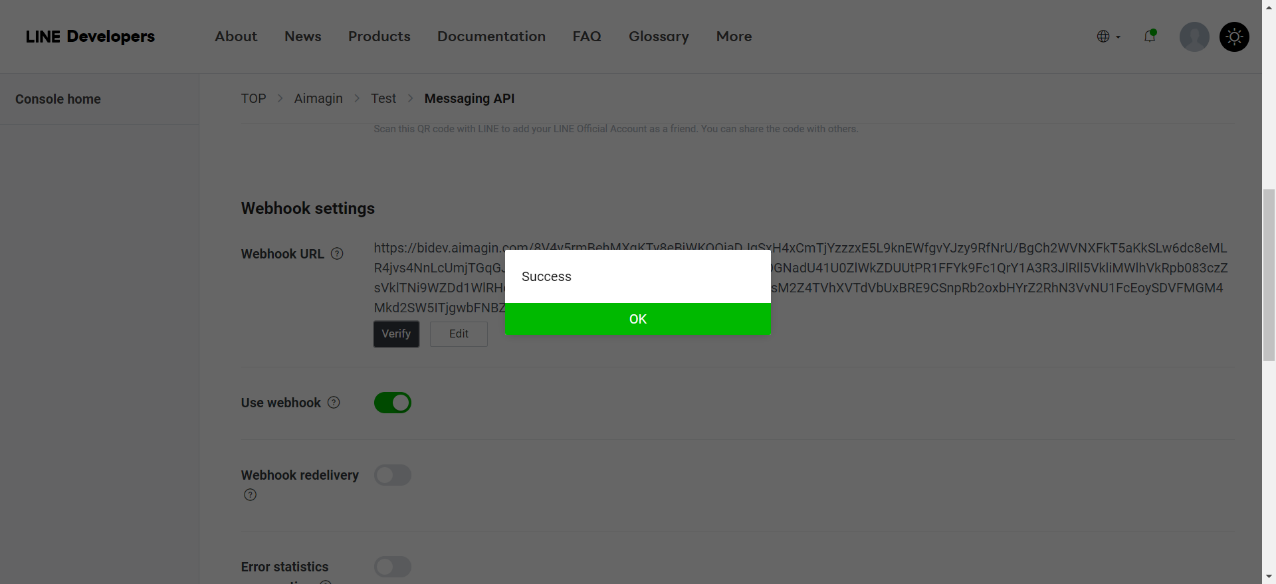
c.After pasting the group ID and channel access token, click on Update and generate the Line webhook link on the Aimagin server --> paste into Webhook URL under Messaging API settings. Activate the use of webhook as well.
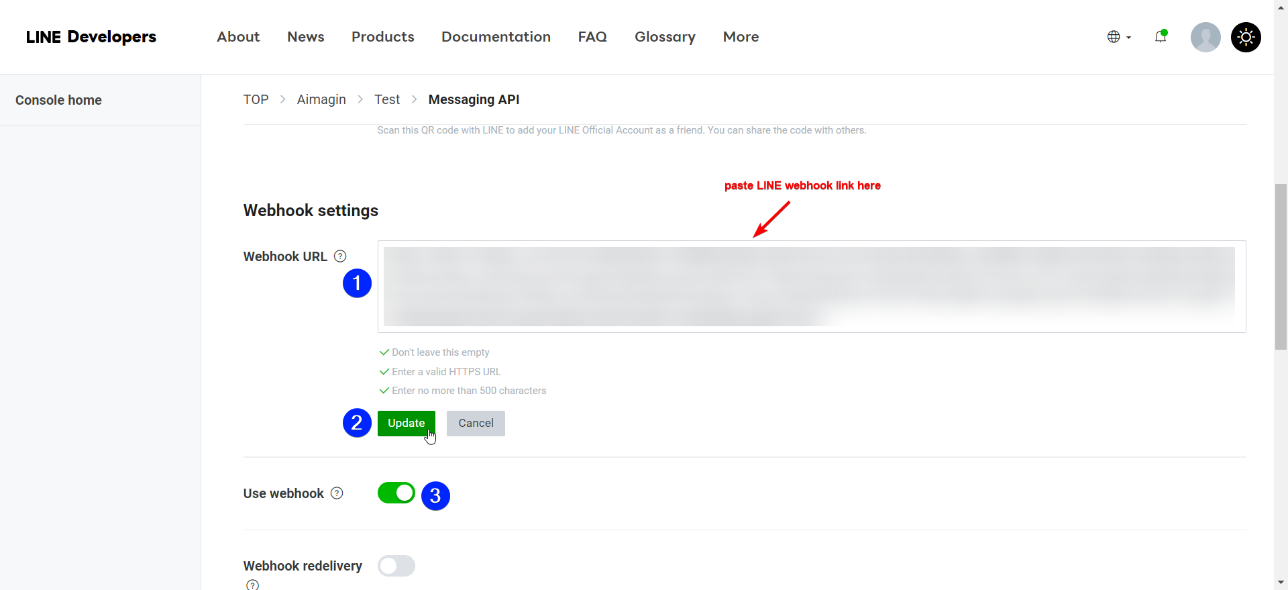
d.Verify Webhook URL.
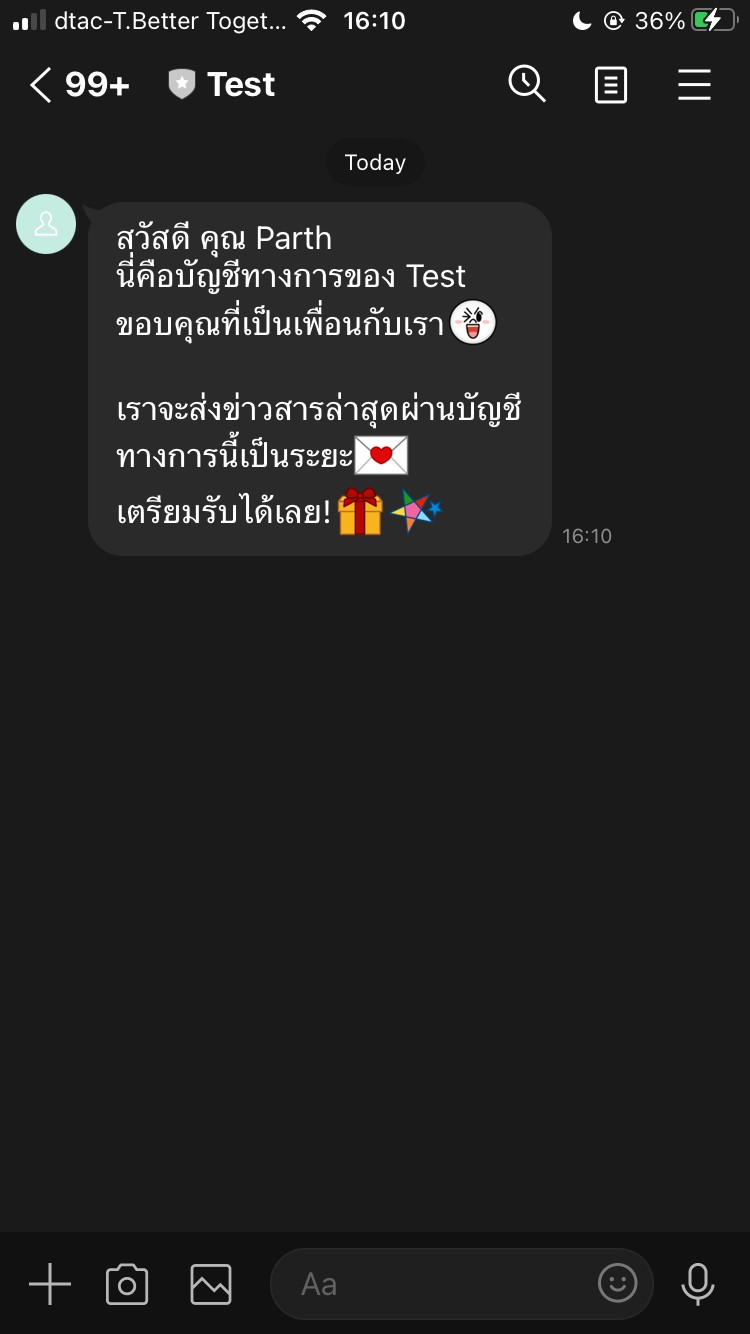
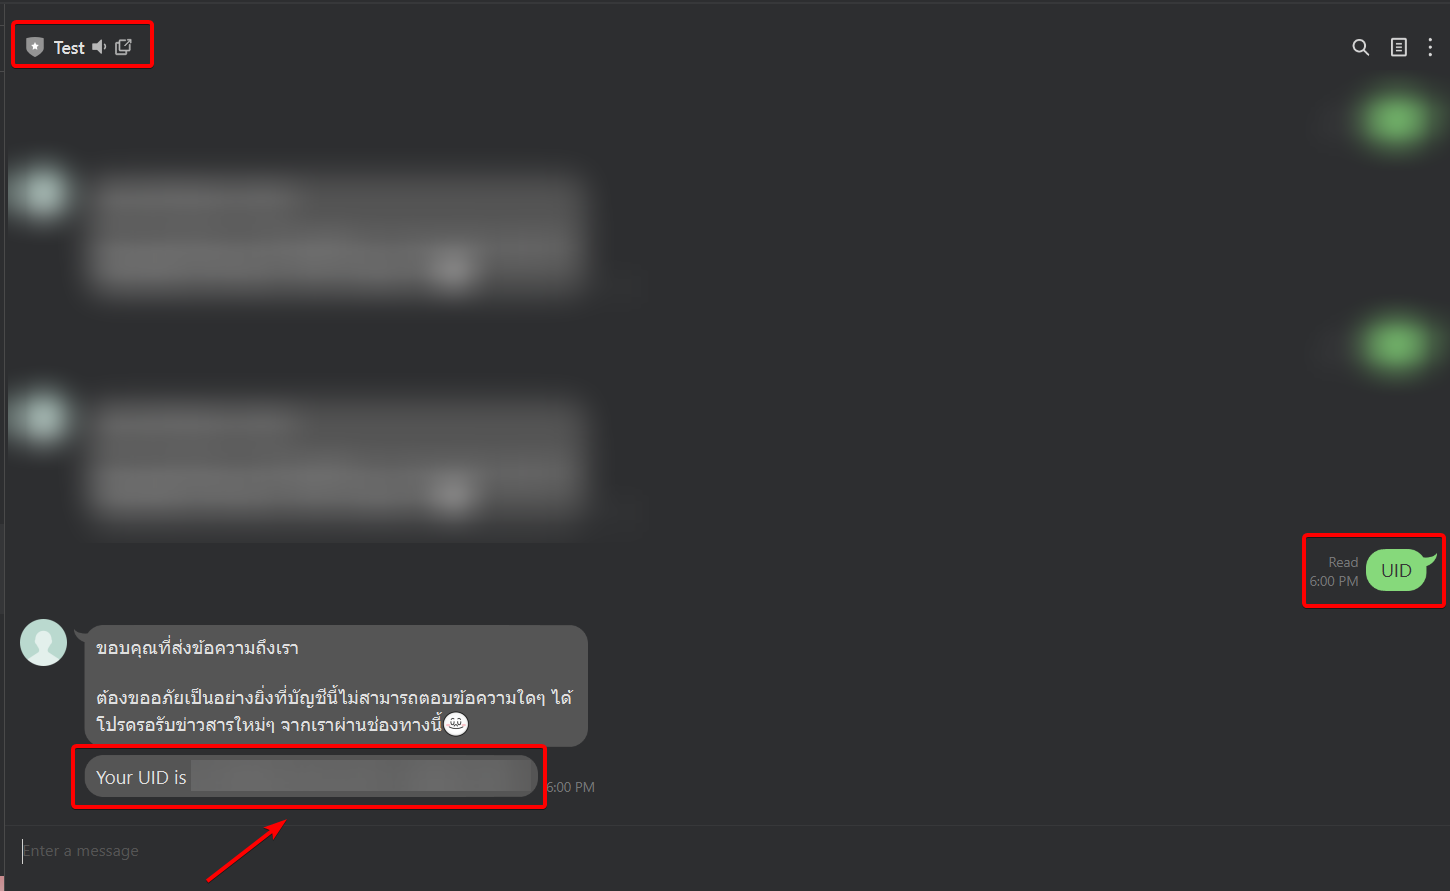
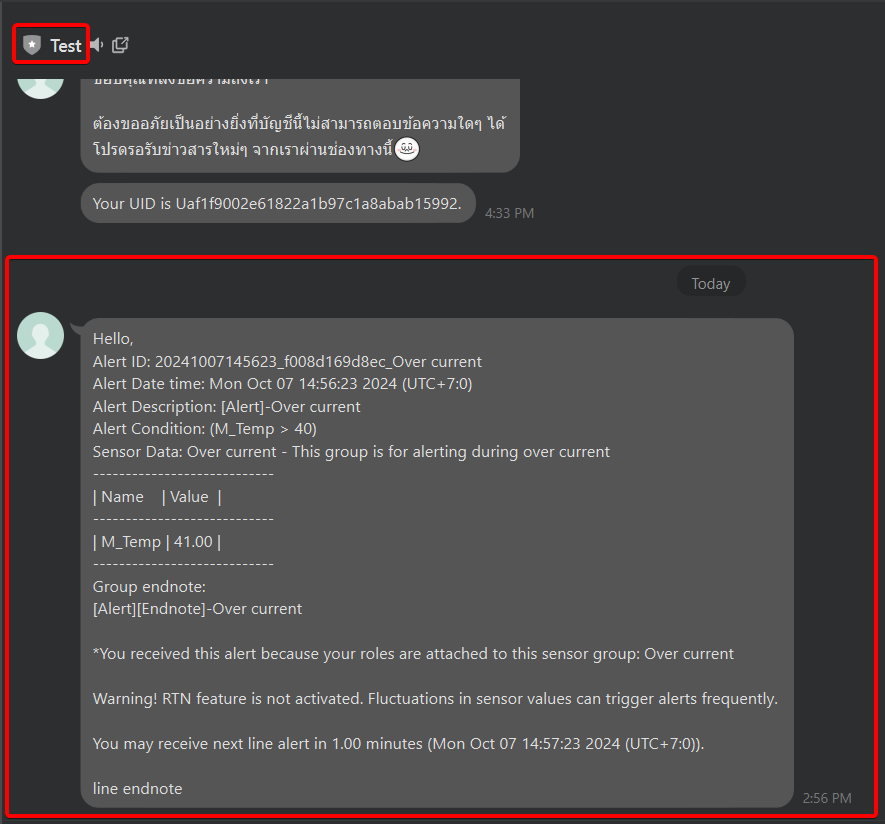
8.Go back to the LINE Official Account chat and send “UID” in the chat box. If you have done all the steps correctly, the bot will respond with a LINE UID, which is your unique User ID.
Part 2: Enabling LINE alert on gateway
1.Copy the LINE UID --> Go to gateway's web interface at 192.168.10.10 --> System settings > Users via the gateway's web interface at 192.168.10.10 --> paste --> Update

2.If you have not created a sensor group or set alert conditions yet, follow the steps in Email Part 2 section of this document to learn how to do so before moving on to the next step.
3.If you have already created a sensor group and set alert conditions as shown in Email Part 2 section of this document, select the sensor group under Web app > Alerts management > Sensor & Signal group alert configuration > Edit
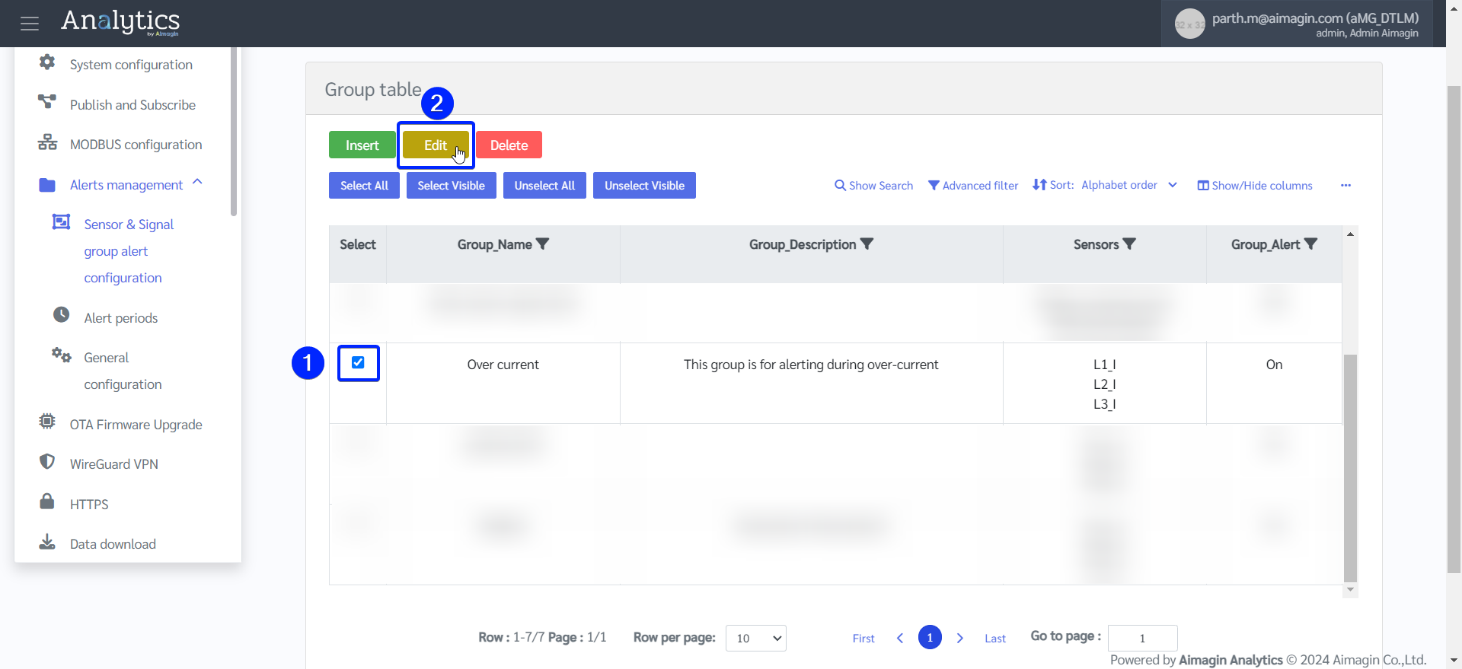
4.Enable the LINE alert channel and specify the endnote.
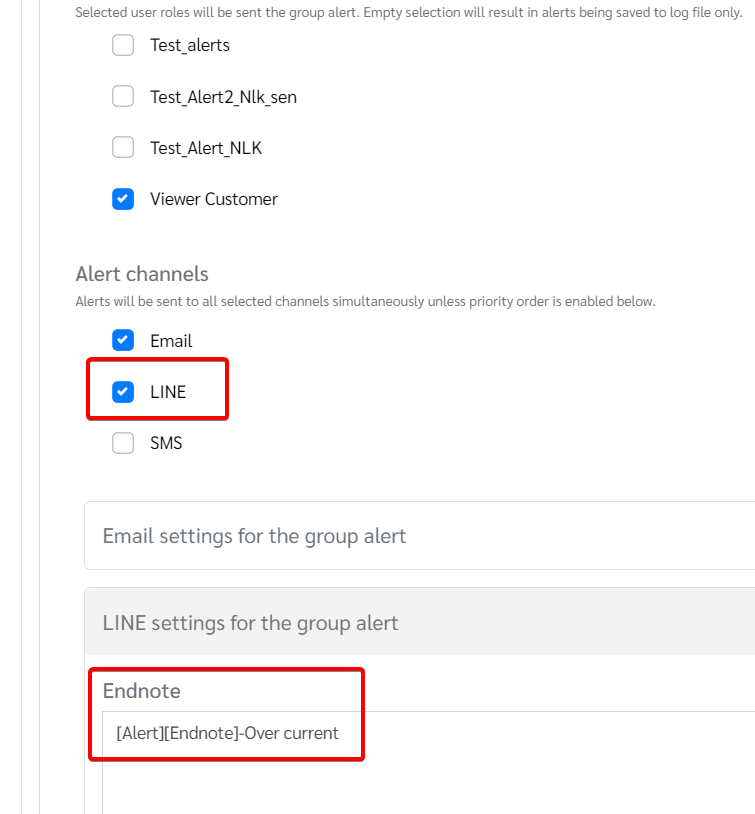
5.Click on "Submit" to save the changes.
6.Under Web app > Alerts management > General configuration > LINE tab, enter the Channel access token previously generated in LINE Part 1 section of this document.
7.You can use https://api.line.me/v2/bot/message/push as the Messaging API.
8.Save.

9.Once everything has been configured correctly, log out of the web app. If sensor value outside the threshold is detected, you should be receiving a LINE alert on your created LINE account.
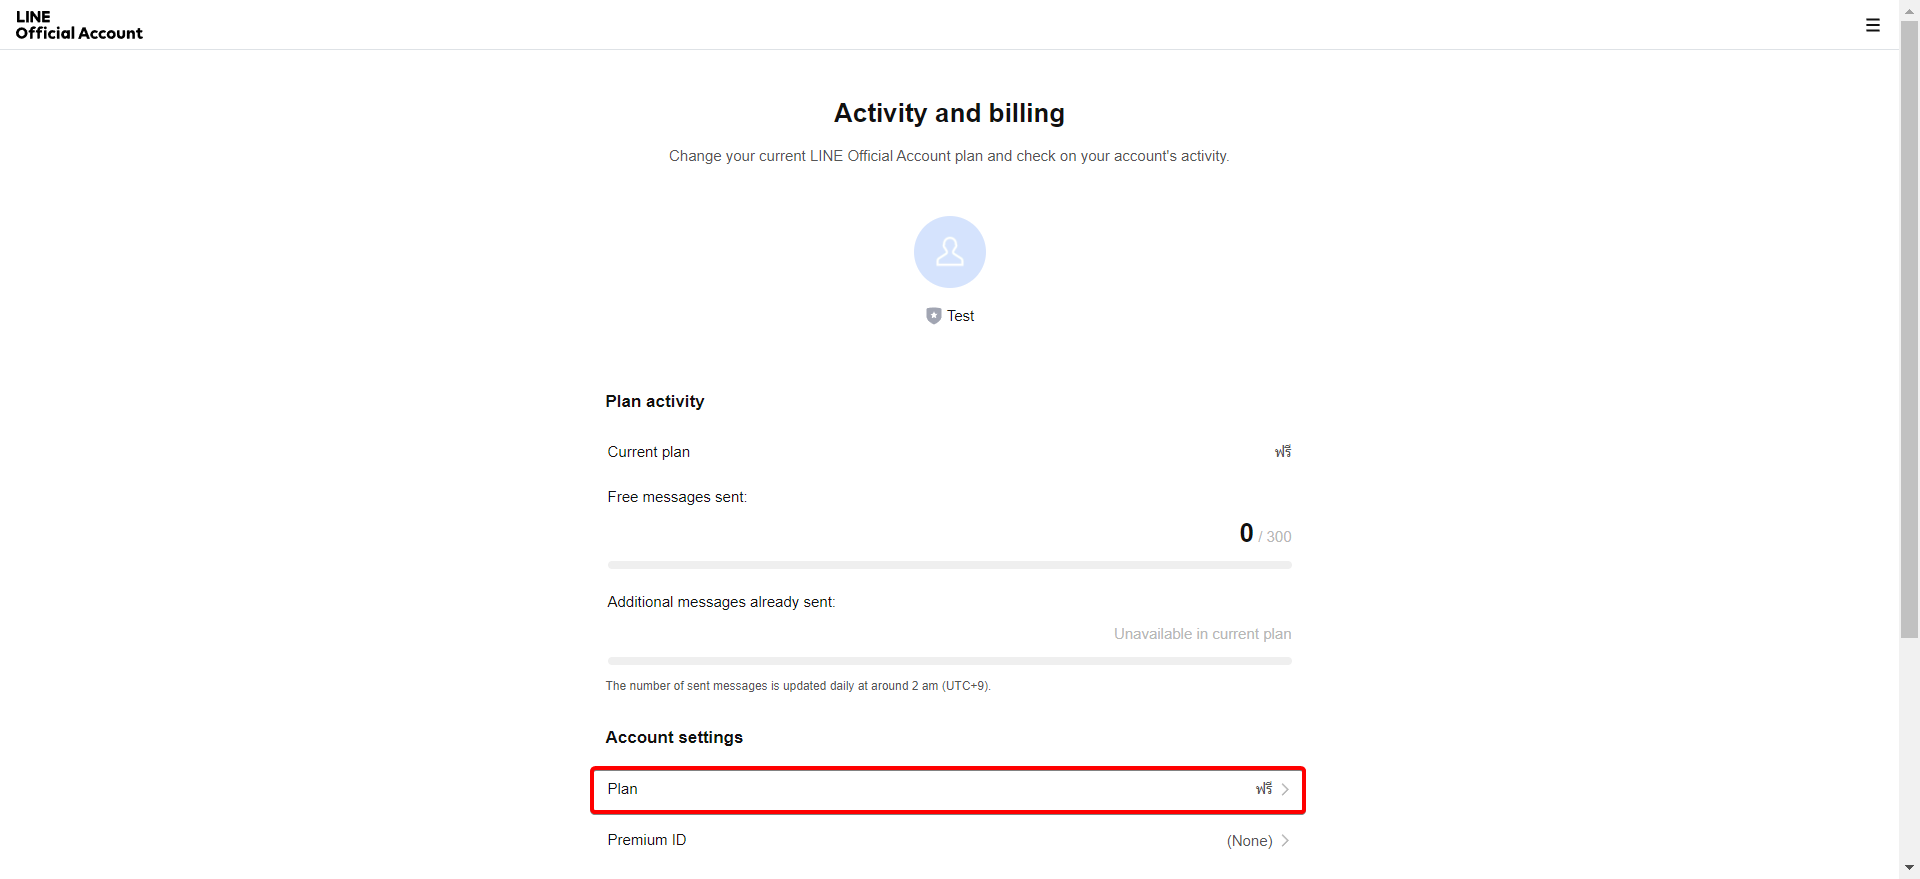
10.Please note that there is a monthly limit of 300 LINE messages in the Free Plan. If you would need more than 300 messages please upgrade your plan. More details can be found here.

Setting up SMS alerts
If interested to receive alerts via SMS, you must use a router that supports SMS functionality. We highly recommend using this industrial-standard 4G WIFI Router. A SIM card can be purchased and topped up with balance to enable SMS transmission.
This 4G WIFI router with a SIM card + internet package solves both purposes:
1.It can be used for sending data from the gateway to the server over 4G. For this, we recommend an internet package with a minimum speed of 15Mbps.
2.SMS alerts
If you have this 4G WIFI Router, continue following the next steps.
Part 1: Authorizing SMS functionality through router
1.Use the RUT200 Quick Start Guide or the booklet provided with the router for the installation and setup. Once that is complete, connect to the router and log in using the router’s Web interface.
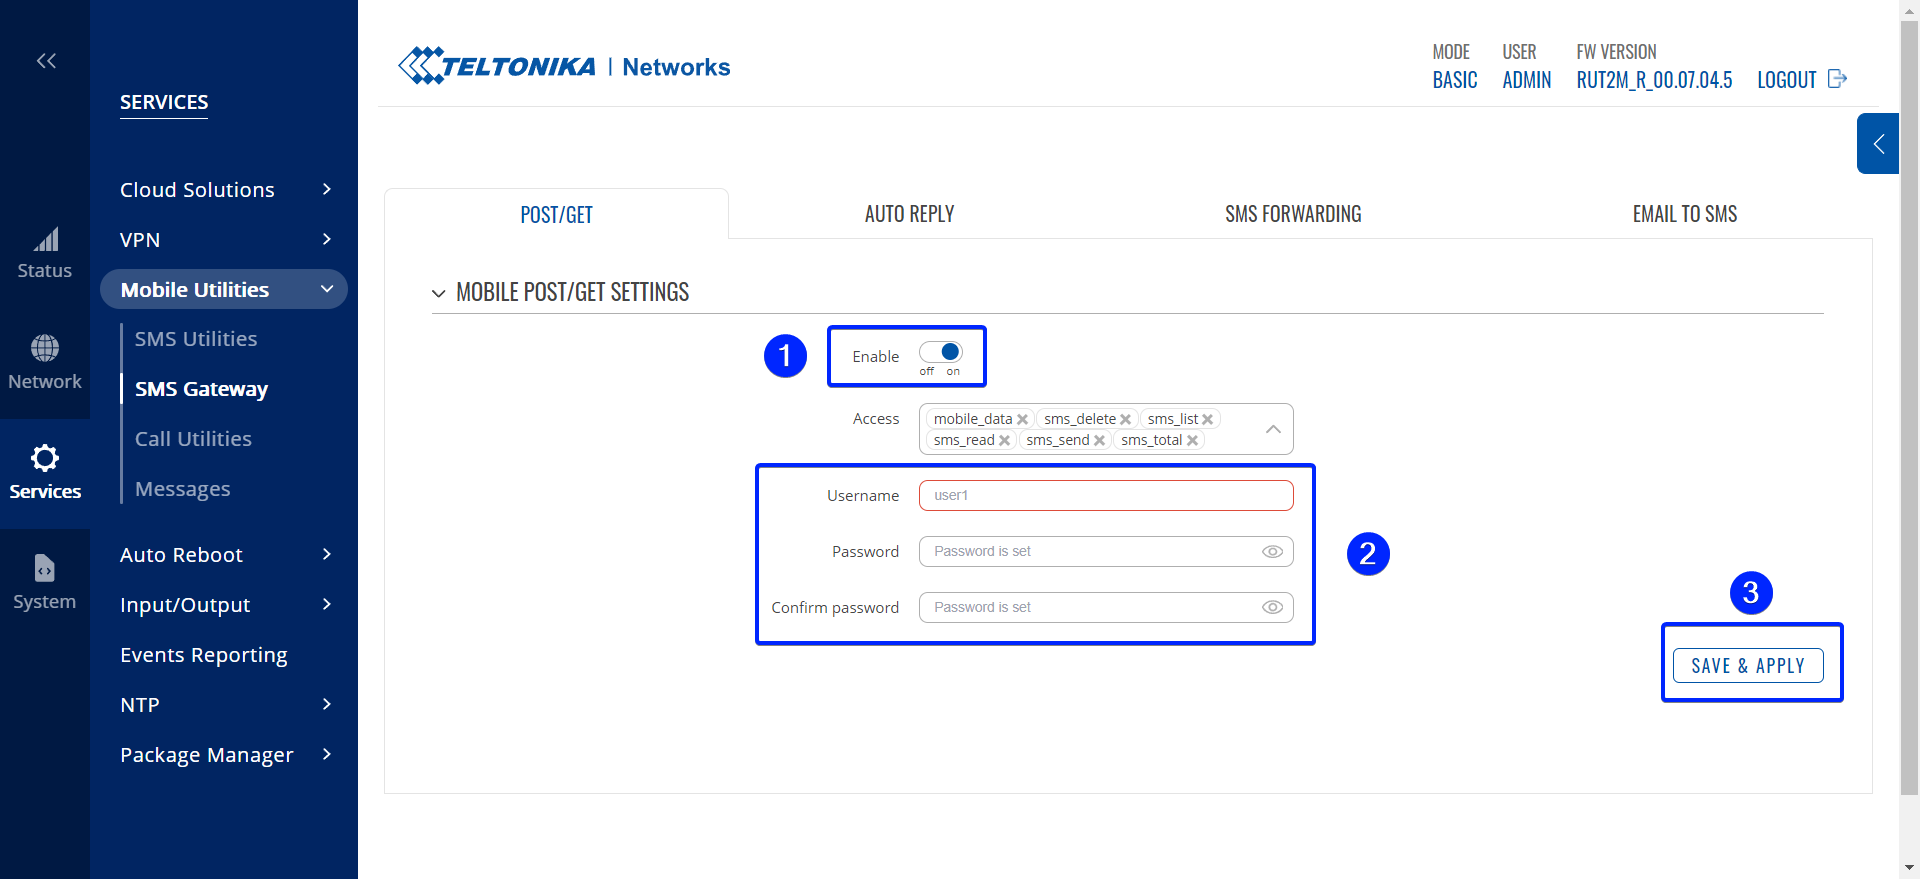
2.After logging in and completing the preliminary required steps, a username and password is required to authorize SMS functionality of RUT200. This can be configured under Services > Mobile Utilities > SMS Gateway > POST/GET
3.Once configuration is complete on the router’s web interface, go to the gateway’s web interface. Enter the details Under Web app > Alerts management > General configuration > SMS tab and save.
Part 2: Enabling SMS alert on gateway
1.On the gateway’s web interface, go to Alerts management > Sensor and Signal group alert configuration.
2.If you have not created a sensor group or set alert conditions yet, follow the steps in Email Part 2 section of this document before moving on to the next step.
3.If you have already created a sensor group and set alert conditions as shown in the Email Part 2 section of this document, you need to select the sensor group in the table and click on “Edit”.
4.Enable the SMS alert channel and specify the SMS endnote.
5.Click on “Submit” to save the changes.
6.Once everything has been configured correctly, log out of the web app. If sensor value outside the threshold is detected, you should be receiving a SMS alert on your registered phone number. Make sure that:
▪The gateway is connected to the 4G router's WIFI network
▪The SIM card has balance to send SMS messages
