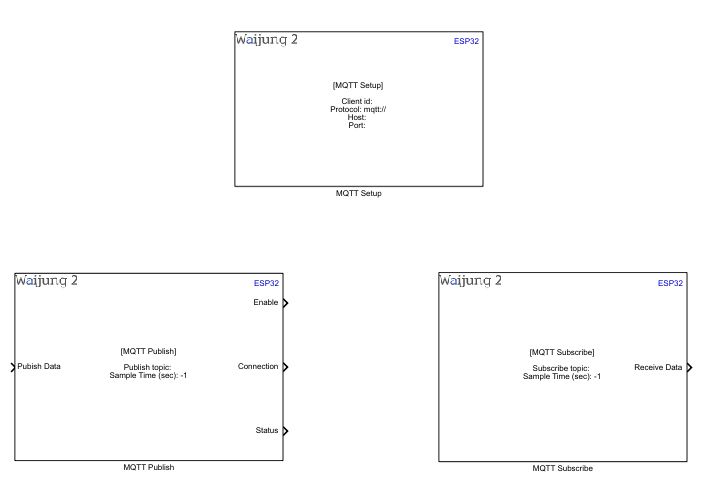
How this block appears in a Simulink model?
What can be configured?
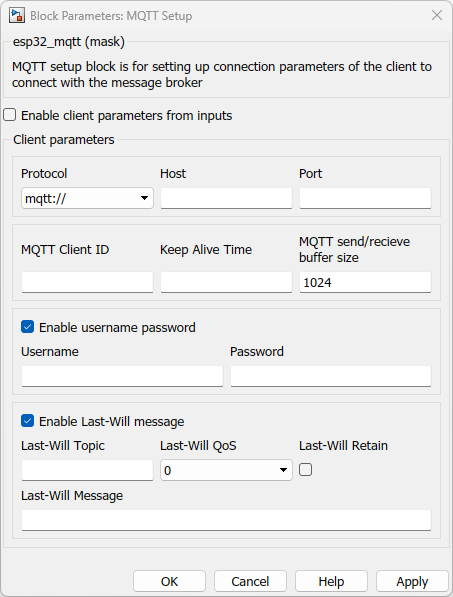
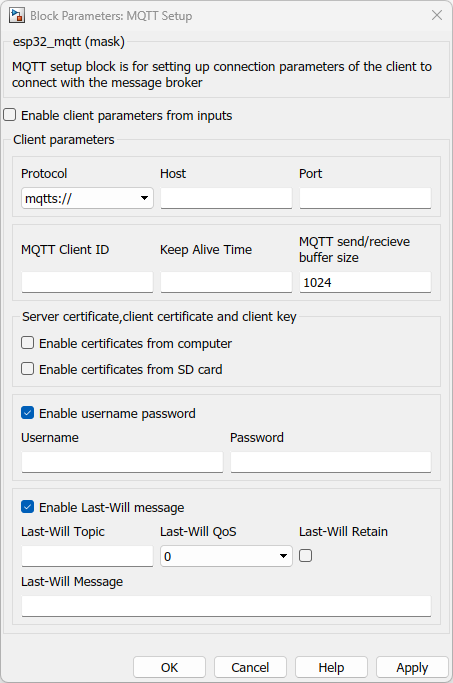
MQTT Setup Block
Configuration Parameter |
Selectable Option/Value |
Description |
Enable client parameters from inputs |
Check--Uncheck |
Enable parameters from input ports.Default uncheck. |
Protocol |
mqtt:// - (TCP connection) , mqtts:// - (TLS connection) |
MQTT client protocol |
Host |
|
MQTT message broker host details.Ex: https://mqtt.eclipseprojects.io/ and https://test.mosquitto.org/ are open source mqtt message brokers |
Port |
|
MQTT message broker port.TCP connection - 1883 and TLS connection - 8884.Port can different depending on the message broker use.Mentioned ports are the common ports available in most open source message brokers. |
MQTT Client ID |
|
Client ID details |
Enable username password |
Check--Uncheck |
Enable username and password of MQTT client |
Username |
|
Client username |
Password |
|
Client password |
Enable certificates from computer |
Check--Uncheck |
This will automatically pop up when select TLS connection(mqtts://). You can give the certificate path of your computer |
Folder path |
|
Folder path for certificates which are client key,client certificate and server certificate. |
Enable certificates from SD card |
Check--Uncheck |
This will automatically pop up when select TLS connection(mqtts://).You can give the path of certificates from the SD card connected to the ESP |
Enable Last-Will message |
Check--Uncheck |
Enable Last-Will message |
Last-Will Topic |
|
Last-Will Topic |
Last-Will QoS |
0--1--2 |
Quality of service level of Last-Will message |
Last-Will Retain |
Check--Uncheck |
Enable and disable Last-Will message Retain |
Last-Will message |
|
Last-Will message of client |
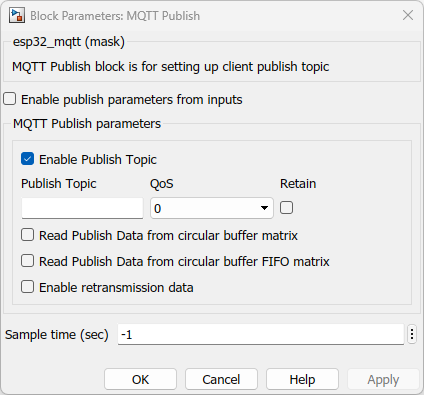
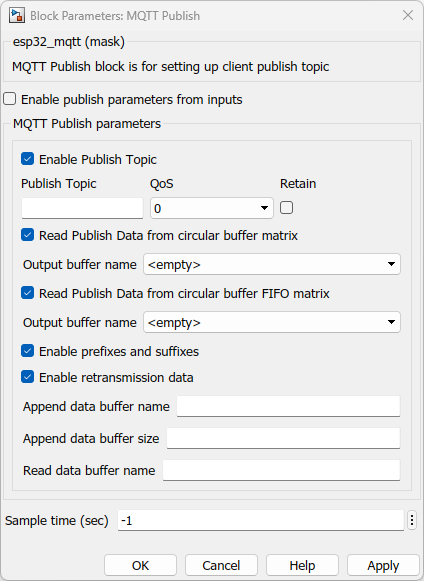
MQTT Publish block
Configuration Parameter |
Selectable Option/Value |
Description |
Enable publish parameters from inputs |
Check--Uncheck |
Enable parameters from input ports.Default uncheck. |
Enable Publish Topic |
Check--Uncheck |
Enable and disable publish topic |
Publish topic |
|
Publish topic can be any form as you required.Ex:aimagin/data/sensor1 |
QoS |
0--1--2 |
Quality of service level of publish message |
Retain |
Check--Uncheck |
Enable and disable message Retain |
Read Publish Data from circular buffer matrix |
Check--Uncheck |
Enable to read publish data from circular buffer matrix block |
Output buffer name |
|
Circular buffer matrix block output buffer name |
Read Publish Data from circular buffer FIFO matrix |
|
Enable to read publish data from circular buffer FIFO matrix block |
Output buffer name |
|
Circular buffer FIFO matrix output buffer name |
Enable prefixes and suffixes |
Check--Uncheck |
Enable prefixes and suffixes |
Enable retransmission data |
Check--Uncheck |
Enable retransmission capability |
Append data buffer name |
|
buffer name which append failed publish packet |
Append data buffer size |
|
Size of append buffer |
Read data buffer name |
|
Buffer name which kept retransmit data |
Sample time (sec) |
-1(inherited) or specify |
Specify the sample time |
INPUT Port
Port Name |
Port Type |
Date Type |
Description |
Publish data |
Vector |
uint8 |
Feed in a character vector with the data to be published |
OUTPUT Port
Port Name |
Port Type |
Date Type |
Description |
Enable |
Scalar |
Boolean |
Output the status whether the MQTT setting has establish |
Connection |
Scalar |
Boolean |
Output the status whether the MQTT connection is available or not |
Status |
Scalar |
Boolean |
Status of MQTT |
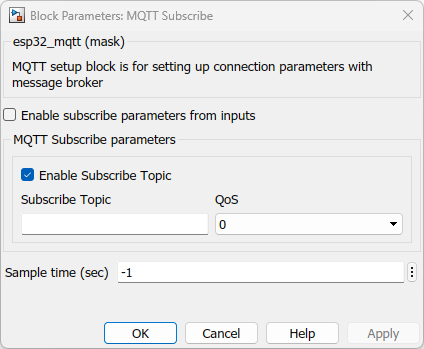
MQTT Subscribe block
Configuration Parameter |
Selectable Option/Value |
Description |
Enable subscribe parameters from inputs |
Check--Uncheck |
Enable parameters from input ports.Default uncheck. |
Enable Subscribe Topic |
Check--Uncheck |
Enable and disable subscribe topic |
Subscribe topic |
|
Subscribe topic can be any form as you required.Ex:aimagin/data/control1 |
QoS |
0--1--2 |
Quality of service level of subscribe message |
Sample time (sec) |
-1(inherited) or specify |
Specify the sample time |
OUTPUT Port
Port Name |
Port Type |
Date Type |
Description |
Receive Data |
Vector |
uint8 |
The port outputs a vector with the data received from the subscribed topic |
When to use this block?
This block can use to send and receive data using MQTT protocol. Using publish block can send data to the MQTT message broker and using subscribe block can receive data from MQTT message broker. It is mandatory to have a setup block when using publish or subscribe block.It has two connection protocol types which are TCP connection and TLS connection.You can use one connection type depending on the message broker using.
How does this block work?
•MQTT Setup: Use to set up connection parameters of the MQTT Client.
•MQTT Publish: Use to set up publish topics of MQTT Client.
•MQTT Subscribe: Use to set up subscribe topics of the MQTT Client.
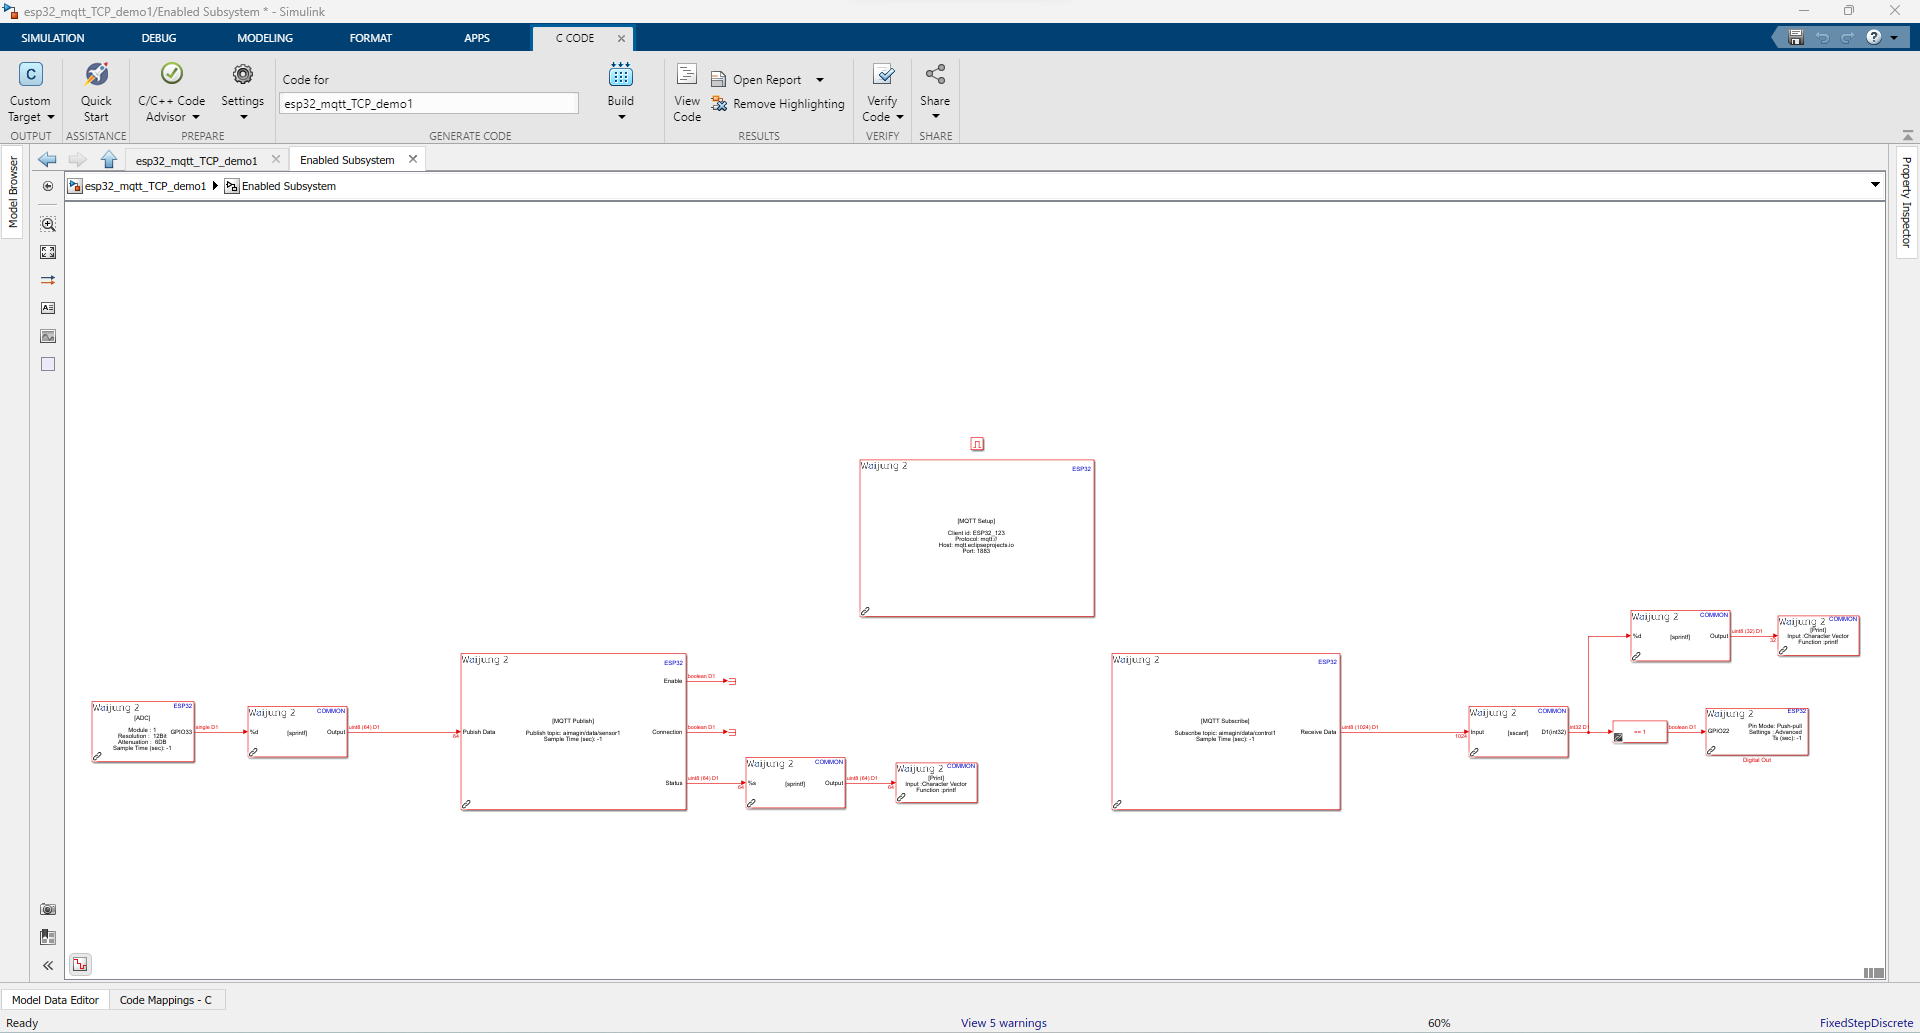
Demo
TCP connection demo files
Demo1 file : esp32_mqtt_TCP_demo1.slx
Demo2 file : esp32_mqtt_TCP_demo2.slx
Demo3 file : esp32_mqtt_TCP_demo3.slx
TLS connection demo files
Demo1 file : esp32_mqtt_TLS_demo1.slx
Demo2 file : esp32_mqtt_TLS_demo2.slx
Demo3 file : esp32_mqtt_TLS_demo3.slx
Demo4 file : esp32_mqtt_TLS_demo4.slx
TCP connection demos
Description
This examples demonstrate how to use MQTT blocks to publish and receive data from the MQTT message broker. It publishes analog sensor reading to the MQTT message broker and receives a JSON command to switch on/off a digital output.These example used MQTT message broker as mqtt.eclipseprojects.io which is a free message broker that can use for testing purposes. You can log in to the broker site using URL:https://mqtt.eclipseprojects.io/ .
TCP connection Demo1: Publish one sensor data and receive one control data
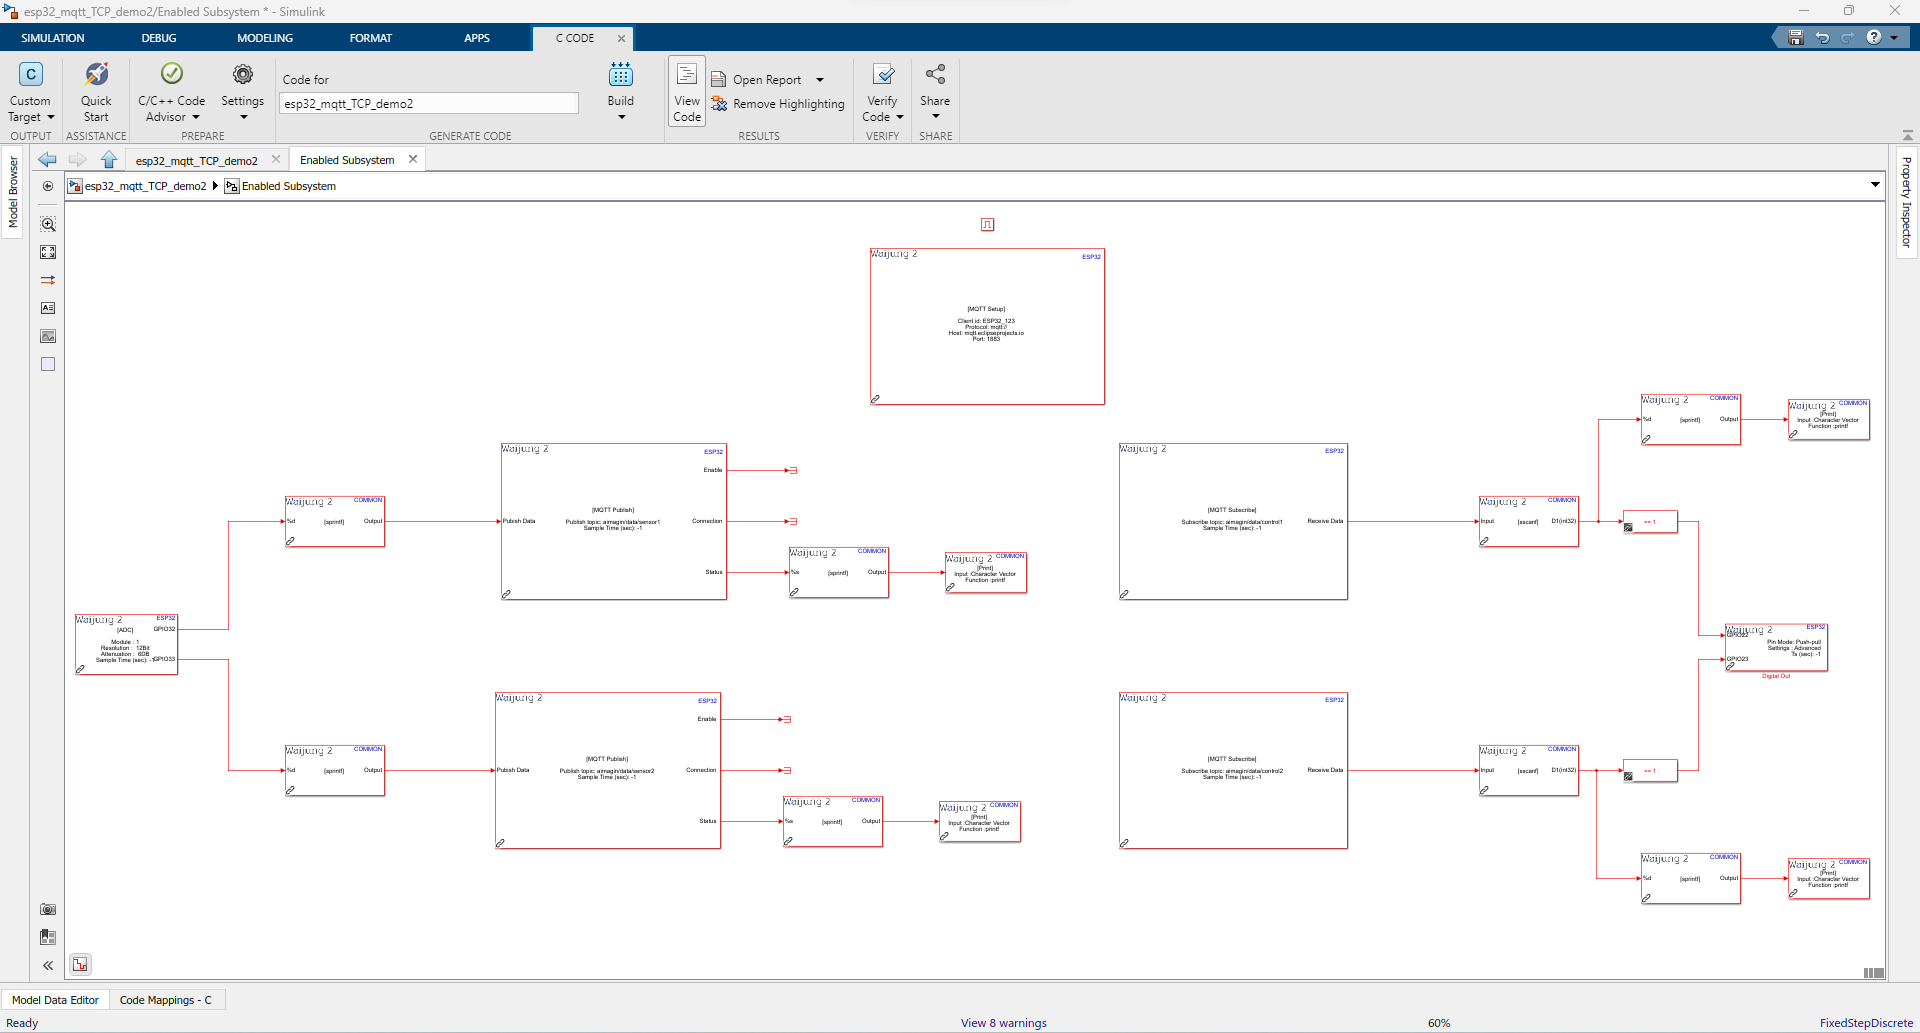
Full model

Subsystem
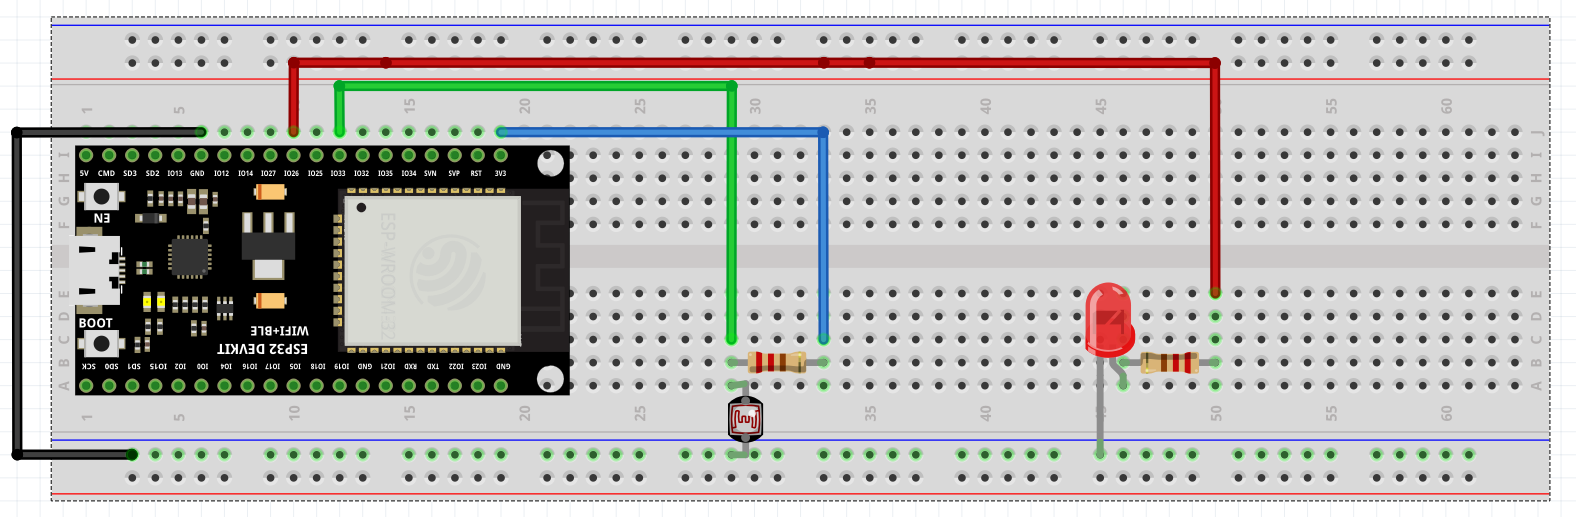
Hardware setup
Description
This demo demonstrates an application of MQTT Block set. It publishes analog read value to the publish topic and receives a control command from subscribe topic. Using 'MQTT explorer' client software, you can subscribe to the same publish topic to see receiving data to the message broker and you can publish a control command to the subscribed topic to control the digital output.In this demo uses TCP as the connection protocol and https://mqtt.eclipseprojects.io/ as the message broker.Below explain details steps to test the demo.
What should be happening?
Set your Wi-Fi settings and build the demo1 file and once it successfully deploys to the hardware, open serial communication software to test the demo. Select the correct COM port in the software to monitor the data. As in the below image, first, you can see the configured settings that are set up in the block set and after that, it starts to publish data to the message broker to the defined publish topic.
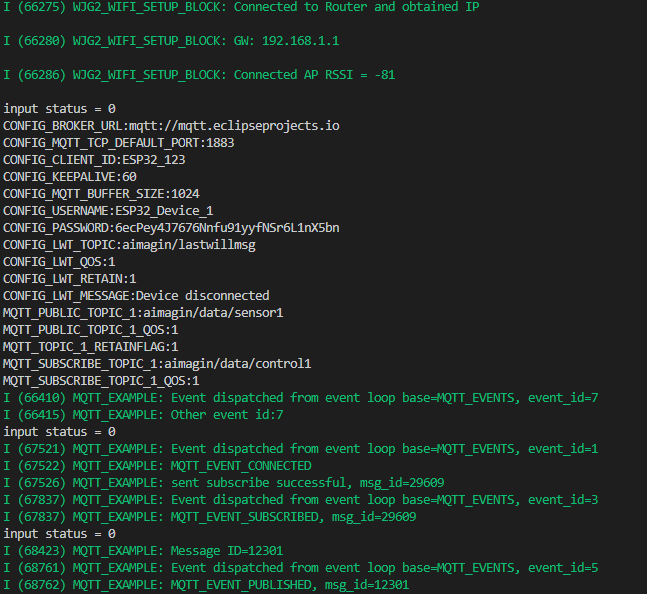
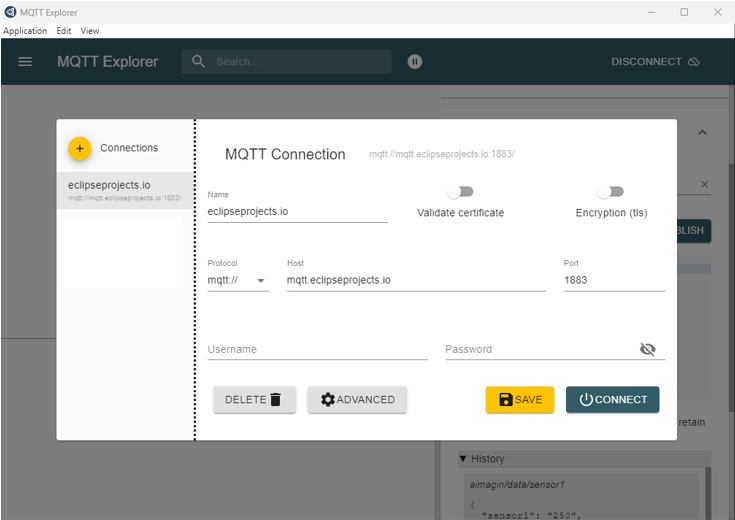
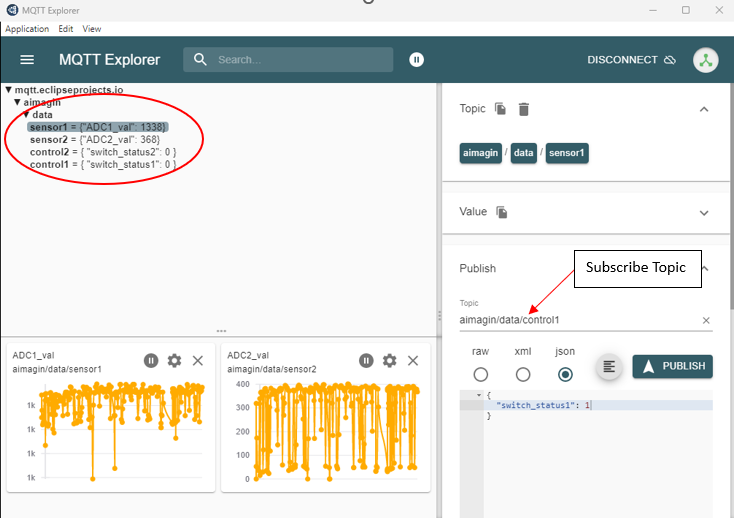
By using the 'MQTT Explorer' client software, you can subscribe to the publish topic to see the published data from the hardware. First set up the client software by following the steps.
Step 1: Setup protocol,host and port as follows
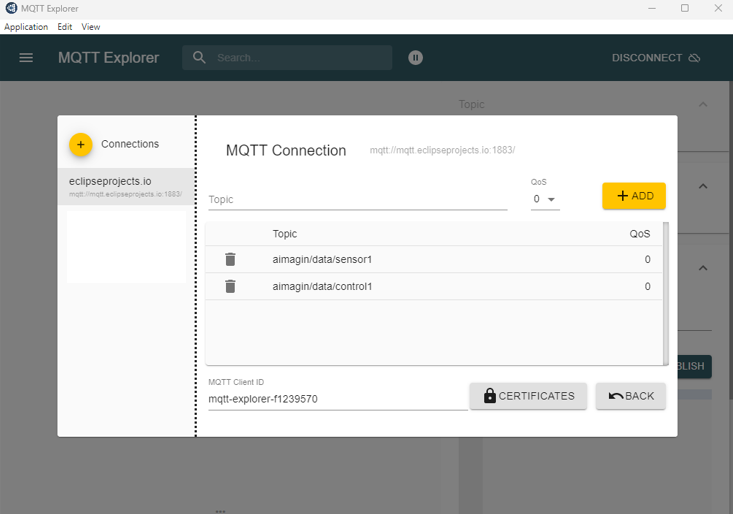
Step 2: Go to the advanced setting and set publish topic as below. After that go back and save the setting and select connect button to establish the client connection.
Step 3: Once it is connected to the message broker the data is showing as follows.
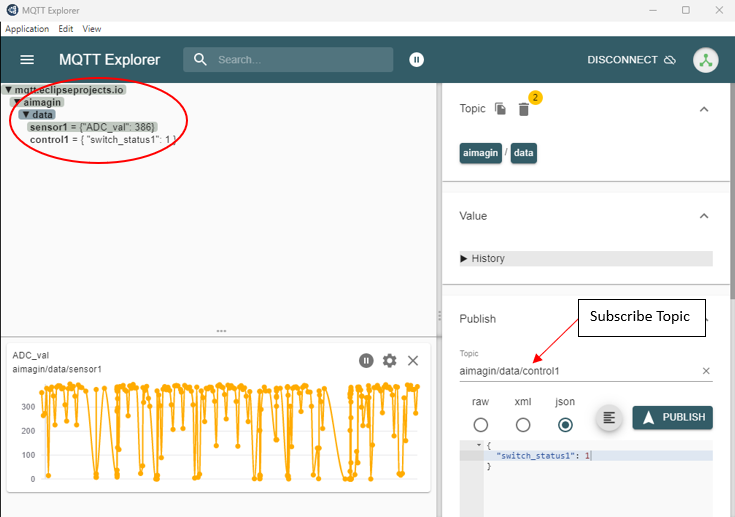
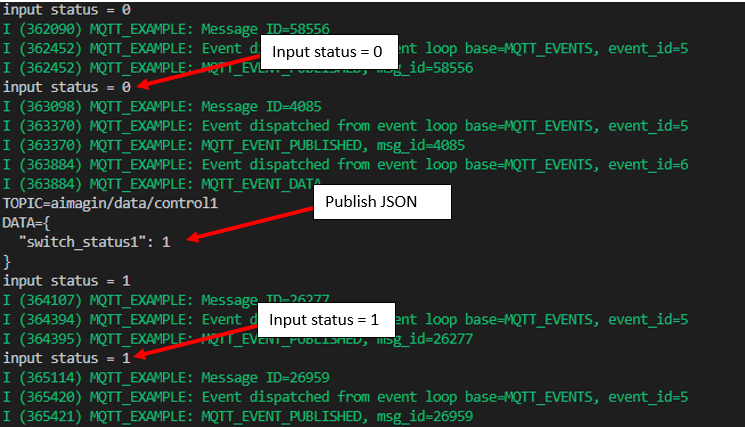
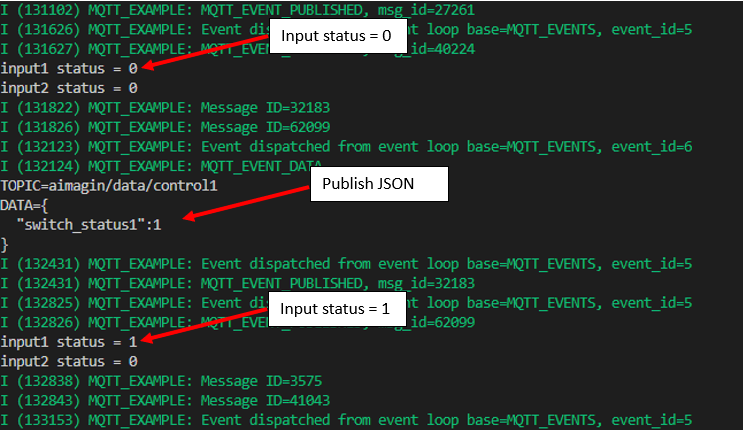
Step 4: Setting up the subscribe topic and the JSON message as shown in the above image. Once it publishes the JSON command, the device should receive it and will pull up the digital output. As in the below image before publishing the control JSON the input status is zero and after it is published it becomes one.
TCP connection Demo2: Publish two sensor data and receive two control data
Subsystem
Description
This demo is same as demo1 but it uses two publish topics to publish sensor data and two subscribe topics to control the outputs.
What should be happening?
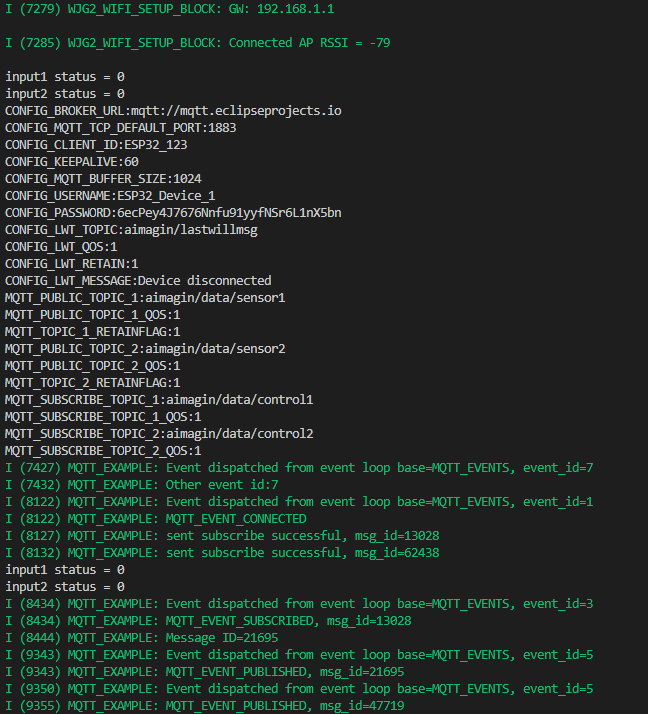
Set your Wi-Fi settings and build the demo2 file and once it successfully deploys to the hardware, open serial communication software to test the demo. Select the correct COM port in the software to monitor the data. As in the below image, first, you can see the configured settings that are setup in the block set and after that, it starts to publish data to the message broker to the define publish topic.
The steps are the same as demo1 and please refer demo1 as reference for the following steps.

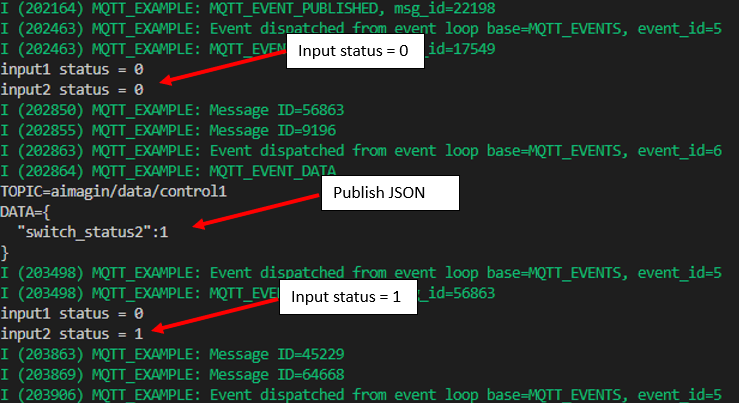
All published data can see as in the following images.
As shown in the below image, publish JSON has to receive by the device and change the status of control outputs.
TCP connection Demo3: Same as demo2 but use input ports to configuration
TLS connection demos
Description
This examples demonstrate how to use MQTT blocks to publish and receive data from the MQTT message broker. It publishes analog sensor reading to the MQTT message broker and receives a JSON command to switch on/off a digital output.These example used MQTT message broker as test.mosquitto.org which is a free message broker that can use for testing purposes. You can log in to the broker site using URL: https://test.mosquitto.org/.
TLS connection Demo1: Publish one sensor data and receive one control data
Full model

Subsystem

Description
This demo demonstrates an application of MQTT Block set. It publishes analog read value to the publish topic and receives a control command from subscribe topic. Using 'MQTT explorer' client software, you can subscribe to the same publish topic to see receiving data to the message broker and you can publish a control command to the subscribed topic to control the digital output.In this demo uses TLS as the connection protocol and https://test.mosquitto.org/ as the message broker.
Before running the demo files, first, you have to create client certificates for authentication. To do that, you have to download a software called OpenSSL in to your computer. Use https://slproweb.com/products/Win32OpenSSL.html to download the software.
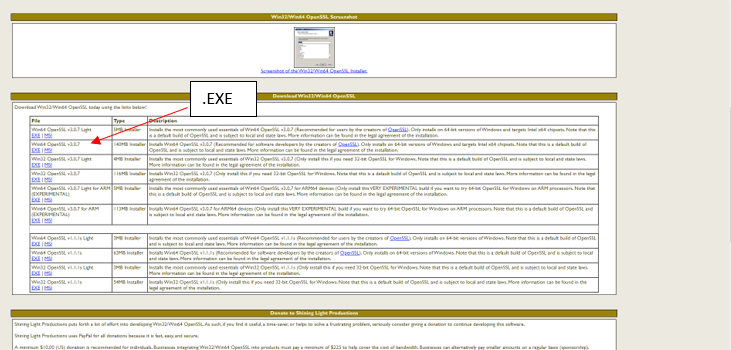
Download the .EXE file and install it. After the installation need to add installation bin path to the windows system environment variable as follows.First search environment variables on windows search bar and select the option as in the image.
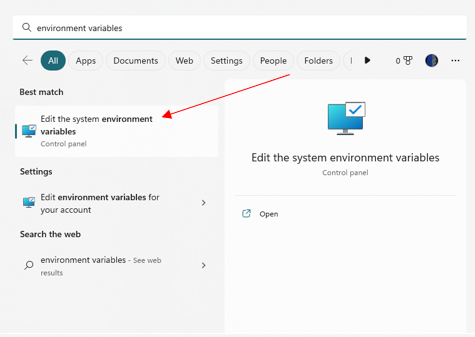
After that select 'Environment variable' option.
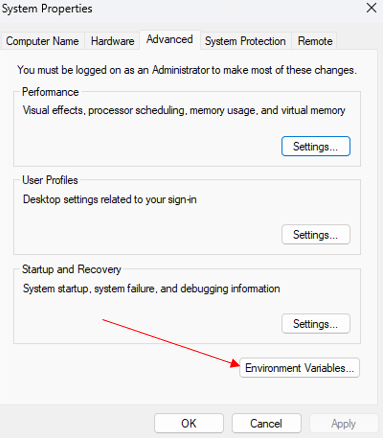
Select the 'Path' option under the system variables.

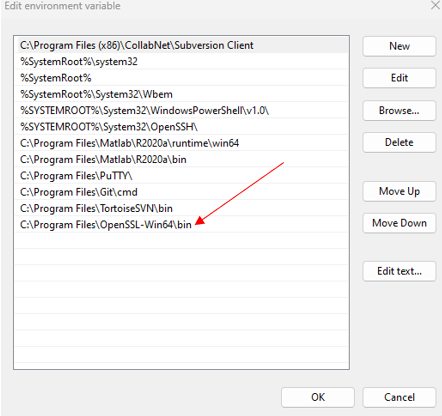
Add Openssl installation \bin path as shown below.Installation directory should be as you installed it on your computer.
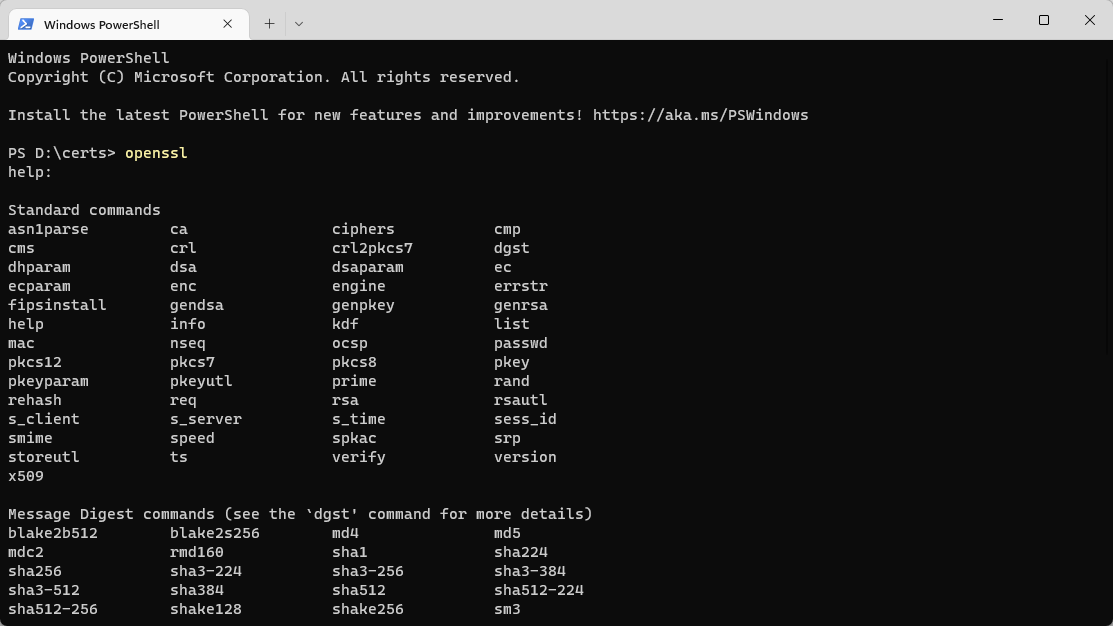
Once above steps are done, create a new folder in your computer in any file directory in which you want to save the certificate files. Then open the command terminal and type 'OpenSSL' to confirm whether it installs successfully.
After that type the following commands to generate two client certificates.
Generate a private key:
•openssl genrsa -out client.key
Generate the CSR:
•openssl req -out client.csr -key client.key -new
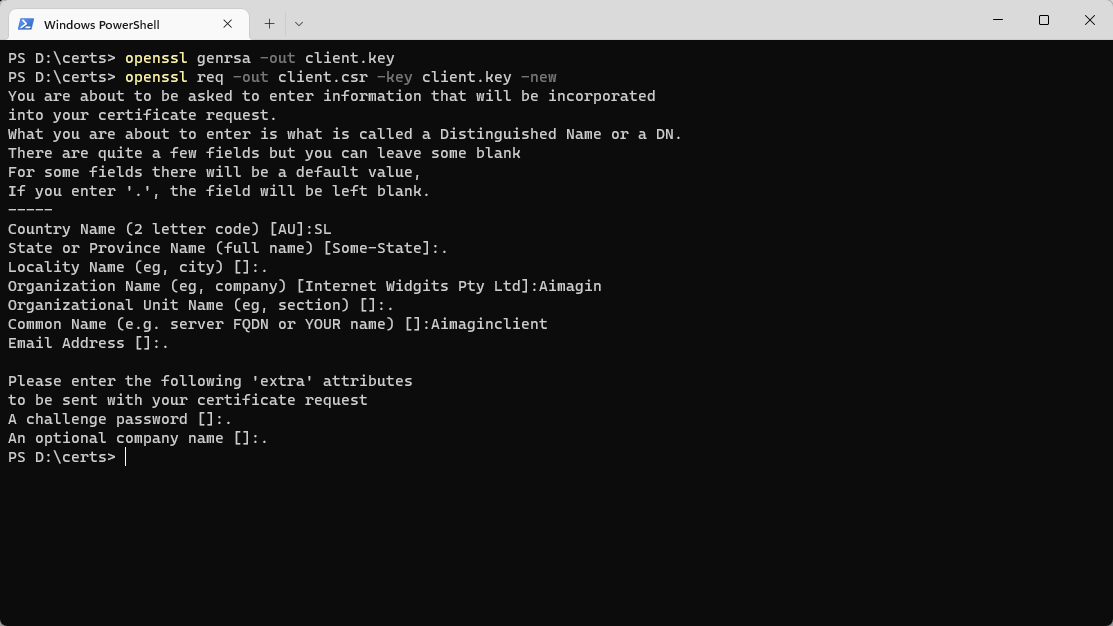
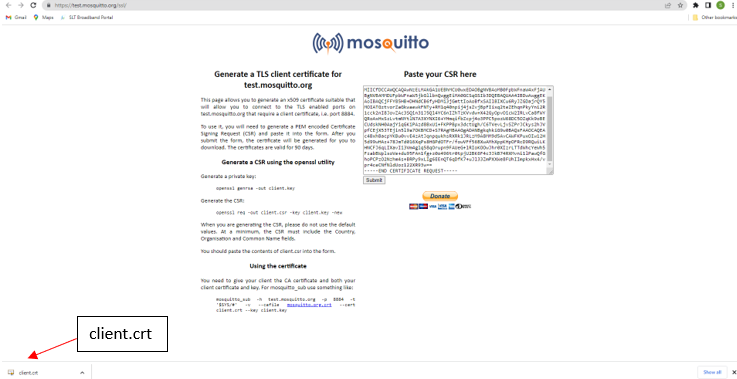
First command will generate the client.key file and the second command will generate the client.csr file in your file directory.When you are generating the CSR, please do not use the default values. At a minimum, the CSR must include the Country, Organization and Common Name fields.After that open the client.csr file and copy the content of it and paste it on the text field on https://test.mosquitto.org/ssl/ page as the following image.
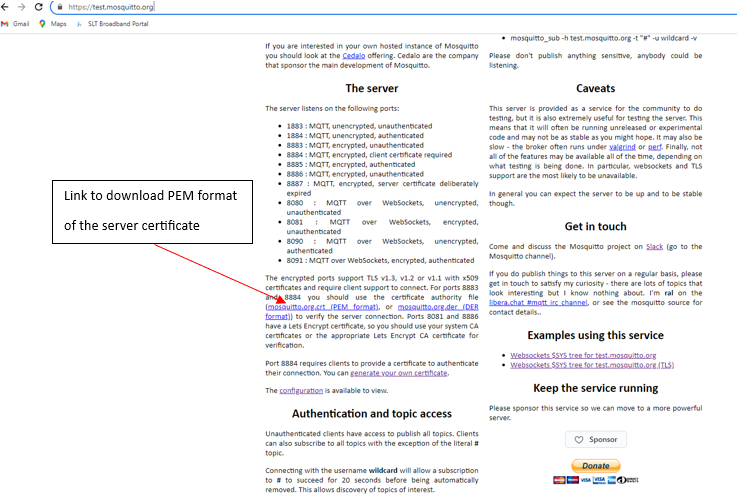
After you press submit button it will download the client.crt file. Once download it, copy the file to the same file directory which the previous files have. Then go to https://test.mosquitto.org/ page and download the server certificate from the link provided by mosquitto.org as follows.
After downloading the file, copy it to the same directory in which all the certificates are included.
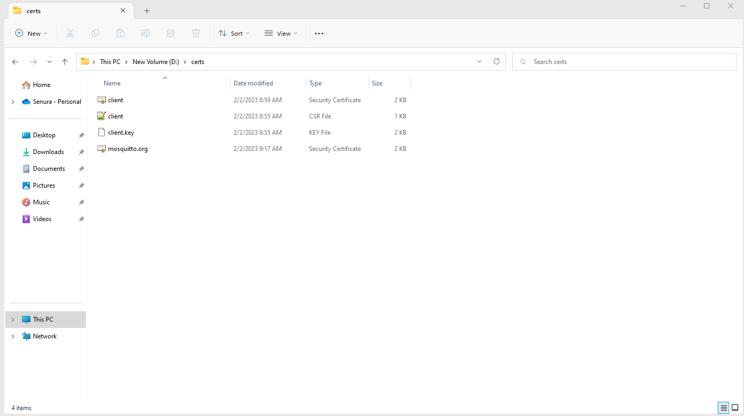
After that change the format of mosquitto.crt to root_cert_auth.pem and delete client.csr file from the directory by using the command prompt. Open cmd from the file directory and type the following commands
•dir
•openssl x509 -in mosquitto.org.crt -out server.crt
•del "client.csr"
•del "mosquitto.org.crt"

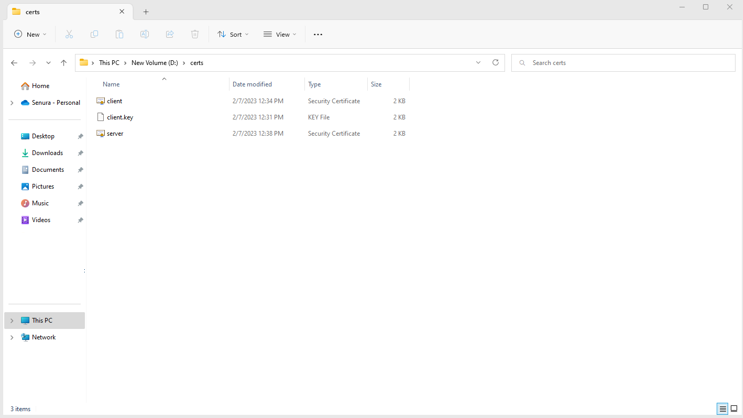
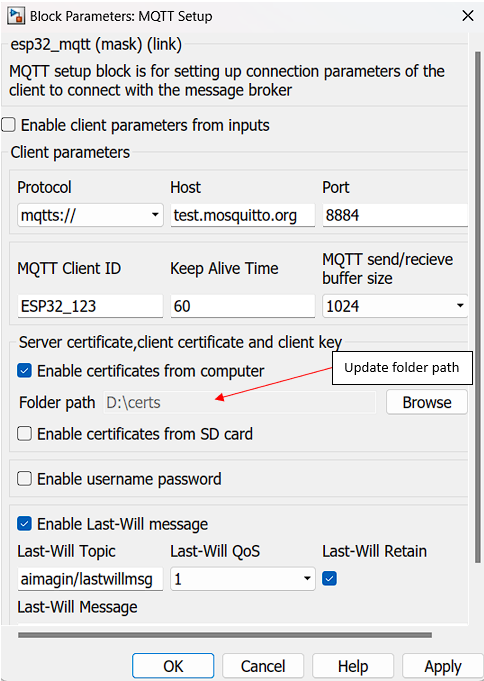
After everything completed, open the MQTT setup block and update the folder certificate path to the directory which the files have created. Please make sure file names are correct as defined.Otherwise, TLS authentication will fail.
What should be happening?
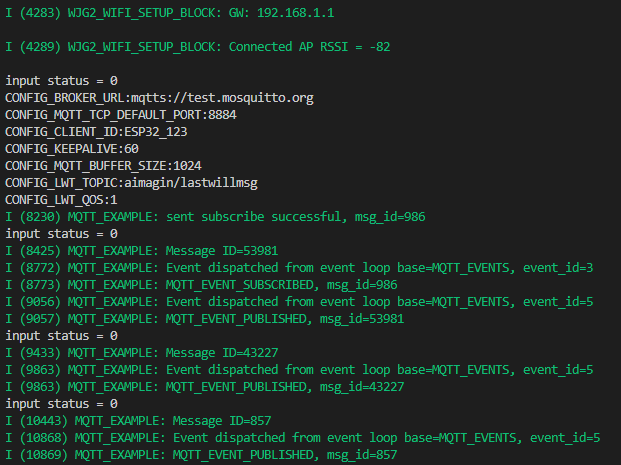
After the above steps, build the demo file. Once it successfully deploys to the hardware, open serial communication software to test the demo. Select the correct COM port in the software to monitor the data. As in the below image, first, you can see the configured settings that are set up in the block set and after that, it starts to publish data to the message broker to the defined publish topic.
By using the 'MQTT Explorer' client software, you can subscribe to the publish topic to see the published data from the hardware. Please refer to TCP demo 1 for the steps to configure the client software but step 1 is as below since we use test.mosquitto.org for TLS connection. Protocol, host, and port details are deferred from demo 1.
Step 1: Setup protocol,host and port as follows
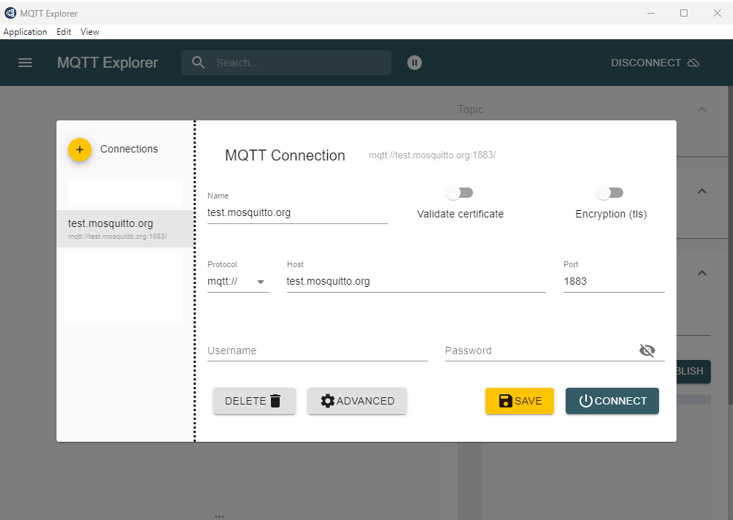
Other steps are the same as TCP demo1. Please refer to it for the remaining steps.
TLS connection Demo2: Publish two sensor data and receive two control data
This demo is the same as TCP connection demo2 and only sets the TLS connection and adds the certificate path. For more information, refer to TCP connection demo2.
TLS connection Demo3: Same as demo2 but use input ports to configuration
This demo is the same as TCP connection demo3 and only sets the TLS connection and adds the certificate path.
TLS connection Demo4: use SD card to add TLS certificates
This demo demonstrate how to add TLS certificates from SD card.Please make sure your have external SD card connected to the ESP before run this demo.To learn more about configure SD card to your ESP, please refer our SD card demo examples to get better understand.