How this block appears in a Simulink model?

What can be configured?
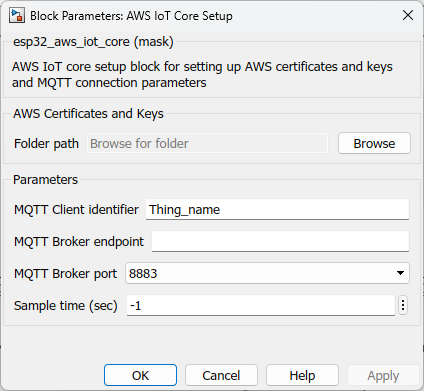
AWS IoT Core Setup Block
Configuration Parameter |
Selectable Option/Value |
Description |
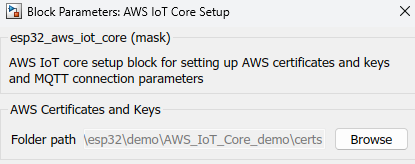
Folder path |
|
Browse to the folder in which AWS IoT core certificates are located. Note: Please create an AWS IoT core account and create a thing(device) before this step. Certificates should the once you downloaded from your account when creating a thing. Certificates should be renamed as explained in the demo tutorial. For more information follow the demo tutorial. |
MQTT Client identifier |
|
Specify the Thing name (device name) you created in the AWS account. |
MQTT Broker endpoint |
|
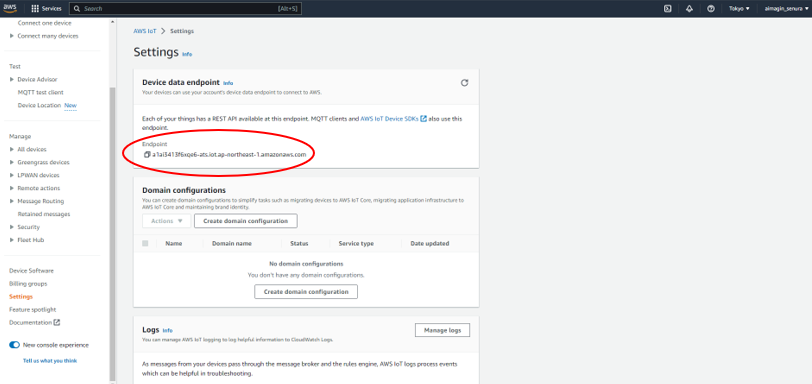
Specify the data endpoint of the created account. Note: Data endpoint can be found on the setting page of the AWS IoT Core account. For more information follow the demo. |
MQTT Broker port |
default |
The default port is 8883 |
Sample time (sec) |
-1(inherited) or specify |
Specify the sample time |
AWS IoT Core Publish block

Configuration Parameter |
Selectable Option/Value |
Description |
MQTT Publish buffer size |
32--64--128--256--512--1024--2048--4096 |
Select the expected number of characters to be read from the file. |
MQTT Publish topic |
|
The public topic can be any form you create in your AWS account and recommend following the format as follows. For more information, please refer demo tutorial. EX: Thing_name/example/publish |
Sample time (sec) |
-1(inherited) or specify |
Specify the sample time |
INPUT Port
Port Name |
Port Type |
Date Type |
Description |
Data |
Vector |
uint8 |
Feed in a character vector with the data to be published |
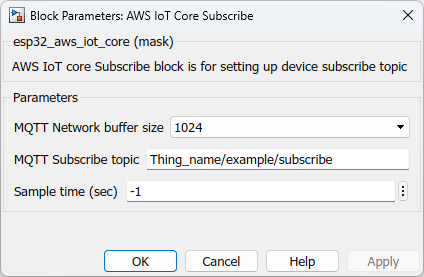
AWS IoT Core Subscribe block
Configuration Parameter |
Selectable Option/Value |
Description |
MQTT Network buffer size |
32--64--128--256--512--1024--2048--4096 |
Select the expected number of characters to be received from the subscribed topic. |
MQTT Subscribe topic |
|
The Subscribe topic can be any form you create in your AWS account and recommend following the format as follows. For more information, please refer demo tutorial. EX: Thing_name/example/subscribe |
Sample time (sec) |
-1(inherited) or specify |
Specify the sample time |
OUTPUT Port
Port Name |
Port Type |
Date Type |
Description |
Data |
Vector |
uint8 |
The port outputs a vector with the data received from the subscribed topic |
When to use this block?
This block can use to send and receive data from the AWS IoT core. Using publish block can send data to the AWS IoT core MQTT message broker and using subscribe block can receive data from the AWS IoT core MQTT message broker. It is mandatory to have all three blocks present in the model while using it.
How does this block work?
•AWS IoT Core Setup: Use to set up certificates, Client identifier of the thing (device name) you created and message broker endpoint, and broker port of the AWS account.
oMQTT Client identifier: Thing name (device name)
oMQTT Broker endpoint: can be found in AWS IoT core account settings
oMQTT Broker port: default is 8883
•AWS IoT Core Publish: Use to set up publish topic and buffer size of the publish data packet.
oMQTT Publish buffer size: Select the buffer size as required
oMQTT Publish topic: Specify the Publish topic as set up in the AWS IoT core account. Refer demo for detailed information about how to set up publish topic in the account
•AWS IoT Core Subscribe: Use to set up subscribe topic and buffer size of the received data packet
oMQTT Network buffer size: Select the buffer size as required
oMQTT Subscribe topic: Specify the Subscribe topic as set up in the AWS IoT core account. Refer demo for detailed information about how to set up the subscribe topic in the account
Demo
Demo file : esp32_aws_iot_core_demo.slx
Description
This example demonstrates how to use AWS IoT Core blocks to publish and receive data from the MQTT message broker of the AWS IoT core. It publishes analog sensor reading to the MQTT message broker and receives a JSON command to switch on/off a digital output to control led.
Before going to the model, you must create an account in AWS IoT core and create a device (Thing) in the account. After that, you have to create a security policy defining the MQTT topics as required. The following steps explain further the configuration of the account.
Step 1: Create an AWS IoT Core account
Create an account using the link-: https://aws.amazon.com/iot-core/
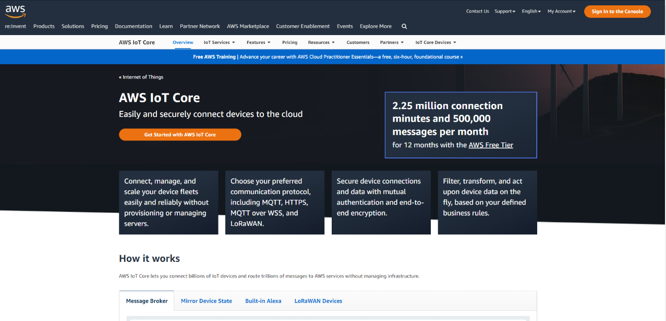
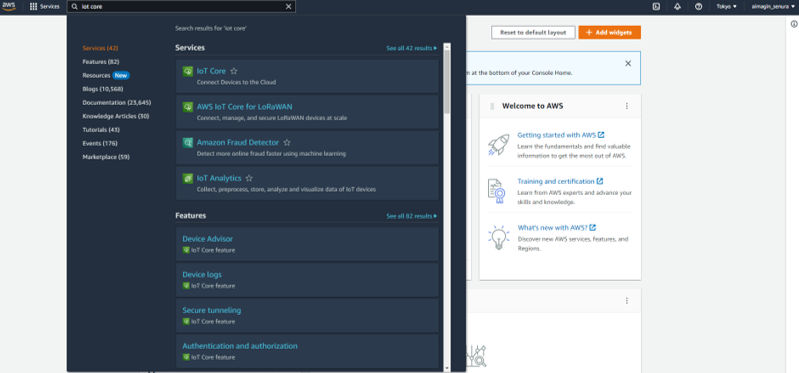
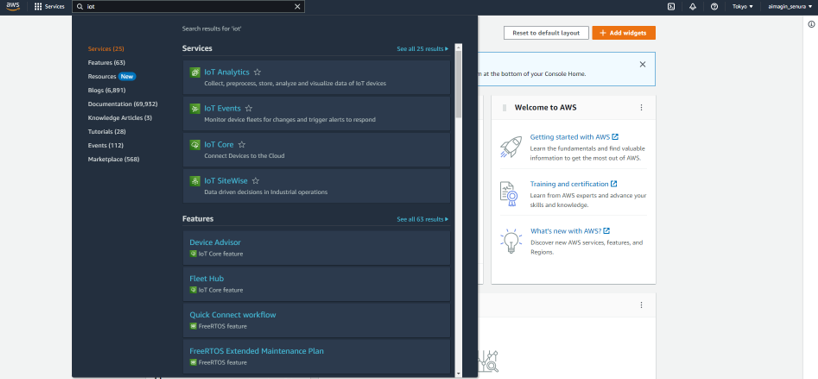
After you create a new account, you will log in to the management console and search IoT core on the search bar. Click on the IoT Core option and then it will load the AWS IoT Core console.
Step 2: Create a Thing (New device)
Once you logged select All devices > Things to create a new device.
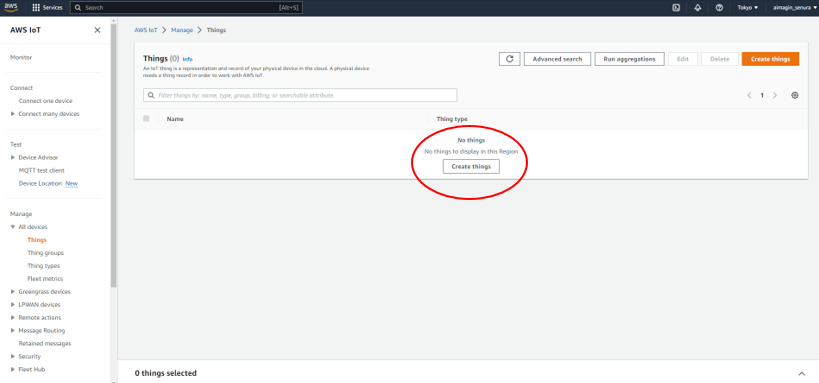
Select create a Thing and after that select create single thing option.
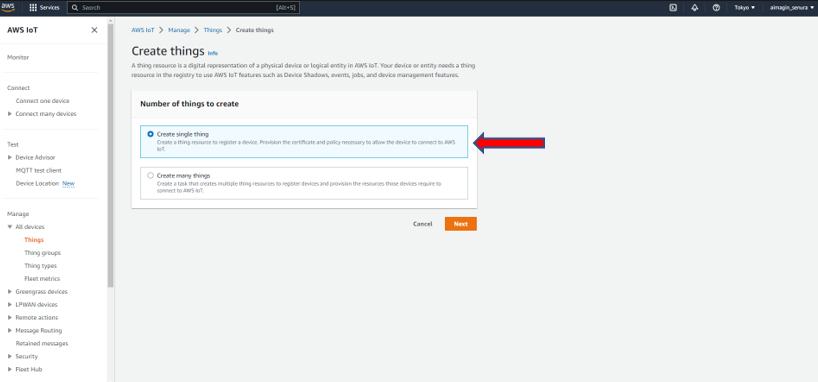
After selecting Next, enter the Thing name(Ex: ESP32_device_V1) and this will be the client identifier of the setup block. Keep the device shadow as no shadow and click next.

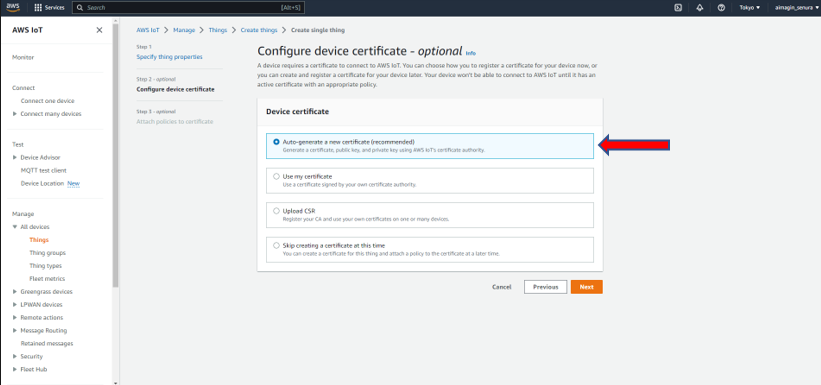
After that select Auto-generate a new certificate option and click next.
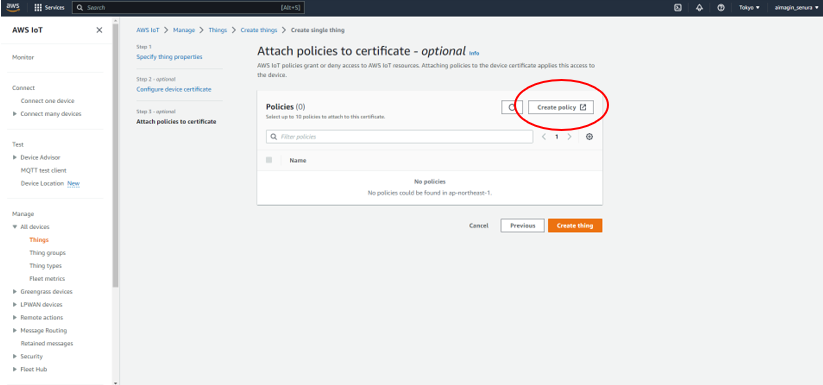
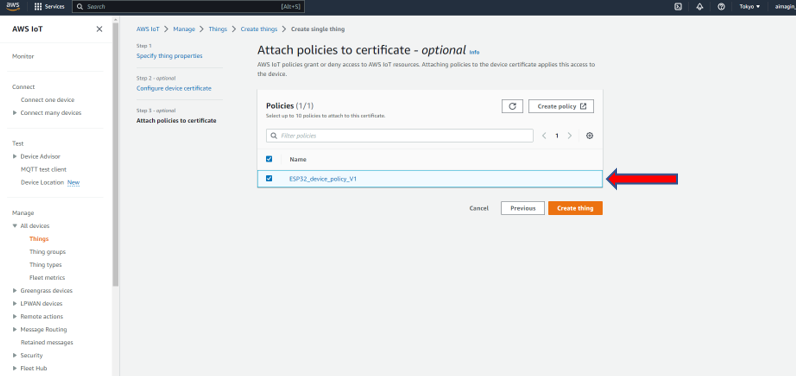
Then move to the attached policies page. We have to create a security policy for the newly created device. For that select create policy option highlighted below.
In policy create page first give a name to the policy(Ex: ESP32_device_policy_V1).After that create policy document as described below
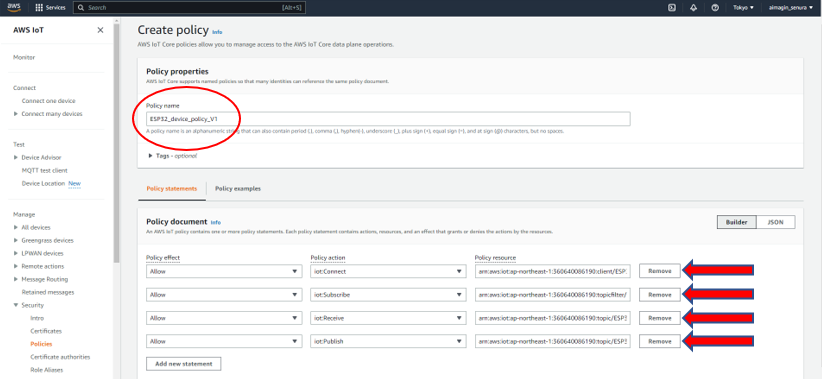
Create the Policy document as mention in the below table
Policy effect |
Policy action |
Policy resource |
Allow |
iot:Connect |
arn:aws:iot:ap-northeast-1:314491238620:client/ESP32_device_V1 |
Allow |
iot:Subscribe |
arn:aws:iot:ap-northeast-1:314491238620:topicfilter/ESP32_device_V1/example/subscribe |
Allow |
iot:Receive |
arn:aws:iot:ap-northeast-1:314491238620:topic/ESP32_device_V1/example/subscribe |
Allow |
iot:Publish |
arn:aws:iot:ap-northeast-1:314491238620:topic/ESP32_device_V1/example/publish |
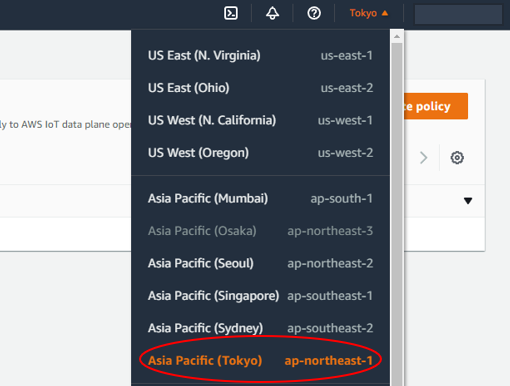
ap-northeast-1 : Is account region code and you can find it on the top right corner of the account page.This is unique to your create account and please make sure to replace it with your account region code.
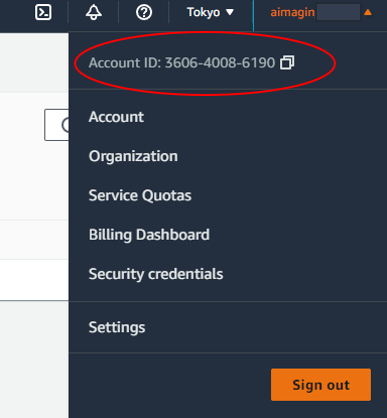
314491238620 : Is account ID and you can find it on the top right corner of the account page.This is unique to your account and please make sure to replace it with your account ID.
ESP32_device_V1 : Thing name you define at the beginning.
ESP32_device_V1/example/subscribe : MQTT Subscribe topic.Recommended format is Thing_name/example/subscribe.Also you can create the subscribe topic as your wish.
ESP32_device_V1/example/publish : MQTT Publish topic.Recommended format is Thing_name/example/publish.Also you can create the public topic as your wish.
After creating the policy as described above go back to the attached policy page and select the newly created policy and select create thing to finalize.
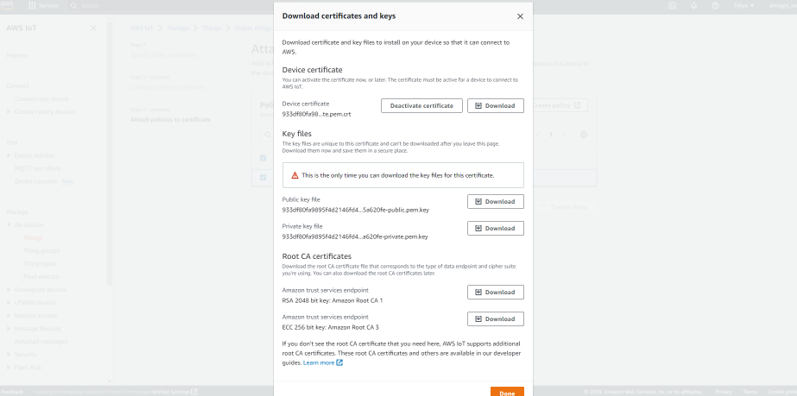
Once select create thing button, a new page will pop up with the AWS certificates for the created device(Thing). Please make sure to download all certificates before selecting the done button. If not there is no way to download all the certificates again. Therefore, it is mandatory to download all the certificate files before selecting the done button.
After you select the done, successfully created a device(Thing).

Step 2: Build demo block
Open esp32_aws_iot_core_demo.slx model file.First open the Waijung2 target setup block and select the ESP32 parameter settings according to your device.After that setup the SSID and password of the available WIFI connection.
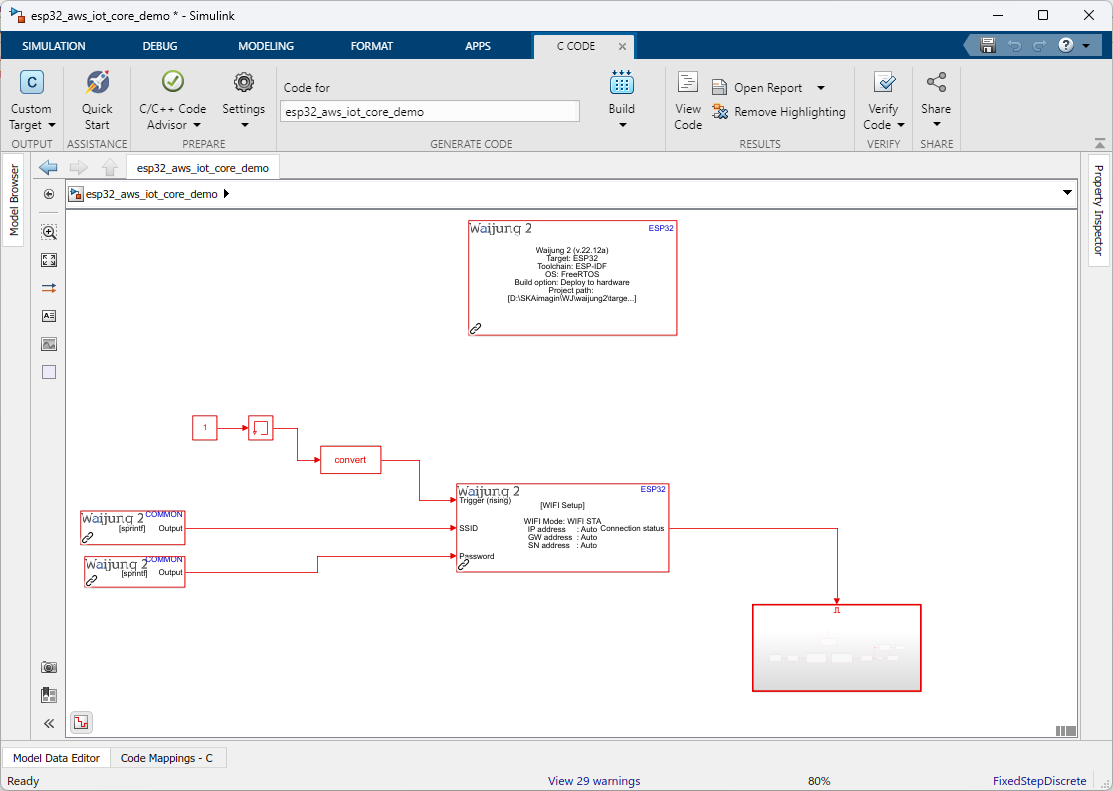
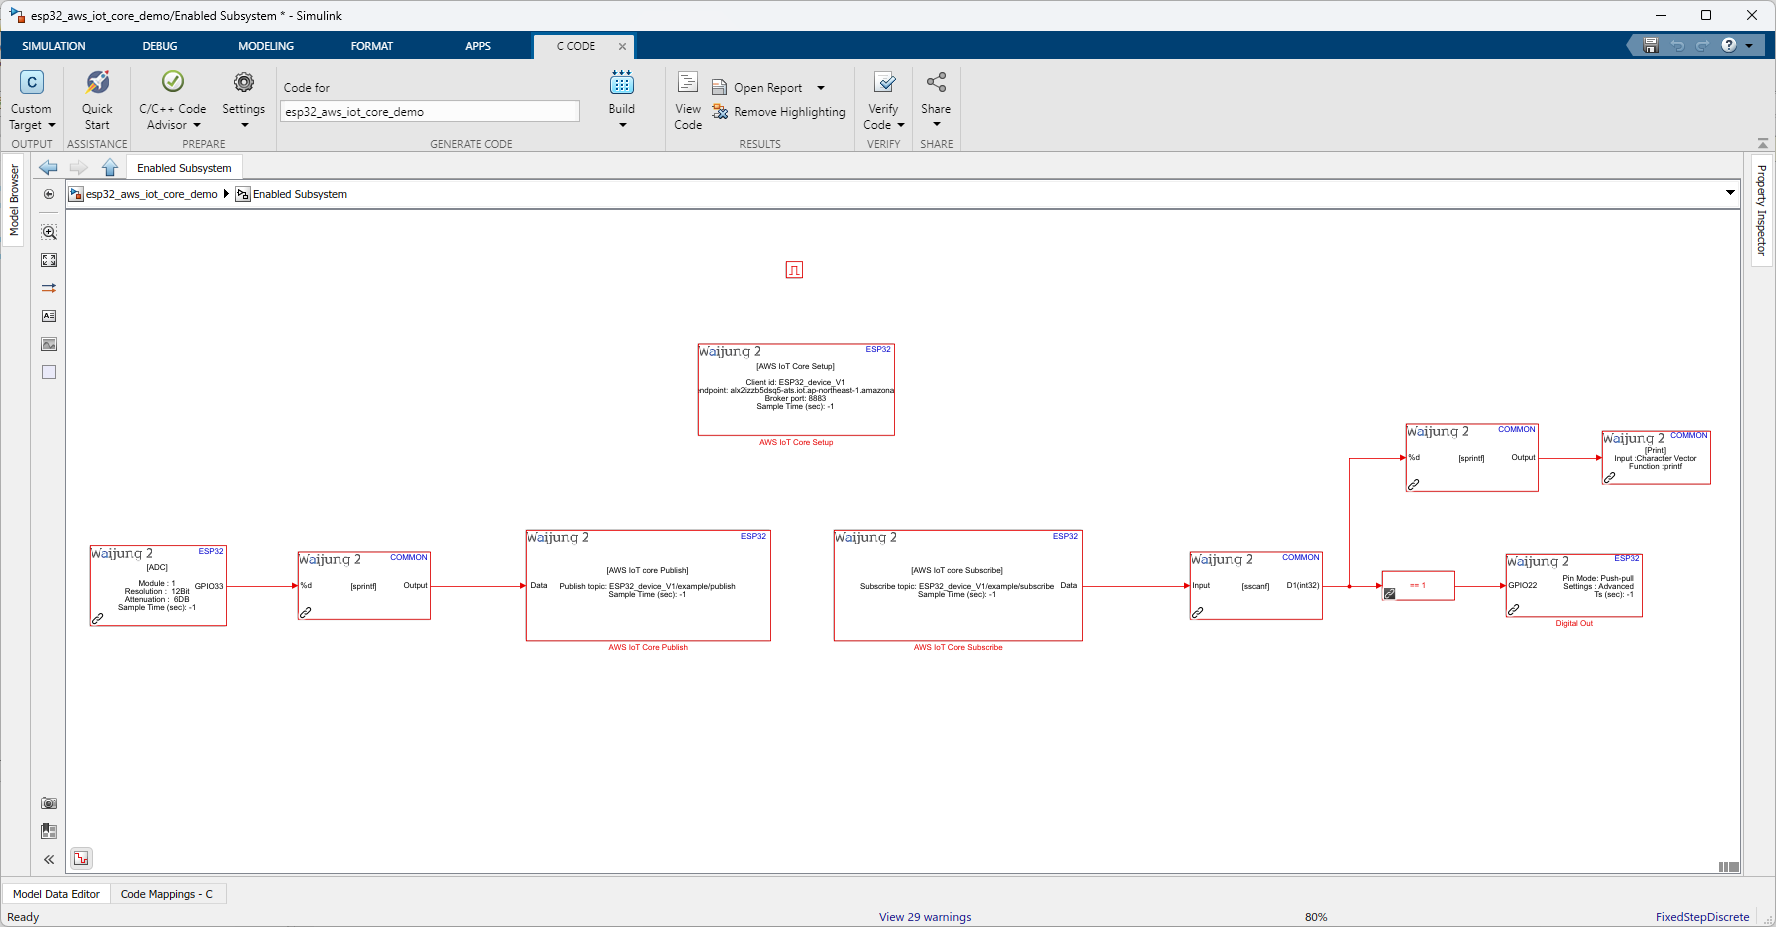
Then select the subsystem and setting up AWS IoT Core blocks.
Hardware setup
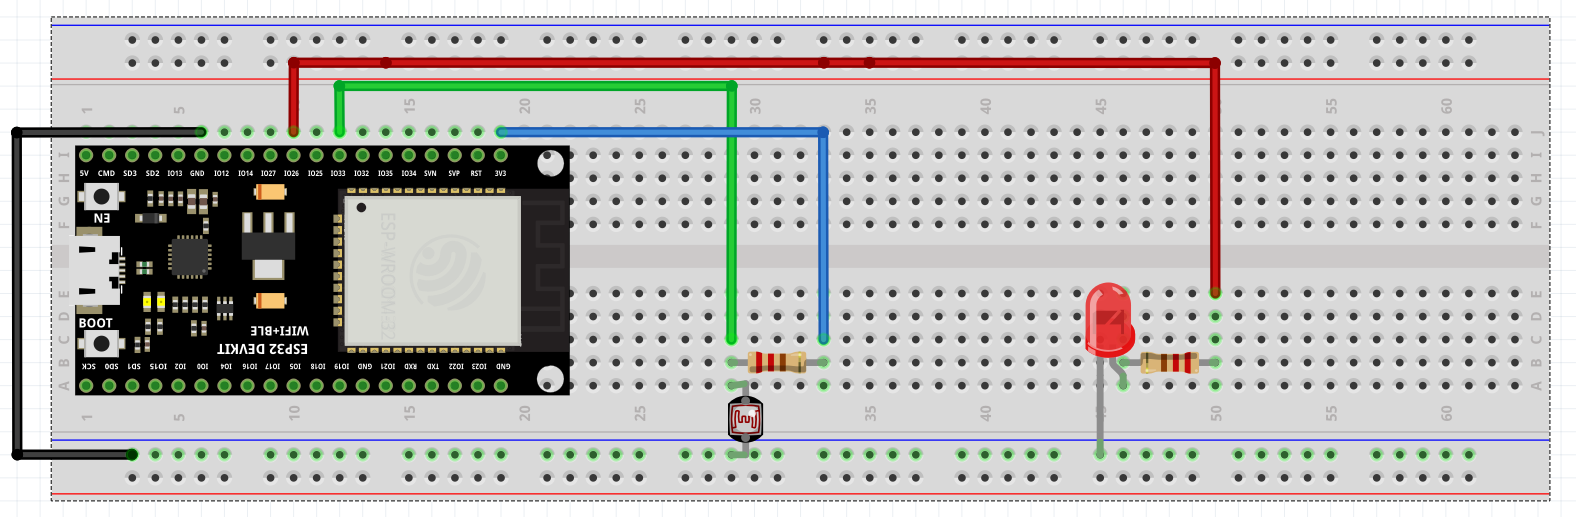
•AWS IoT Core Setup:
oFolder path: AWS certificates and keys folder paths.These are the once we have downloaded during create a Thing.
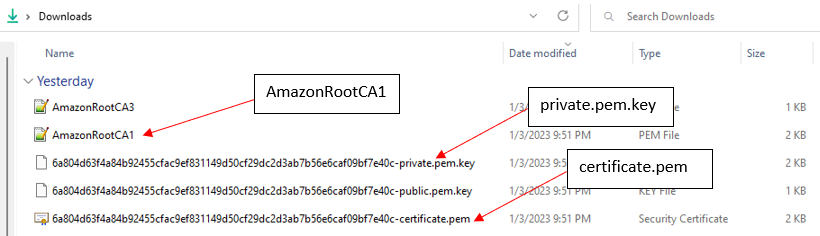
Out of five downloads, we need only three files as mentioned above image.Therefore, copy those three files and past on new folder create on the demo folder other directory.After that should rename those files as mention below.
➢AmazonRootCA1 -> root_cert_auth (file type: root_cert_auth.pem)
➢private.pem.key -> client (file type: client.key)
➢certificate.pem -> client (file type: client.crt)
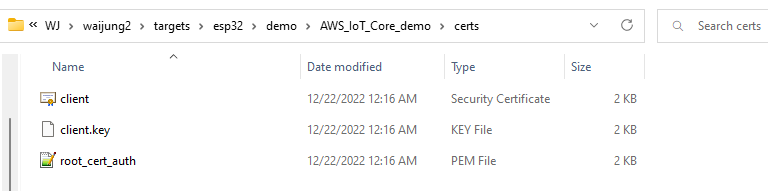
After create the folder and rename the files, browse the folder path to that folder in the setup block.
oMQTT Client identifier: Thing name (Ex: ESP32_device_V1)
oMQTT Broker endpoint: can be found in AWS IoT core account settings
oMQTT Broker port: default is 8883
•AWS IoT Core Publish:
oMQTT Publish buffer size: Select the buffer size as required
oMQTT Publish topic: Specify the Publish topic as set up in the AWS IoT core account.(Ex: ESP32_device_V1/example/publish)
•AWS IoT Core Subscribe:
oMQTT Network buffer size: Select the buffer size as required
oMQTT Subscribe topic: Specify the Subscribe topic as set up in the AWS IoT core account.(Ex: ESP32_device_V1/example/subscribe)
What should be happening?
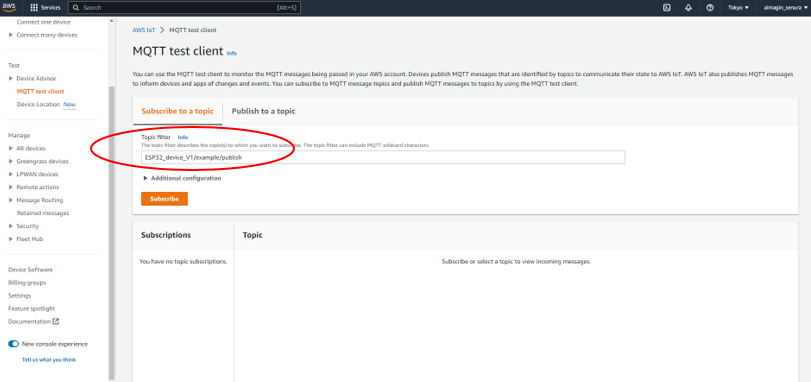
Before build the system, need setup MQTT test client to see the publish data.Therefore, select MQTT test client option available in AWS IoT Core page and subscribe to the topic which publish the data from the device.
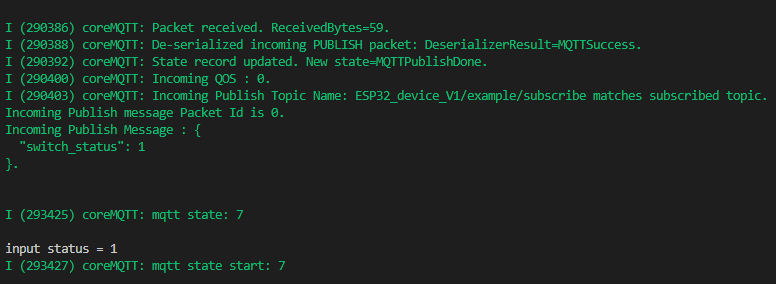
After that, configure the blocks and build the model.Use a serial communication monitor software to test this demo. Select the correct COM port in the software to monitor the data.
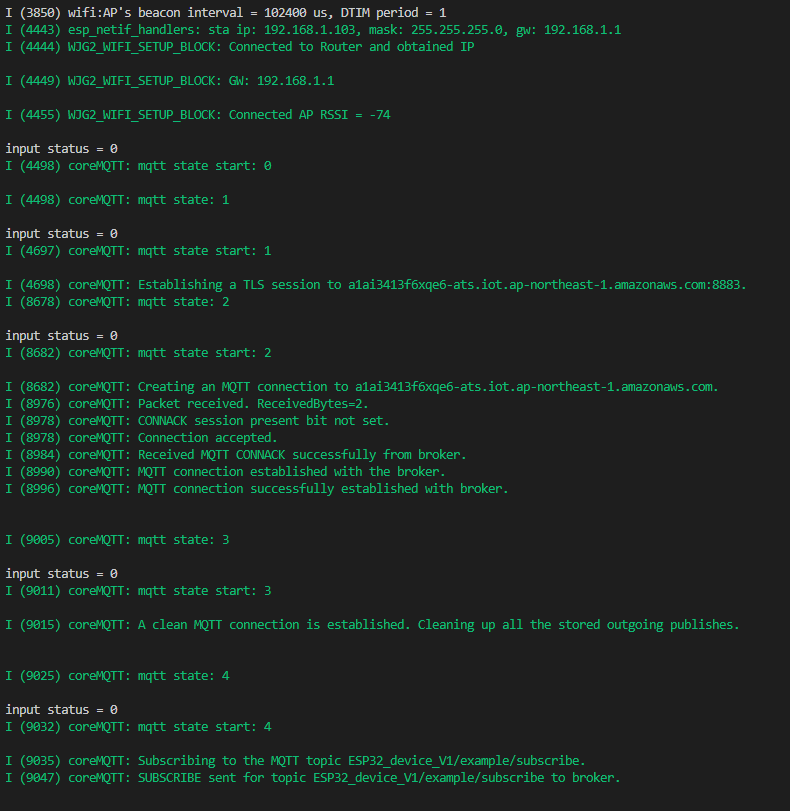

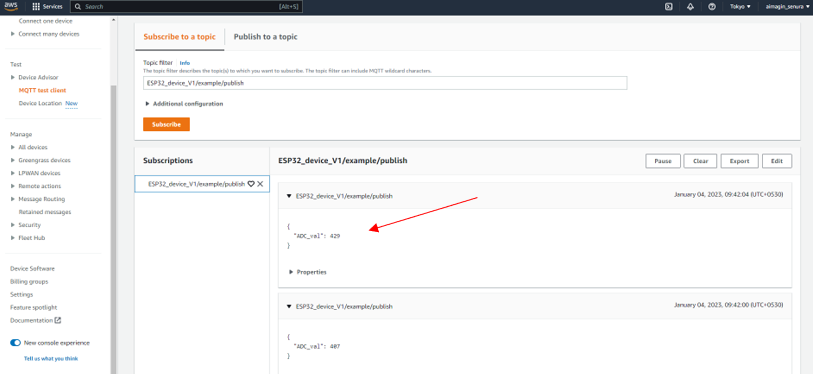
If everything configure correctly device starts publish and receive data from topics.At MQTT test client you can see the published analog readings as publish JSON format.
Also you can publish data to subscribed device topic and control digital output as in the demo.To do that, select 'Publish to a topic' option and set device MQTT subscribe topic.
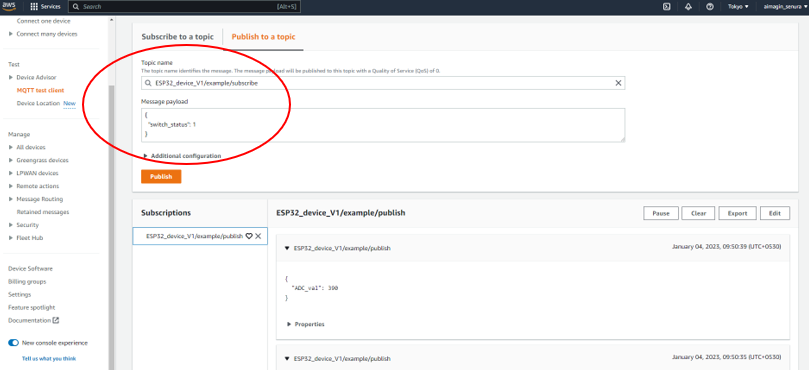
To pull up digital output, payload should be as below.
{
"switch_status": 1
}
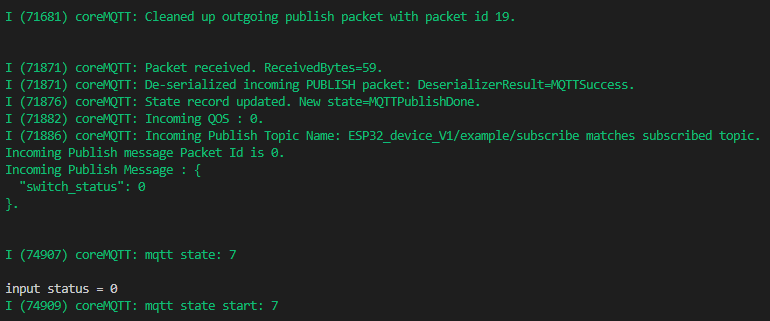
To pull down digital output, payload should be as below.
{
"switch_status": 0
}
Step 3: Visualize data (Optional)
Note: For data visualization use AWS IoT services as described in following steps.When use these services, AWS will charge monthly depending on the data capacity use. Therefore, from these step onwards you have to pay a monthly cost for AWS for their services.
After creating the connection between the device and AWS IoT core, you can visualize the data in a dashboard using AWS services which are AWS IoT analytics and AWS IoT Sitewise.
Search IoT Analytics on search bar and select the option.After logged in to it,give a name(Ex:esp32_project) for resources prefix option available.
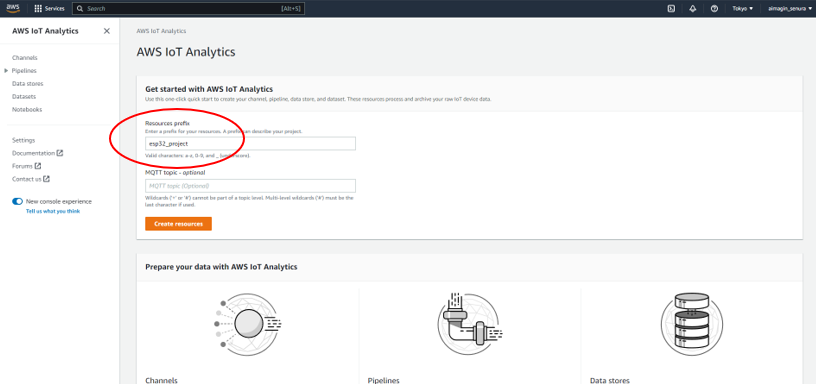
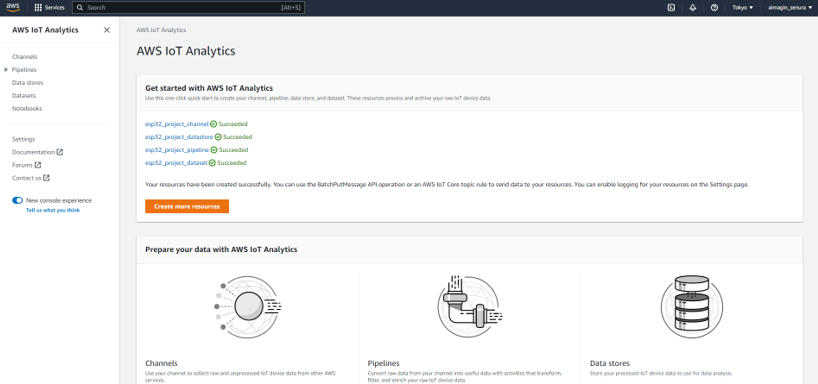
Select create resources button to create resources automatically.
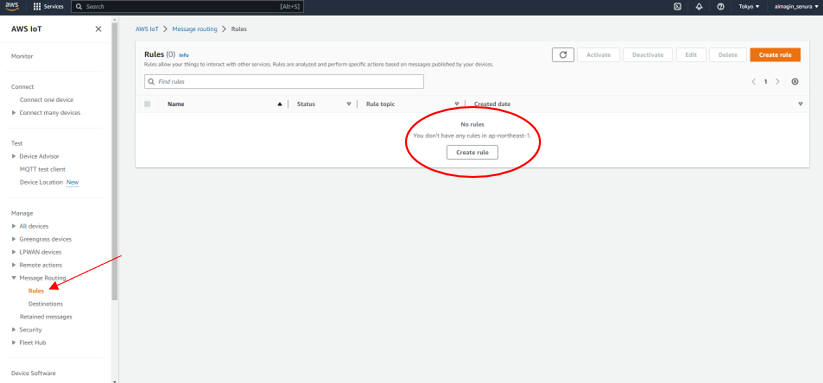
After that, go back to AWS IoT core and create a rule under the message routing option.
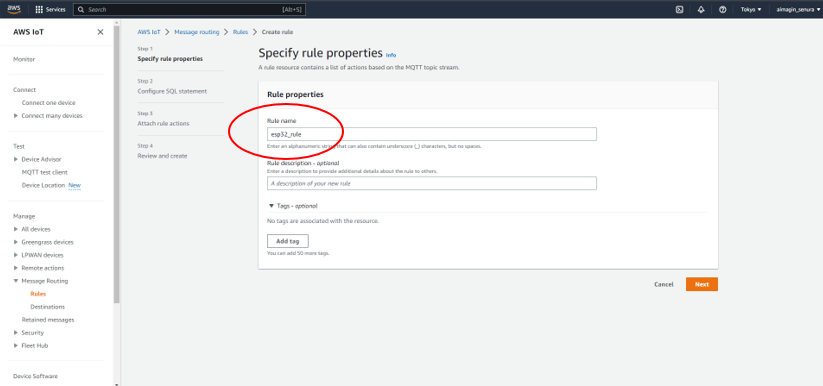
Give a rule name(Ex:esp32_rule) and click next.
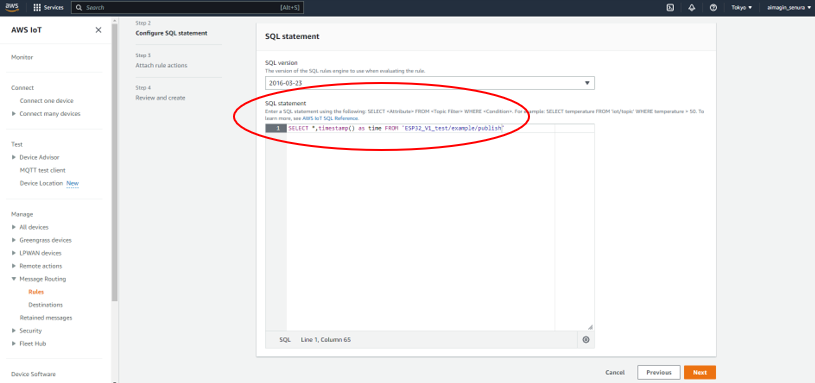
After that, need to define SQL query statement with the MQTT publish topic as define below.
EX: SELECT *,timestamp() as time FROM 'ESP32_device_V1/example/publish'
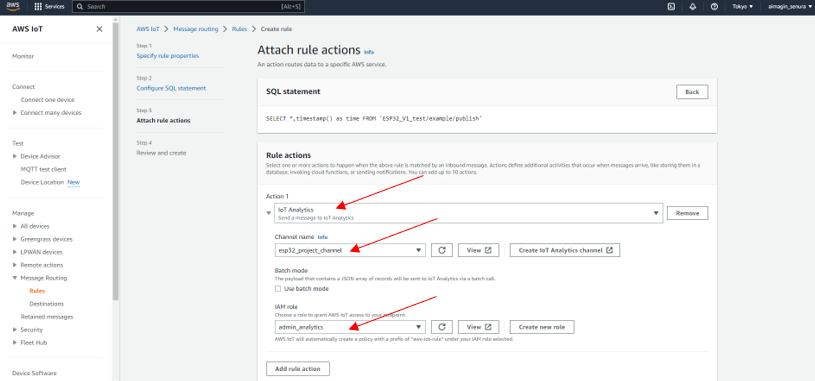
Once set the SQL statement, click next and it move to attached rule action page.Under anction1 select IoT Analytics and select channel name which we created earlier.After that, create IAM role as your wish(Ex:admin_analytics).
After that click next until it create a rule successfully.
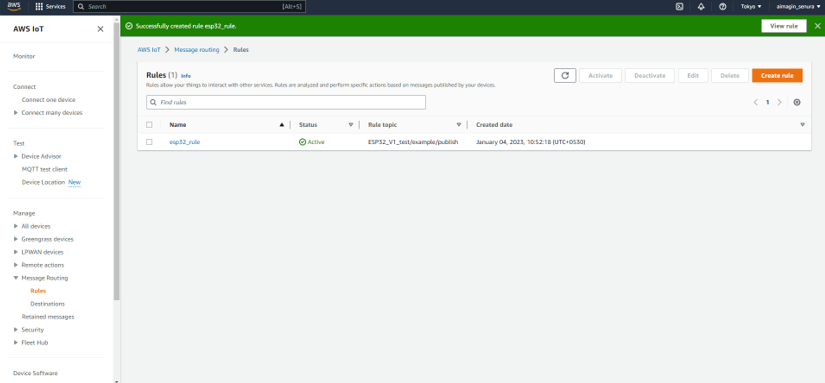
Once it done, go back to AWS IoT Analytics and select datasets->project name->details->edit->test query to check whether the query is working properly.
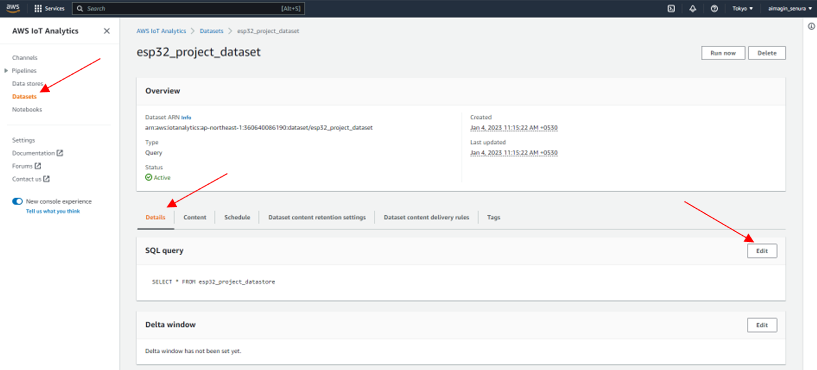
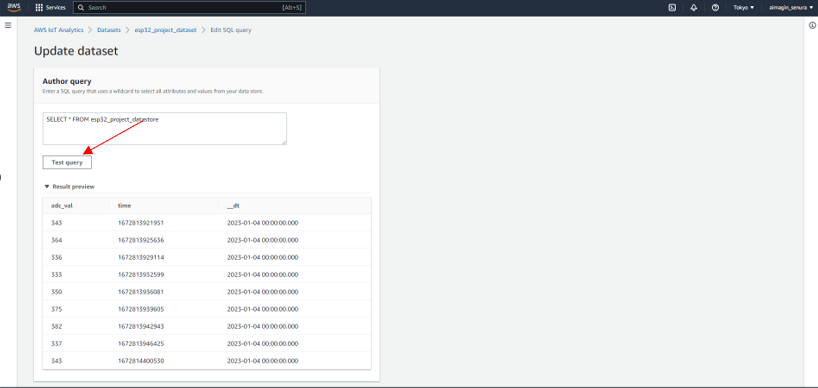
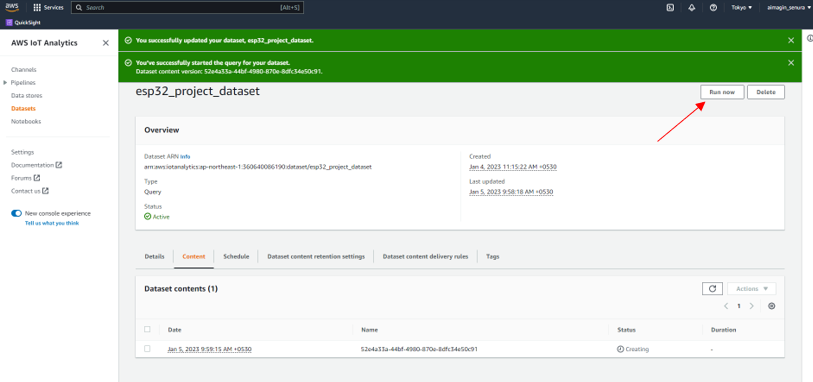
If data is showing as above then click update.After that press Run now button as shown below
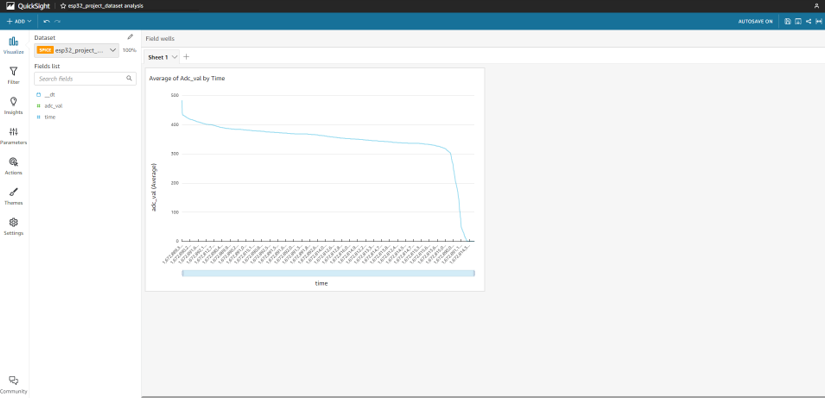
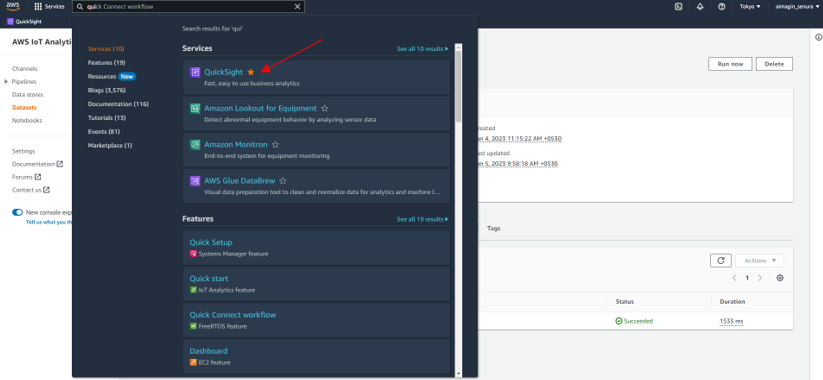
Once all done search QuickSight on search bar and log in.
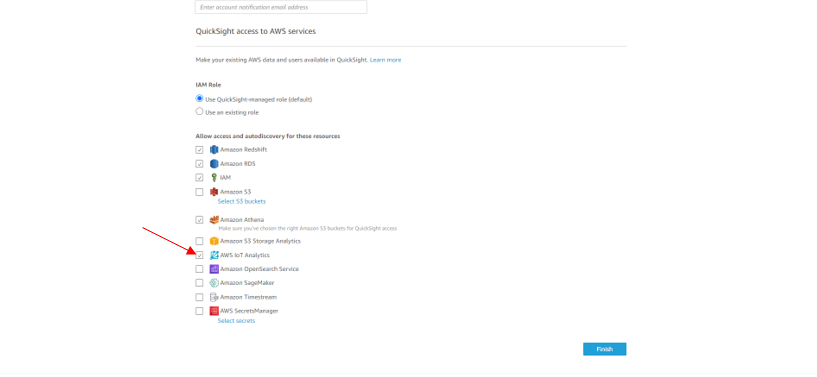
After that, register the account following the steps below

Select the option.
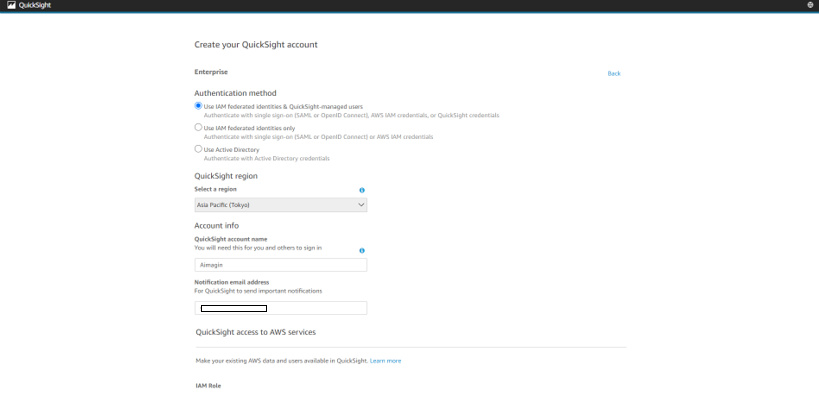
Please make sure to tick on AWS IoT Analytics as shown below.
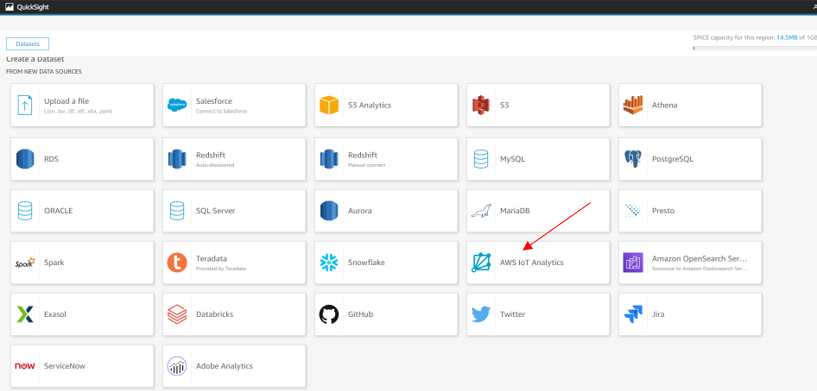
After that, go to Datasets->New dataset

Then select AWS IoT Analytics and select the dataset we created earlier.

Finally create the chart as your requirement selecting required parameters as below