How this block appears in a Simulink model?
What can be configured?
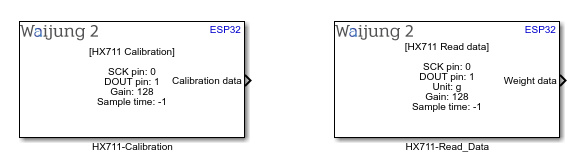
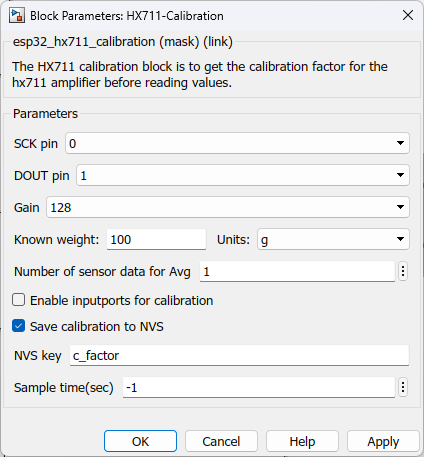
HX711-Calibration
Configuration Parameters |
Selectable Option/value |
Description |
SCK pin |
All gpio pins supported to target family |
Select the pin for the SCK pad for the HX711 amplifier |
DOUT pin |
All gpio pins supported to target family |
Select the pin for the DOUT pad for the HX711 amplifier |
Gain |
32--64--128 |
Select gain for the amplifier. Channel A can be used with a gain value of 128 & 64, Channel B has a fixed gain of 32. For more info check the datasheet of hx711 |
Known weight |
|
A known weight of an object for the calibration. |
Units |
g--kg--lb--oz |
Units of the known weight |
Number of sensor data for Avg |
|
Number of sensor data for average the calibration value |
Enable inputports for calibration |
Check--Uncheck |
Two input-ports will available to Tare(zero) the load-cell and for calibration |
Save calibration to NVS |
Check--Uncheck |
Check to save calibration data to Non-Volatile-Storage(NVS) |
NVS key |
|
Unique name for the NVS. This should be very short |
Sample time (sec) |
-1 (inherited) or specify |
Specify the sample time. |
INPUT/ OUTPUT Port
Port Name |
Port Type |
Data Type |
Description |
Tare(Zero) |
Scalar |
Boolean |
Signal to set the offset |
Calibrate |
Scalar |
Boolean |
Signal to trigger calibration |
Calibration data |
Scalar |
Double |
Calibration data output |
Note: Standard license users will be limited to use only one hx711 block for a Simulink model, and calibration parameter saving/load from Non-Volatile-Storage will not be allowed. Professional and Commercial uses have full features.
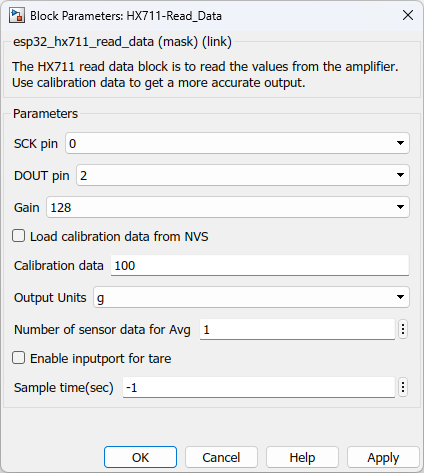
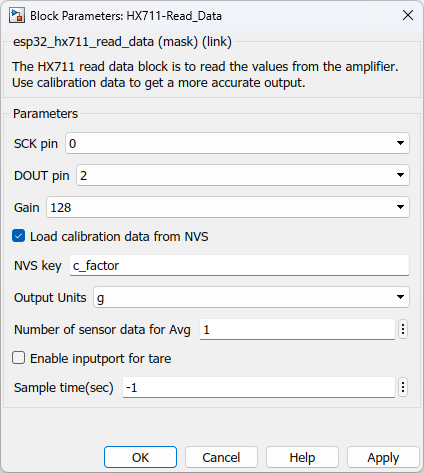
HX711-Read_data
Load calibration data from NVS - Uncheck
Load calibration data from NVS - Check
Configuration Parameters |
Selectable Option/value |
Description |
SCK pin |
All gpio pins supported to target family |
Select the pin for the SCK pad of the HX711 amplifier |
DOUT pin |
All gpio pins supported to target family |
Select the pin for the DOUT pad of the HX711 amplifier |
Gain |
32--64--128 |
Select gain for the amplifier. Channel A can be used with a gain value of 128 & 64, Channel B has a fixed gain of 32. For more info check the datasheet of hx711 |
Load calibration data from NVS |
Check--Uncheck |
Check to load calibration data from Non-Volatile-Storage(NVS) |
NVS key |
|
NVS key to grab the calibration data. This should be very short |
Calibration data |
|
If "Load calibration data from NVS" is not checked, user can enter calibration data manually. |
Units |
g--kg--lb--oz |
Output weight units |
Number of sensor data for Avg |
|
Number of sensor data to average the output values |
Enable inputports for tare |
Check--Uncheck |
Check to enable input-port for doing Tare(zero) |
Sample time (sec) |
-1 (inherited) or specify |
Specify the sample time. |
INPUT/ OUTPUT Port
Port Name |
Port Type |
Data Type |
Description |
Tare(Zero) |
Scalar |
Boolean |
Signal to set the offset |
Calibration data |
Scalar |
Double |
Calibration data output |
Demo
Calibration
Demo file : esp32_hx711_calibration_demo.slx
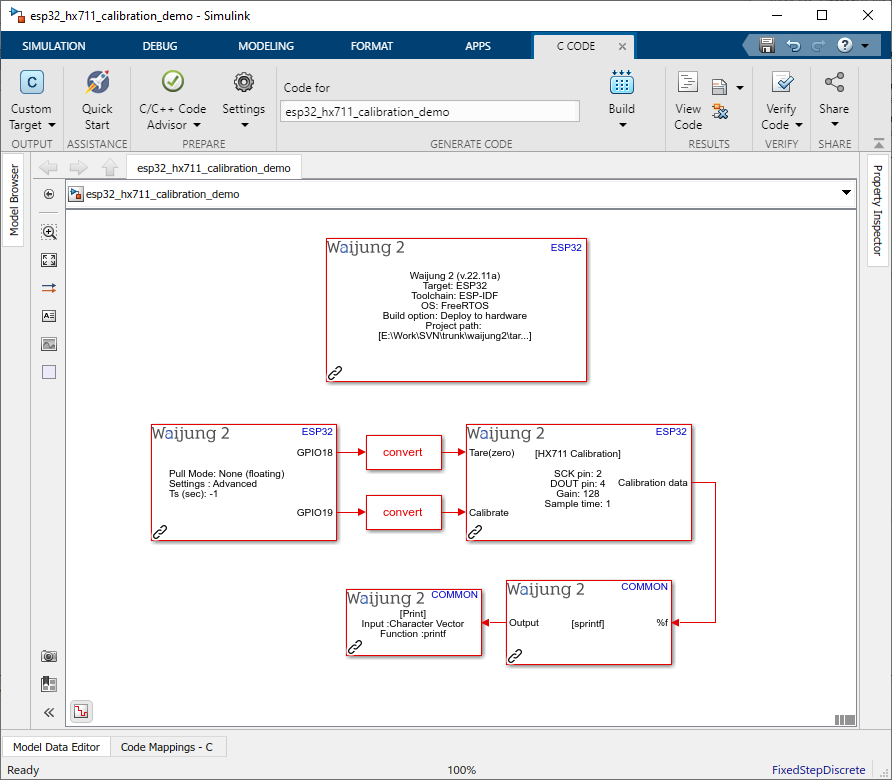
Description
This example demonstrates how the hx711_calibration block is used to calibrate before use. Block uses input-ports to reset the weight to zero and Calibrate. Here in the example, saving calibration data to Non-Volatile-Storage(NVS) is also enabled. This feature will be limited to standard users. Standard license users can copy the value from the serial monitor output and use that for the next example.
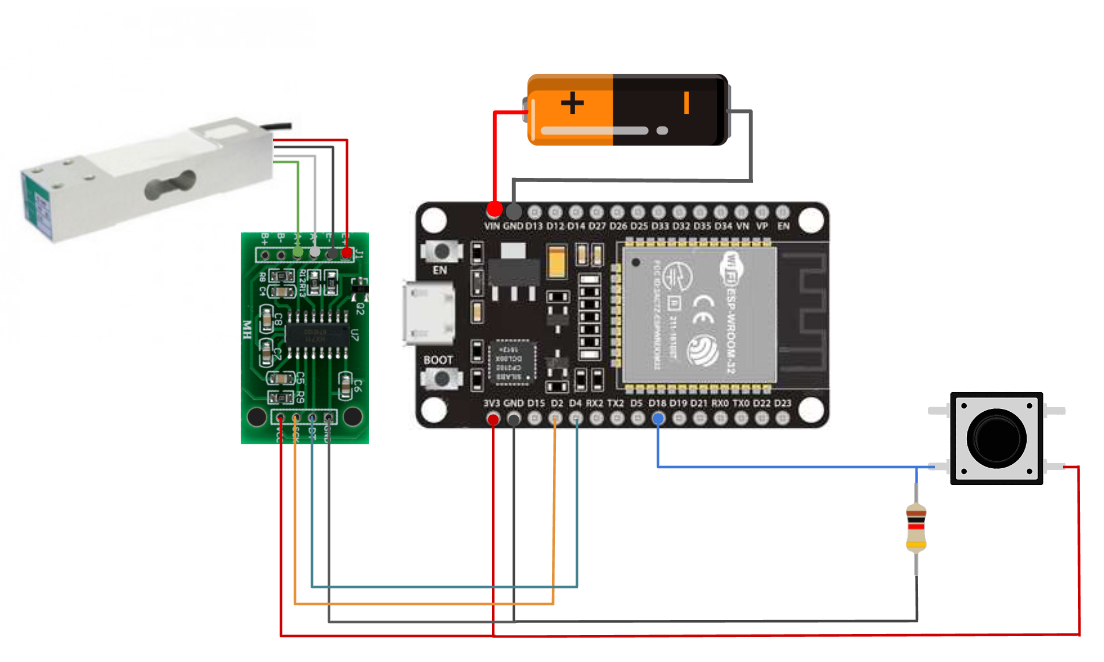
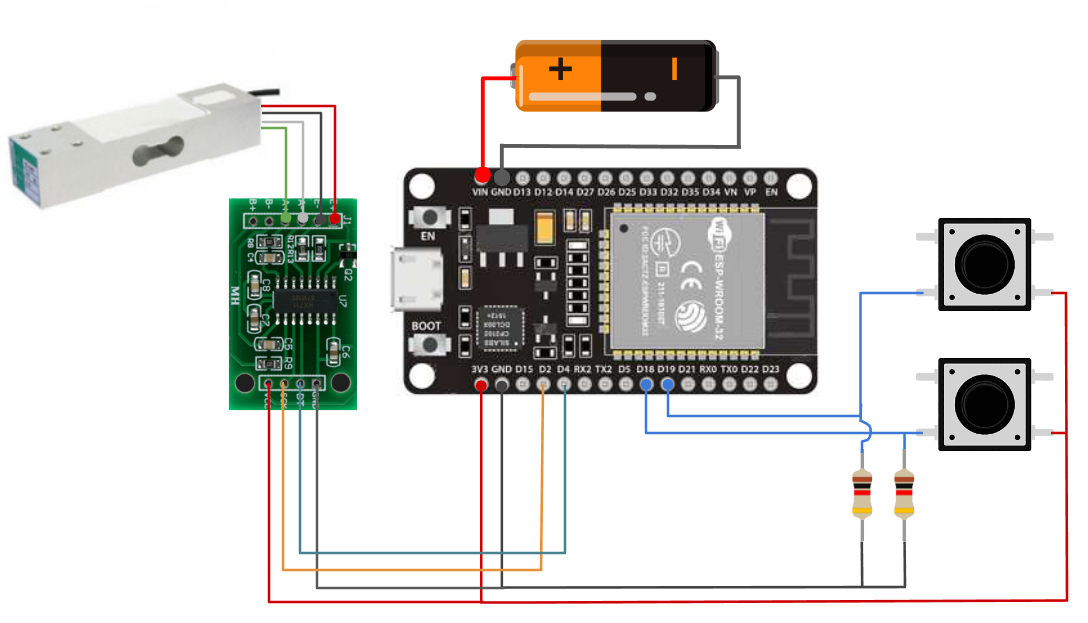
GPIO 18 and GPIO 19 need to connect with 2 buttons, and GPIO 2 and GPIO 4 need to connect HX711 amplifier with the SCK and DOUT pad respectively. Calibration data will be out from the output-port regardless of the button trigger for the calibration, saving to the NVS will be done when the calibration button is pressed.
Calibration steps:
•Before calibration, make sure you mount the load cell correctly. Another way to mount can be found here.
•Remove all weights from the load-cell and trigger Tare(zero) port. It will set the offset for the hx711 amplifier.
•Place the known weight object on the load-cell and trigger the calibration port to save the calibration value in the NVS.
Note: This example has the full feature set for the HX711 block. If you are under Standard license calibration data needs to be manually entered for the next example.
If "enable input-ports for the calibration" is unchecked input-ports will be not available to do the related functions. Tare(zero) function will automatically run when the chip is boot-up and the calibration value will output every sample time.
What should be happening?
Once the program is written to the target board open the serial monitor to get the output(baud rate - 115200). Two buttons can used reset the weight to zero and save calibration data to NVS. Calibration values will be shown in the serial monitor at a given sample time.
Hardware Setup
1.ESP32
2.2x Push buttons (a DIP Switch can also be used. If you do, please change "Pull Mode" in Digital Input block to "Pull-down")
3.2x Resistors
4.HX711 amplifier
5.Load-cell(bar type)
Read data
Demo file : esp32_hx711_read_data_demo.slx
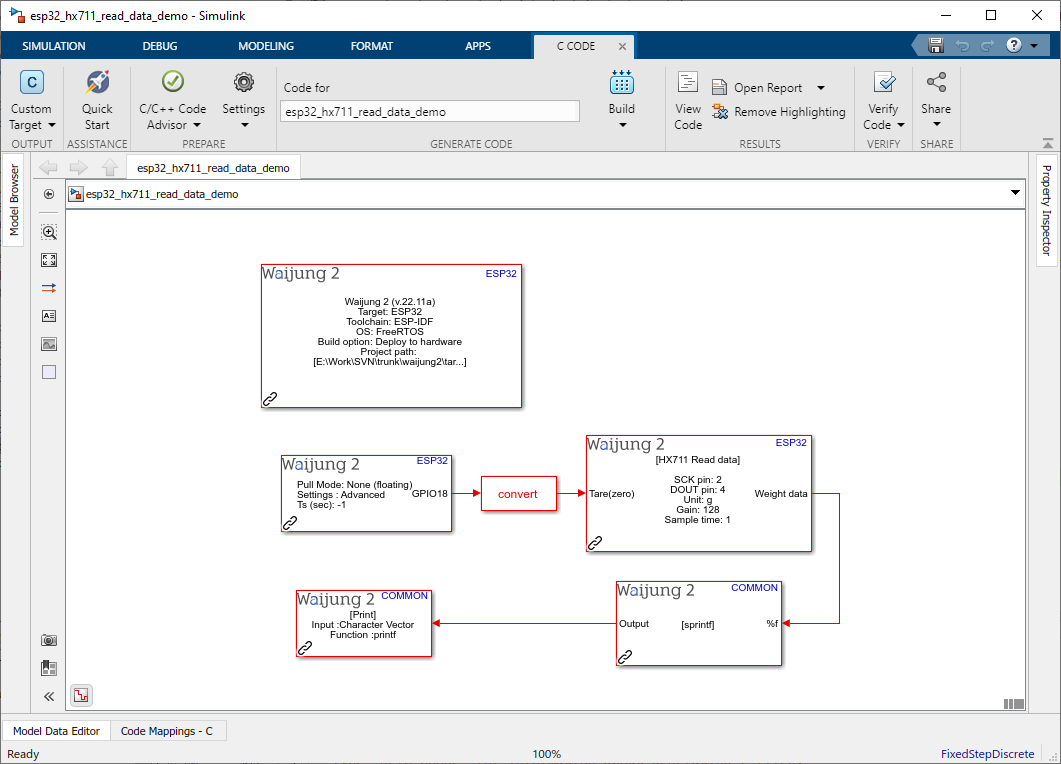
Description
This example demonstrates how hx711_read_data block is used to get the weight data from the hx711 amplifier. Block uses input-port to reset the weight to zero. Here it also uses Non-Volatile-Storage(NVS) to load data from the memory. This feature will be limited to standard users. Standard license users can manually enter the calibration data.
GPIO 18 needs to connect with a button, and GPIO 2 and GPIO 4 need to connect HX711 amplifier with the SCK and DOUT pad respectively. Weight data will be output from the output-port in the given sample time.
If "enable input-ports for tare" is unchecked input-ports will be not available to do the related function. Tare(zero) function will automatically run when the chip is boot-up.
What should be happening?
Once the program is written to the target board open the serial monitor to get the output(baud rate - 115200).
Hardware Setup
1.ESP32
2.1x Push buttons
3.1x Resistors
4.HX711 amplifier
5.Load-cell(bar type)